With the release of the iOS 5 SDK, the UIAlertView class has been updated to natively support text input, secure text input, and username/password form fields. This quick tip will demonstrate how to take advantage of these new enhancements!
In a previous full-length tutorial for beginners, I walked the reader through setting up a project with a custom button and background. I’ll use the project created in that tutorial as the starting point for this one.
Introducing Alert View Styles
The layout and form elements of a
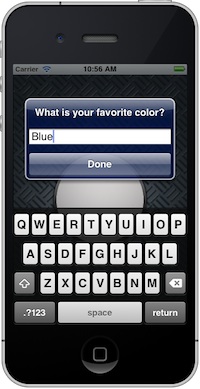
UIAlertView can now be easily and quickly controlled by setting the alertViewStyle property. Possible options for this property include: UIAlertViewStylePlainTextInput
This style will add a single text field to the alert view:
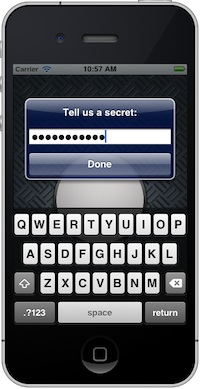
UIAlertViewStyleSecureTextInput
This style is just like the plain text field, except that all characters entered will be obscured:
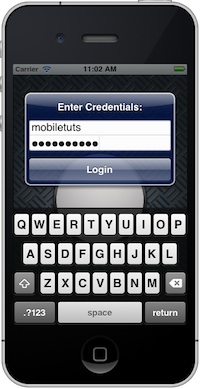
UIAlertViewStyleLoginAndPasswordInput
Setting this value for the style property will add both a regular text field input for a username and a secure text field input for a password:
UIAlertViewStyleDefault
This is the default style we all already know and love:

Implementation
Any of the above styles are as easy to implement as setting the
alertViewStyle property on your UIAlertView, either with dot notation: message.alertViewStyle = UIAlertViewStylePlainTextInput;
Or by directly calling the setter method:
[message setAlertViewStyle:UIAlertViewStylePlainTextInput];
That’s it! After you’ve set this property, the alert view display will adjust accordingly.
Of course, displaying text fields on the alert view won’t do much good unless you can also access the value the user enters. This is done with the
textFieldAtIndex: method. You simply supply the index of the text field you want to access (0 – 1 in the examples above), and the relevant UITextField object is returned. For an example of how this might work, consider the
-alertView:clickedButtonAtIndex: delegate method we’ve already implemented in the attached demo project. If we change the alert view style to UIAlertViewStyleLoginAndPasswordInput and change the default button title to “Login”, then we could access the values entered by the user in the delegate method like so: - (void)alertView:(UIAlertView *)alertView clickedButtonAtIndex:(NSInteger)buttonIndex
{
NSString *title = [alertView buttonTitleAtIndex:buttonIndex];
if([title isEqualToString:@"Login"])
{
UITextField *username = [alertView textFieldAtIndex:0];
UITextField *password = [alertView textFieldAtIndex:1];
NSLog(@"Username: %@\nPassword: %@", username.text, password.text);
}
}
Potential Pitfalls
There a few ways that using the new alert styles might backfire.
Too Many Buttons
If you add as few as three buttons to the
UIAlertView, the layout of each new style will become skewed. 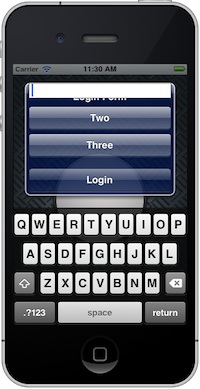
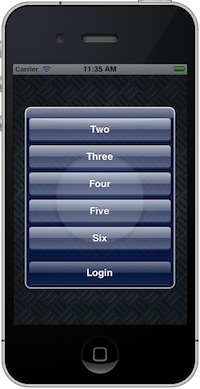
All of the new styles can handle 2 buttons comfortably, but the default style used in the past can handle up to 6 when the title and message is removed:
Too Much Text
The
UIAlertViewStyleLoginAndPasswordInput style can’t handle overflow text gracefully the way the other styles can: 
Even entering just a brief message like “You must enter both a username and password.” was enough to ruin the aesthetic.
Validating Input
In addition to the button styles discussed above, the iOS 5 SDK also introduced a new
UIAlertViewDelegate method, -alertViewShouldEnableFirstOtherButton:. This method is called both when the alert view is first displayed and also each time the user types a character into one of the text fields, making it very easy to perform basic input validation prior to accepting a user’s value. Consider the following example:
- (IBAction)showMessage:(id)sender {
UIAlertView *message = [[UIAlertView alloc] initWithTitle:@"What is your phone number?"
message:nil
delegate:self
cancelButtonTitle:@"Cancel"
otherButtonTitles:@"Continue", nil];

[message setAlertViewStyle:UIAlertViewStylePlainTextInput];

[message show];
}

- (BOOL)alertViewShouldEnableFirstOtherButton:(UIAlertView *)alertView
{
NSString *inputText = [[alertView textFieldAtIndex:0] text];
if( [inputText length] >= 10 )
{
return YES;
}
else
{
return NO;
}
}
The code above will only allow the user to press the “Continue” button after they have entered at least 10 characters into the form field. I’m sure you’ll want to make your own validation more robust, but this basic example shows just how useful this new delegate method can be.
没有评论:
发表评论