2011年12月30日星期五

iPhone Development – core data relationships tutorial part 1

iPhone Development – core data relationships tutorial part 1:
I’m going to start a short series on Core Data relationships and maybe throw in some general Core Data stuff too. Here in part one we’re just going to set our app up with core data and add two entities with a simple one to one relationship between them. A one to one relationship means that for every Fruit there will be one source and in our case here the reverse it true too, for every source there is one fruit.

Core Data Relationships


1.) Create a new Tab Bar Application named CoreDataRelationshipsTutorial.

2.) Change FirstView.xib so it looks similar to this.

FirstView.xib

3.) Add the core data framework to the app.

Add Core Data Framework

4.) Right click on Supporting Files and select New File, then choose Core Data select Data Model and hit Next. I just accepted the default name of Model and clicked save.

Add Data Model

5.) Select Model.xcdatamodeld and the visual editor will open. Click Add Entity and name it Fruit. Add an Attribute named fruitName of type String. Add another Entity named Source with an Attribute sourceName, which will also be of type String.

6.) Select Fruit and then click the plus symbol under Relationships. Name the relationship fruitSource. Set the destination to Source, there will be no inverse yet. In the relationship data model inspector uncheck the Optional checkbox. In the delete rule select Cascade.

Edit Data Model

7.) Now select Source and add a relationship named sourceFruit. Destination should be Fruit and set the inverse to artistCareer. Uncheck the Optional checkbox again.

Set up relationships

8.) Select Fruit under ENTITIES and then go under the file menu up top and select New File. Choose Core Data and NSManagedObject subclass,, click Next. Keep the default location and click Create.

Create Managed Objects

Repeat this same process after selecting Source under ENTITIES.

You should now see your new objects listed under Supporting Files.

xcode view

9.) Open up CoreDataRelationshipsTutorial-Prefix.pch and add an import for CoreDate. This saves us from having to import it into every file that will use it.

#import

#ifndef __IPHONE_3_0
#warning "This project uses features only available in iPhone SDK 3.0 and later."
#endif

#ifdef __OBJC__
#import
#import
#import
#endif

10.) Now let’s add all the necessary Core Data code to the app delegate files.

First the header file. Import our FirstViewController, then declare private instance variables for our NSManagedObjectContext, NSManagedObjectModel and NSPersistentStoreCoordinator. Create an IBOutlet with out FirstViewController, and declare two methods that we’ll implement.

#import
#import "FirstViewController.h"

@interface CoreDataRelationshipsTutorialAppDelegate : NSObject
{

@private
NSManagedObjectContext *managedObjectContext;
NSManagedObjectModel *managedObjectModel;
NSPersistentStoreCoordinator *persistentStoreCoordinator;

}

@property (nonatomic, retain) IBOutlet UIWindow *window;
@property (nonatomic, retain) IBOutlet UITabBarController *tabBarController;

@property (nonatomic, retain) IBOutlet FirstViewController *firstViewController;

@property (nonatomic, retain, readonly) NSManagedObjectContext *managedObjectContext;
@property (nonatomic, retain, readonly) NSManagedObjectModel *managedObjectModel;
@property (nonatomic, retain, readonly) NSPersistentStoreCoordinator *persistentStoreCoordinator;

- (NSURL *)applicationDocumentsDirectory;
- (void)saveContext;

@end

11.) Now open the app delegate implementation file. Synthesize our firstViewController, then set it’s managedObjectContext to the one created in the app delegate. You may see an error on the line that sets the managedObjectContext because we haven’t set that up in FirstViewController yet.

#import "CoreDataRelationshipsTutorialAppDelegate.h"

@implementation CoreDataRelationshipsTutorialAppDelegate

@synthesize window=_window;
@synthesize tabBarController=_tabBarController;
@synthesize firstViewController;

- (BOOL)application:(UIApplication *)application didFinishLaunchingWithOptions:(NSDictionary *)launchOptions
{
firstViewController.managedObjectContext = self.managedObjectContext;

self.window.rootViewController = self.tabBarController;
[self.window makeKeyAndVisible];
return YES;
}

Implement all these methods.

/**
Returns the URL to the application's Documents directory.
*/
- (NSURL *)applicationDocumentsDirectory
{
return [[[NSFileManager defaultManager] URLsForDirectory:NSDocumentDirectory inDomains:NSUserDomainMask] lastObject];
}

- (void)saveContext
{

NSError *error = nil;
NSManagedObjectContext *objectContext = self.managedObjectContext;
if (objectContext != nil)
{
if ([objectContext hasChanges] && ![objectContext save:&error])
{
// add error handling here
NSLog(@"Unresolved error %@, %@", error, [error userInfo]);
abort();
}
}
}

#pragma mark -
#pragma mark Core Data stack

/**
Returns the managed object context for the application.
If the context doesn't already exist, it is created and bound to the persistent store coordinator for the application.
*/
- (NSManagedObjectContext *)managedObjectContext
{

if (managedObjectContext != nil)
{
return managedObjectContext;
}

NSPersistentStoreCoordinator *coordinator = [self persistentStoreCoordinator];
if (coordinator != nil)
{
managedObjectContext = [[NSManagedObjectContext alloc] init];
[managedObjectContext setPersistentStoreCoordinator:coordinator];
}
return managedObjectContext;
}

/**
Returns the managed object model for the application.
If the model doesn't already exist, it is created from the application's model.
*/
- (NSManagedObjectModel *)managedObjectModel
{
if (managedObjectModel != nil)
{
return managedObjectModel;
}
managedObjectModel = [[NSManagedObjectModel mergedModelFromBundles:nil] retain];

return managedObjectModel;
}

/**
Returns the persistent store coordinator for the application.
If the coordinator doesn't already exist, it is created and the application's store added to it.
*/
- (NSPersistentStoreCoordinator *)persistentStoreCoordinator
{

if (persistentStoreCoordinator != nil)
{
return persistentStoreCoordinator;
}

NSURL *storeURL = [[self applicationDocumentsDirectory] URLByAppendingPathComponent:@"CoreDataTabBarTutorial.sqlite"];

NSError *error = nil;
persistentStoreCoordinator = [[NSPersistentStoreCoordinator alloc] initWithManagedObjectModel:[self managedObjectModel]];
if (![persistentStoreCoordinator addPersistentStoreWithType:NSSQLiteStoreType configuration:nil URL:storeURL options:nil error:&error])
{
NSLog(@"Unresolved error %@, %@", error, [error userInfo]);
abort();
}

return persistentStoreCoordinator;
}

12.) Open up FirstViewController.h and let’s set it up with the necessary code and instance variables.

#import

@interface FirstViewController : UIViewController
{

NSFetchedResultsController  *fetchedResultsController;
NSManagedObjectContext      *managedObjectContext;

}

@property (nonatomic, retain) NSString *fruitNameString;
@property (nonatomic, retain) NSString *fruitSourceString;

@property (nonatomic, retain) NSFetchedResultsController    *fetchedResultsController;
@property (nonatomic, retain) NSManagedObjectContext        *managedObjectContext;

- (IBAction) saveData;

@end

13.) Now for the implementation file. Let’s import our managed objects.

#import "FirstViewController.h"
#import "Fruit.h"
#import "Source.h"

Then synthesize the instance variables.

@synthesize fetchedResultsController, managedObjectContext;
@synthesize fruitNameString, fruitSourceString;

Let’s go ahead and set the values of those two strings in ViewDidLoad.

- (void)viewDidLoad
{
[super viewDidLoad];
fruitNameString = [[NSString alloc] initWithString:@"Apple"];
fruitSourceString = [[NSString alloc] initWithString:@"Apple Tree"];
}

14.) Implement the saveData method.

- (IBAction) saveData
{
NSLog(@"saveData");
Fruit *fruit = (Fruit *)[NSEntityDescription insertNewObjectForEntityForName:@"Fruit" inManagedObjectContext:managedObjectContext];
fruit.fruitName = fruitNameString;
Source *source = (Source *)[NSEntityDescription insertNewObjectForEntityForName:@"Source" inManagedObjectContext:managedObjectContext];
source.sourceName = fruitSourceString;

// Because we set the relationship fruitSource as not optional we must set the source here
fruit.fruitSource = source;

NSError *error;

// here's where the actual save happens, and if it doesn't we print something out to the console
if (![managedObjectContext save:&error])
{
NSLog(@"Problem saving: %@", [error localizedDescription]);
}

// **** log objects currently in database ****
// create fetch object, this object fetch's the objects out of the database
NSFetchRequest *fetchRequest = [[NSFetchRequest alloc] init];
NSEntityDescription *entity = [NSEntityDescription entityForName:@"Fruit" inManagedObjectContext:managedObjectContext];
[fetchRequest setEntity:entity];
NSArray *fetchedObjects = [managedObjectContext executeFetchRequest:fetchRequest error:&error];

for (NSManagedObject *info in fetchedObjects)
{
NSLog(@"Fruit name: %@", [info valueForKey:@"fruitName"]);
Source *tempSource = [info valueForKey:@"fruitSource"];
NSLog(@"Source name: %@", tempSource.sourceName);

}
[fetchRequest release];
}

15.) Release our objects in the dealloc method and set them to nil in viewDidUnload.

- (void)viewDidUnload
{
[super viewDidUnload];
fetchedResultsController = nil;
managedObjectContext = nil;
fruitNameString = nil;
fruitSourceString = nil;
}

- (void)dealloc
{
[fetchedResultsController release];
[managedObjectContext release];
[fruitNameString release];
[fruitSourceString release];

[super dealloc];
}

16.) Open up FirstView.xib and connect the UIButton to our saveData IBAction.

17.) Open up MainWindow.xib, select the app delegate and connect firstViewController outlet to FirstViewController under the Tab Bar Controller.

Link view controller

18.) Now you can run the app and hit the Save Data button. Look in the console to see the results of the fetch.

console

The important things to note from this tutorial are these.

When we created the relationship from Fruit to Source we made it so that it was not optional. Therefore during our saveData method we had to set the fruitSource to something.

Fruit *fruit = (Fruit *)[NSEntityDescription insertNewObjectForEntityForName:@"Fruit" inManagedObjectContext:managedObjectContext];
fruit.fruitName = fruitNameString;
Source *source = (Source *)[NSEntityDescription insertNewObjectForEntityForName:@"Source" inManagedObjectContext:managedObjectContext];
source.sourceName = fruitSourceString;

Try commenting out that last line

//    source.sourceName = fruitSourceString;

And then running it again. What happens? Crash and burn. Because the relationship is not optional you must set the sourceName.

You can also see from the block of code above that we use reuse the same managedObjectContext to create both of the managed objects. Then we set the values and just saved the context. Doing this saved both objects (entities in Core Data).

Another thing to take note of happens in the fetch process. You notice that we only fetch the Fruit entity. But because of the relationship between Fruit and Source we can access the Source entity. We don’t need to do a separate fetch on Source.

NSFetchRequest *fetchRequest = [[NSFetchRequest alloc] init];
NSEntityDescription *entity = [NSEntityDescription entityForName:@"Fruit" inManagedObjectContext:managedObjectContext];
[fetchRequest setEntity:entity];
NSArray *fetchedObjects = [managedObjectContext executeFetchRequest:fetchRequest error:&error];

for (NSManagedObject *info in fetchedObjects)
{
NSLog(@"Fruit name: %@", [info valueForKey:@"fruitName"]);
Source *tempSource = [info valueForKey:@"fruitSource"];
NSLog(@"Source name: %@", tempSource.sourceName);
[tempSource release];
}

Okay that does it for this tutorial. Next time we will look at a one to many relationship.

As always here’s the code.

iPhone App Development Tutorial – Core Data part 2 – One to Many Relationship

iPhone App Development Tutorial – Core Data part 2 – One to Many Relationship:
In this tutorial we will look at creating a one to many relationship in core data. It’s really very easy and not that much different than creating the one to one relationship. The difference comes in how the relationship allows the entities to interact with each other. In part one we had two entities, Fruit and Source. These two entities had a one to one relationship to each other. For each Fruit there was only one Source, and the inverse was true as well, for each Source there was only one Fruit. Now we are going to create two new entities, Artist and Album. Each artist can have multiple albums, but each album can have only one artist. We’ll just pretend that no artists ever collaborate on albums together for the sake of this tutorial :)

We’re going to use the app that I / we created in the Core Data duplicate entities tutorial. In that tutorial we set up an app that did not allow us to enter the same Artist twice. It seems like a good app to start with, only I’m even going to take care of a few more things for us To save time. I’ve set up the second tab with a UITableView and hooked it up with the view controller. This table view will hold the the list of artists that have been saved in the app. I’ve also created a new view with view controllers that will be used to enter Album information for an artist.

Screen Shot


What is going to happen is when we go to the second tab a search will return all Artists saved and display them in the UITableView. We can then click on an Artist and go to the enter Album informations view. The Artist object will be passed to this new view so that when we enter info for an album and save it, it will be saved with a relationship to the artist we selected. In this way we can create many albums for an artist, but an album can only have one artist. Thus the one to many relationship.

Here’s the code we’ll start with.

Let’s get going.

1.) If you run the app right now you can see the second tab with a hard coded string populating each table view cell.

Select An Artist Table Hardcoded

And though there’s no way to get to the new view yet, here is what it looks like.

Enter Album Info View

So that’s what we are starting with.

2.) The first thing we are going to do is a search in SecondViewController and populate our table with the Artists returned. Open up SecondViewController.h and add an NSMutableArray to hold our Artists and declare an ivar for NSMananagedObjectContext.

#import

@interface SecondViewController : UIViewController
{
NSMutableArray *artistsArray;
}

@property (nonatomic, retain) IBOutlet UITableView *artistTable;
@property (nonatomic, retain) NSManagedObjectContext        *managedObjectContext;

@end

Then go to the implementation file and synthesize the managedObjectContext ivar.

#import "SecondViewController.h"

@implementation SecondViewController

@synthesize artistTable;
@synthesize managedObjectContext;

3.) Go to app delegate header file and import SecondViewController, then declare an ivar of it and

#import
#import "FirstViewController.h"
#import "SecondViewController.h"

@interface CoreDataTutorial5AppDelegate : NSObject
{

@private
NSManagedObjectContext *managedObjectContext;
NSManagedObjectModel *managedObjectModel;
NSPersistentStoreCoordinator *persistentStoreCoordinator;

}

@property (nonatomic, retain) IBOutlet UIWindow *window;
@property (nonatomic, retain) IBOutlet UITabBarController *tabBarController;

@property (nonatomic, retain, readonly) NSManagedObjectContext *managedObjectContext;
@property (nonatomic, retain, readonly) NSManagedObjectModel *managedObjectModel;
@property (nonatomic, retain, readonly) NSPersistentStoreCoordinator *persistentStoreCoordinator;

@property (nonatomic, retain) IBOutlet FirstViewController *firstViewController;
@property (nonatomic, retain) IBOutlet SecondViewController *secondViewController;

- (NSURL *)applicationDocumentsDirectory;
- (void)saveContext;

@end

finally synthesize it in the app delegate implementation file.

#import "CoreDataTutorial5AppDelegate.h"

@implementation CoreDataTutorial5AppDelegate

@synthesize window=_window;
@synthesize tabBarController=_tabBarController;
@synthesize firstViewController, secondViewController;

Then open MainWindow.xib and connect the secondViewController ivar to the SecondViewController under Tab Bar Controller.

Now that they are connected let’s set the managed object context in secondViewController. Do this in the app delegate implementation file application:didFinishLaunchingWithOptions method.

- (BOOL)application:(UIApplication *)application didFinishLaunchingWithOptions:(NSDictionary *)launchOptions
{
self.firstViewController.managedObjectContext = self.managedObjectContext;
self.secondViewController.managedObjectContext = self.managedObjectContext;
self.window.rootViewController = self.tabBarController;
[self.window makeKeyAndVisible];
return YES;
}

4.) We’ve now passed the managedObjectContext to SecondViewController and we can implement the search method. We’re going to implement the viewWillAppear method and do our search there.

- (void)viewWillAppear:(BOOL)animated
{
NSLog(@"viewWillAppear");
NSError *error;

NSFetchRequest *fetchRequest = [[NSFetchRequest alloc] init];
NSEntityDescription *entity = [NSEntityDescription entityForName:@"Artist" inManagedObjectContext:managedObjectContext];
[fetchRequest setEntity:entity];
NSArray *fetchedObjects = [managedObjectContext executeFetchRequest:fetchRequest error:&error];
artistsArray = [[NSMutableArray alloc] initWithArray:fetchedObjects];

[fetchRequest release];
[artistTable reloadData];

}

Then we’ll use our array to set the number of rows in the section.

- (NSInteger)tableView:(UITableView *)tableView numberOfRowsInSection:(NSInteger)section
{
return [artistsArray count];
}

And finally we’ll populate our table view cells with the Artists name. But first import the Artist object.

#import "SecondViewController.h"
#import "Artist.h"

- (UITableViewCell *)tableView:(UITableView *)tableView cellForRowAtIndexPath:(NSIndexPath *)indexPath
{
static NSString *CellIdentifier = @"Cell";

UITableViewCell *cell = [tableView dequeueReusableCellWithIdentifier:CellIdentifier];
if (cell == nil) {
cell = [[[UITableViewCell alloc] initWithStyle:UITableViewCellStyleDefault reuseIdentifier:CellIdentifier] autorelease];
}

// Configure the cell...
Artist *artist = [artistsArray objectAtIndex:indexPath.row];
cell.textLabel.text = artist.artistName;
return cell;
}

Run it and make sure everything is working up to this point.

Select an Artist Table

5.) Now that we have retrieved the Artists and are displaying them, let’s add the new view and pass the Artist to it when selecting a cell in the table view. We’ll need to import EnterAlbumInfoViewController to the SecondViewController header file and declare an ivar of it.

#import
#import "EnterAlbumInfoViewController.h"

@interface SecondViewController : UIViewController
{
NSMutableArray *artistsArray;
}

@property (nonatomic, retain) IBOutlet UITableView *artistTable;
@property (nonatomic, retain) NSManagedObjectContext        *managedObjectContext;

@property (nonatomic, retain) EnterAlbumInfoViewController *enterAlbumInfoViewController;

@end

Then synthesize it in the implementation file.

#import "SecondViewController.h"
#import "Artist.h"

@implementation SecondViewController

@synthesize artistTable;
@synthesize managedObjectContext;
@synthesize enterAlbumInfoViewController;

Now go to the didSelectRowAtIndexPath method and present the new view modally, at the same time we will pass the Artist to it along with the managedObjectContext.

- (void)tableView:(UITableView *)tableView didSelectRowAtIndexPath:(NSIndexPath *)indexPath
{
if (self.enterAlbumInfoViewController == nil)
{
EnterAlbumInfoViewController *temp = [[EnterAlbumInfoViewController alloc] initWithNibName:@"EnterAlbumInfoViewController" bundle:[NSBundle mainBundle]];
self.enterAlbumInfoViewController = temp;
[temp release];
}

Artist *artist = [artistsArray objectAtIndex:indexPath.row];
self.enterAlbumInfoViewController.artistNameString = artist.artistName;
self.enterAlbumInfoViewController.artist = artist;
self.enterAlbumInfoViewController.managedObjectContext = self.managedObjectContext;

[self presentModalViewController:self.enterAlbumInfoViewController animated:YES];
}

I forgot to implement a method for the cancel button so let’s do that real quick. This goes in EnterAlbumInfoViewController.

- (IBAction)cancelView
{
[self dismissModalViewControllerAnimated:YES];
}

6.) Before we go any further we need to add the Album Entity to our Data Model. Open up the visual data model editor by clicking on DataModel.xcdatamodel. Add an Entity named Album with three attributes. Here’s how it should look when done.

Album Entity

Now we need to create the relationships. Select Artist and add a relationship to Album named album. This relationship will be a To-Many Relationship so check that box. This means each artist can have many albums. Also make this Optional since an artist doesn’t need to have an album when we create the artist.

album relationship

Then select Album and create the inverse. This time uncheck the optional checkbox and make sure the To-Many Relationship box is not checked. Each Album will have just one artist.

artist relationship

When done create the Album NSManagedObject subclass, and recreate the Artist object. You’ll also need to change the name of the sqlite db on the back end of the Core Data. I just changed the name in this line of the persistentStoreCoordinator method of the app delegate.

NSURL *storeURL = [[self applicationDocumentsDirectory] URLByAppendingPathComponent:@"CoreDataTutorial63.sqlite"];

After doing this you’ll need to re-enter the Artist info.

7.) Now we should be ready to save the Album info. Implement the saveAlbumInfo in EnterAlbumInfoViewController. You’ll need to import “Album.h” too.

- (IBAction)saveAlbumInfo
{
NSLog(@"saveAlbumInfo");

Album *album = (Album *)[NSEntityDescription insertNewObjectForEntityForName:@"Album" inManagedObjectContext:managedObjectContext];
album.albumName = self.albumNameTextField.text;
album.albumReleaseDate = self.albumReleaseDateTextField.text;
album.albumGenre = self.albumGenreTextField.text;
album.artist = self.artist;

NSError *error;

// here's where the actual save happens, and if it doesn't we print something out to the console
if (![managedObjectContext save:&error])
{
NSLog(@"Problem saving: %@", [error localizedDescription]);
}

// **** log objects currently in database ****
// create fetch object, this object fetch's the objects out of the database
NSFetchRequest *fetchRequest = [[NSFetchRequest alloc] init];
NSEntityDescription *entity = [NSEntityDescription entityForName:@"Album" inManagedObjectContext:managedObjectContext];
[fetchRequest setEntity:entity];
NSArray *fetchedObjects = [managedObjectContext executeFetchRequest:fetchRequest error:&error];

for (NSManagedObject *info in fetchedObjects)
{
NSLog(@"Album name: %@", [info valueForKey:@"albumName"]);
NSLog(@"Album age: %@", [info valueForKey:@"albumReleaseDate"]);
NSLog(@"Album gender: %@", [info valueForKey:@"albumGenre"]);

}
[fetchRequest release];

[self dismissModalViewControllerAnimated:YES];
}

8.) Go ahead and run the app and test it out to make sure everything is working up to this point.

9.) Now let’s add a third tab that will allow us to search for an artist and display all of their albums. Add a Tab Bar Item to the Tab bar and the view should look like this.

Search View

Where it has a UISearchBar and a UITableView.

10.) We’ll have to pass the managed object context to this view just as we did with the first and second view controllers. Go to the app delegate header file and import the new view controller. Then create an ivar for it.

#import
#import "FirstViewController.h"
#import "SecondViewController.h"
#import "SearchViewController.h"

@interface CoreDataTutorial5AppDelegate : NSObject
{

@private
NSManagedObjectContext *managedObjectContext;
NSManagedObjectModel *managedObjectModel;
NSPersistentStoreCoordinator *persistentStoreCoordinator;

}

@property (nonatomic, retain) IBOutlet UIWindow *window;
@property (nonatomic, retain) IBOutlet UITabBarController *tabBarController;

@property (nonatomic, retain, readonly) NSManagedObjectContext *managedObjectContext;
@property (nonatomic, retain, readonly) NSManagedObjectModel *managedObjectModel;
@property (nonatomic, retain, readonly) NSPersistentStoreCoordinator *persistentStoreCoordinator;

@property (nonatomic, retain) IBOutlet FirstViewController *firstViewController;
@property (nonatomic, retain) IBOutlet SecondViewController *secondViewController;
@property (nonatomic, retain) IBOutlet SearchViewController *searchViewController;

- (NSURL *)applicationDocumentsDirectory;
- (void)saveContext;

@end

11.) Synthesize our new ivar in the implementation file. and pass the managed object context in the didFinishLaunchingWithOptions method.

#import "CoreDataTutorial5AppDelegate.h"

@implementation CoreDataTutorial5AppDelegate

@synthesize window=_window;
@synthesize tabBarController=_tabBarController;
@synthesize firstViewController, secondViewController, searchViewController;

- (BOOL)application:(UIApplication *)application didFinishLaunchingWithOptions:(NSDictionary *)launchOptions
{
self.firstViewController.managedObjectContext = self.managedObjectContext;
self.secondViewController.managedObjectContext = self.managedObjectContext;
self.searchViewController.managedObjectContext = self.managedObjectContext;
self.window.rootViewController = self.tabBarController;
[self.window makeKeyAndVisible];
return YES;
}

12.) Open MainWindow.xib and connect the searchViewController outlet to the SearchViewController in the Tab Bar Controller.

13.) Open SearchViewController.h and declare two NSArray ivars. One to hold our fetchedObjects (the search results), and one to hold the list of albums from the artiste returned by our search. Declare an ivar for Artist and import Artist into the header file. Create IBOutlets fort our table view and search bar and finally create ivars for the fetchedResultsController and the managedObjectContext.

#import
#import "Artist.h"

@interface SearchViewController : UIViewController
{
NSArray *fetchedObjects;
NSArray *albumArray;
Artist *artist;
}

@property (nonatomic, retain) IBOutlet UITableView *searchResultsTableView;
@property (nonatomic, retain) IBOutlet UISearchBar *mySearchBar;
@property (nonatomic, retain) NSFetchedResultsController    *fetchedResultsController;
@property (nonatomic, retain) NSManagedObjectContext        *managedObjectContext;

@end

14.) Now open up SearchViewController.m and import both Artist and Album and synthesize all our ivars.

#import "SearchViewController.h"
#import "Artist.h"
#import "Album.h"

@implementation SearchViewController

@synthesize searchResultsTableView, mySearchBar, fetchedResultsController, managedObjectContext;

Then implement viewWillAppear. We’ll use this to clear our search bar.

- (void)viewWillAppear:(BOOL)animated
{
mySearchBar.text = @"";
}

15.) Now let’s implement the viewDidLoad method. We’ll set up our core data elements here.

- (void)viewDidLoad
{
[super viewDidLoad];

//    NSFetchRequest needed by the fetchedResultsController
NSFetchRequest *fetchRequest = [[NSFetchRequest alloc] init];

//    NSSortDescriptor tells defines how to sort the fetched results
NSSortDescriptor *sortDescriptor = [[NSSortDescriptor alloc] initWithKey:@"artistName" ascending:YES];
NSArray *sortDescriptors = [[NSArray alloc] initWithObjects:sortDescriptor, nil];
[fetchRequest setSortDescriptors:sortDescriptors];

//    fetchRequest needs to know what entity to fetch
NSEntityDescription *entity = [NSEntityDescription entityForName:@"Artist" inManagedObjectContext:managedObjectContext];
[fetchRequest setEntity:entity];
[sortDescriptors release];
[sortDescriptor release];

fetchedResultsController = [[NSFetchedResultsController alloc] initWithFetchRequest:fetchRequest managedObjectContext:self.managedObjectContext sectionNameKeyPath:nil cacheName:@"Root"];

[fetchRequest release];
}

16.) Next implement the searchBarButtonClicked method. This is where the search takes place and we’ll set the albumArray here.

- (void) searchBarSearchButtonClicked:(UISearchBar *)theSearchBar
{
NSLog(@"searchBarSearchButtonClicked");

NSError *error = nil;

// We use an NSPredicate combined with the fetchedResultsController to perform the search
if (self.mySearchBar.text !=nil)
{
NSPredicate *predicate =[NSPredicate predicateWithFormat:@"artistName  contains[cd] %@", self.mySearchBar.text];
[fetchedResultsController.fetchRequest setPredicate:predicate];
}

if (![[self fetchedResultsController] performFetch:&error])
{
// Handle error
NSLog(@"Unresolved error %@, %@", error, [error userInfo]);
exit(-1);  // Fail
}

// this array is just used to tell the table view how many rows to show
fetchedObjects = fetchedResultsController.fetchedObjects;

// Handle the case where search returns nothing
if ([fetchedObjects count] > 0)
{
artist = [fetchedObjects objectAtIndex:0];

NSSet *artistSet = artist.album;
albumArray = [artistSet allObjects];
}
else
{
UIAlertView *alert = [[UIAlertView alloc] initWithTitle:@"Search Results" message:@"Your search produced no results, please try again." delegate:self cancelButtonTitle:@"OK" otherButtonTitles:nil, nil];
[alert show];
[alert release];

}

// dismiss the search keyboard
[mySearchBar resignFirstResponder];

// reload the table view
[searchResultsTableView reloadData];
}

17.) Use the albumArray to set the numberRowsInSection.

- (NSInteger)tableView:(UITableView *)tableView numberOfRowsInSection:(NSInteger)section
{
return [albumArray count];
}

18.) And finally implement the cellForRowAtIndexPath method like this to display the artist and their albums.

- (UITableViewCell *)tableView:(UITableView *)tableView cellForRowAtIndexPath:(NSIndexPath *)indexPath
{
static NSString *CellIdentifier = @"Cell";

UITableViewCell *cell = [tableView dequeueReusableCellWithIdentifier:CellIdentifier];
if (cell == nil) {
cell = [[[UITableViewCell alloc] initWithStyle:UITableViewCellStyleSubtitle reuseIdentifier:CellIdentifier] autorelease];
}

// Configure the cell...
cell.textLabel.text = artist.artistName;

NSSet *artistSet = artist.album;
NSArray *objectsArray = [artistSet allObjects];

for (int i = 0; i < [objectsArray count]; i++)
{
Album *album = [objectsArray objectAtIndex:indexPath.row];
cell.detailTextLabel.text = album.albumName;

}

return cell;
}

Here's what it looks like when done.

Finished Screen Shot

And here's the code.

2011年12月29日星期四

Using blocks for drawing to avoid subclassing in Objective-C

Using blocks for drawing to avoid subclassing in Objective-C

It is very common for a designer to ask for a 1 pixel tall bar here, or a small gradient there. This is a small request that isn’t very hard, right? Subclass UIView, override drawRect and do the drawing using Core Graphics. But every time you do this you need to add a file to your project. And all this file does is include 1 drawRect method with likely very little code. It personally bothers me when I see lot’s of these little classes that don’t do very much.
Block Based Solution

Instead of subclassing UIView every time we need to draw something what if we were to have one subclass that allowed us to pass in a block that performed the drawing code. So I’ve created a class called DrawView that does exactly that. It also passes itself and the graphics context since that was going to be needed in every block’s implementation so including them as parameters reduced the amount of boiler plate code needed.
typedef void(^DrawView_DrawBlock)(UIView* v,CGContextRef context);
@interface DrawView : UIView
@property (nonatomic,copy) DrawableView_DrawBlock drawBlock;
@end
#import "DrawView.h"
@implementation DrawView
@synthesize drawBlock;
- (void)dealloc
{
    [drawBlock release], drawBlock = nil;
    [super dealloc];
}
- (void)drawRect:(CGRect)rect
{
    [super drawRect:rect];
    
    CGContextRef context = UIGraphicsGetCurrentContext();
    
    if(self.drawBlock)
        self.drawBlock(self,context);
}
@end
Using this class in action is easy. Simply instantiate a DrawView object and pass in a drawBlock with some Core Graphics code in there.
DrawView* drawableView = [[[DrawView alloc] initWithFrame:CGRectMake(0,0,320,50)] autorelease];
drawableView.drawBlock = ^(UIView* v,CGContextRef context)
{
    CGPoint startPoint = CGPointMake(0,v.bounds.size.height-1);
    CGPoint endPoint = CGPointMake(v.bounds.size.width,v.bounds.size.height-1);
    CGContextSetStrokeColorWithColor(context, [UIColor grayColor].CGColor);
    CGContextSetLineWidth(context, 1);
    CGContextMoveToPoint(context, startPoint.x + 0.5, startPoint.y + 0.5);
    CGContextAddLineToPoint(context, endPoint.x + 0.5, endPoint.y + 0.5);
    CGContextStrokePath(context);
};
[self.view addSubview:drawableView];

About.

Hi, I'm David Hamrick. I'm currently working as an iOS developer at Mercury in Nashville, TN. I'm also the author of VueScan Mobile, an easy to use app that allows you to scan from HP, Canon, and Epson printer/scanners to your iPhone, iPad, and iPod Touch.

2011年12月28日星期三

How To Make Your App Stand Out With The New iOS 5 Appearance API

How To Make Your App Stand Out With The New iOS 5 Appearance API:

This is a guest post by +Tope who is Vault Overseer at App Design Vault where you get stunning iPhone App Design templates for developers with a budget or lack of good design contacts.

The App Store with over half a million Apps is now a crowded place. To succeed, your app needs to stand out both in design and functionality. Customizing the appearance of your User interface is a good way to separate your App from the others out there.

Making custom interfaces used to be a painful process in previous releases of the iOS SDK. With iOS 5, Apple made the process easier by introducing the Appearance API.

In this tutorial, I am going to show you how to design an app similar to the cool Find my Friends App.

Basically, at the end of this tutorial, you will be able to transform your app like the screenshot below.


I will be using a fictional recipe app. The screen will have a navigation toolbar with two UIBarButtonItems, Edit and Cancel. There will also be an image with the dish we are making a recipe for, ingredients for the dish and lastly a button that will show the steps needed to prepare the dish. The design elements for this app are part of the suite of iPhone App Design elements called Foody on App Design Vault.

Let’s get started.

Create a new Xcode Project


First, let’s create a new Xcode Single View project and call it styletutorial.


Add the UI Components needed


Now in the ViewController.xib file. Add two instances of UIImageView and a UILabel to the screen. The Image views will be our background for the dish and the ingredients respectively.


Add a Label for the title of the Ingredients list and change the colour to Red.


Add a UITextView component to the screen and change the background to transparent by clicking on the Background tab, then choose the Clear Color option.


Select the top Image View and change the Image field to the “details-photo-mask.png” image. This image is a mask image that gives a photo-frame illusion to the main dish image. Also, choose the “ingredients-list.png” for the image view behind the ingredients. This image is a “scrunched” paper texture so it gives a “Take a note” feeling to our ingredients list.


Now we need to add the Image View that will hold the dish itself. Add another Image view to the screen just above the Image View we just modified. Change the Image field to “food-large.jpg”. Resize the new Image view so that is just slightly smaller than the Image View with the Photo-frame/mask.


If you run the application, you should see our View with all the elements, we have just added. You will not be able to see the navigation controller toolbar at the top because we haven’t added it yet.

Add a Navigation Controller


To add a navigation controller, go to the AppDelegate.m file and modify the application didFinishLaunchingWithOptions: method to look like this.


This will add a navigation controller and then add our initial view as the first view of the navigation controller. Now let’s add some buttons to that navigation controller.

Add Buttons To The Navigation Controller


Add this bit of code as the viewDidLoad method of the ViewController.m class


This is will add two UIBarButton items “Edit” and “Cancel” to our navigation controller . Now, let’s run the application in the simulator and you should see something similar to this.


Let the Styling Begin


Ok, now the magic starts. Let us customise the background of the UINavigationController. To do this, we shall use the Appearance API which is new in iOS 5. Create a method in the AppDelegate.m file and call it customizeAppearance.

In this method, we shall replace the background of the Navigation Bar with the file navar.png. Note: These files are all included in the source files for this tutorial.


In the code above, we created a new Image with the “navbar.png” file and then used the static function UINavigationBar appearance: to modify the background image.

This will set the background image of your Navigation globally across your app.

Now run the application in the Simulator and you should see our new navigation bar with a cool leather theme.


Styling UIBarButtonItems


Our Edit and Cancel buttons look like fish out of water so let’s fix that. All we need to do is add a couple of lines to our customizeAppearance: method


The two new lines uses the same principle used to customise the navigation bar. Create a UIImage instance and then set the background image of our buttons. Check out our new navigation bar. We are getting there. :-)


Changing the background of the View


The next step is to change the background of our view. Gray just doesn’t look like a cool colour to have. Luckily, we have a leather background image we can use to make it look better. To do this, we will need to switch to the ViewController.m file again and the add these lines to our viewDidLoad: method


This bit of code creates a pattern with our image and then sets this as the background of the view.

Lastly, Styling the Button


Lastly, we need to style our button.

First, connect the button to the ViewController.h file to create a reference. I have called this button “stepsButton”.

Change the button Type to default in the Interface Builder and then change the text colour to white with a tray drop shadow.


To style the button, we need to set the background image of our button for two states. The selected and default states. The following code snippet resides in the viewDidLoad: method again.


Run , the app in the simulator and now we have our final product, fully customized and looking almost like the Find my Friends app.


If you have any questions, let me know in the comments and I will make sure to get you an answer.

Building a Universal Framework for iOS

Building a Universal Framework for iOS:
Apple has invested quite a bit of time into making it easy to compile for a number of different architectures in XCode. For instance, compiling a library into its armv6, armv7, and i386 variants is just a matter of specifying the supported architecture types. However, there isn’t a built-in mechanism to take the binaries built for the various architectures and merge them into a universal iOS framework.
Before we go through the steps of building a universal iOS framework we should first review what a framework is and why they are useful.


What is a ‘framework’ and why are they useful?


Apple defines a framework as:

… a hierarchical directory that encapsulates shared resources, such as a dynamic shared library, nib files, image files, localized strings, header files, and reference documentation in a single package.

So instead of having header files and binaries in disperate locations a framework brings everything together into one package (a directory with a known structure). Packaging a library as a framework simplifies things for developers because it not only provides a binary to link against but it includes all of the necessary header files to reference as well.

What is a ‘universal’ framework?


A universal framework can be defined as a framework that contains a binary which has been built for a number of architectures (armv6, armv7, i386) and can be statically1 linked against. This is particularly useful in iOS development because an application can be built for the simulator (i386) and the device (armv6, armv7).

1 Statically linking a library resolves symbols at compile time and embeds the library into the application. It is not possible, currently, to create a dynamic framework for iOS.

Building a ‘universal’ framework


Firstly, there is a project called iOS Universal Framework that simplifies the process of building a universal framework by providing an XCode template. However, I think it is still a meaningful exercise to understand how a universal framework is built using XCode.
Lets get started:

Create a new project

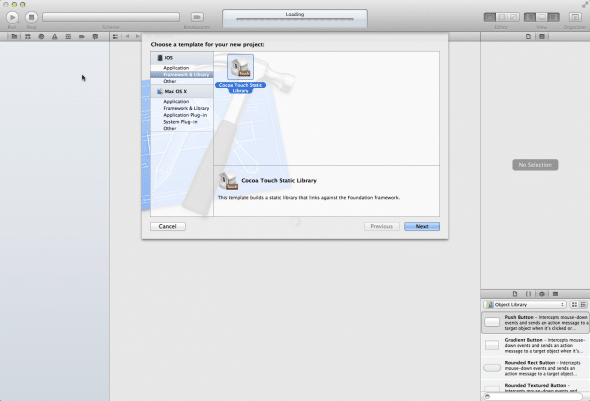
  1. File -> New -> New Project (Command-Shift-N)
  2. Select Frameworks & Libraries under iOS
  3. Select “Cocoa Touch Static Library” and click “Next”
  4. Provide a name for the library


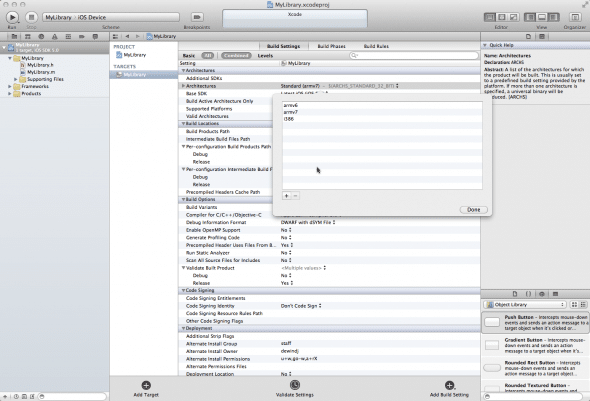
Configure architectures

By default the static library is configured to only build for armv7 so we need to add armv6 and i386 to ensure that the static library is built for older devices (iPhone 3G/Original, early generation iPod Touch) and the simulator.


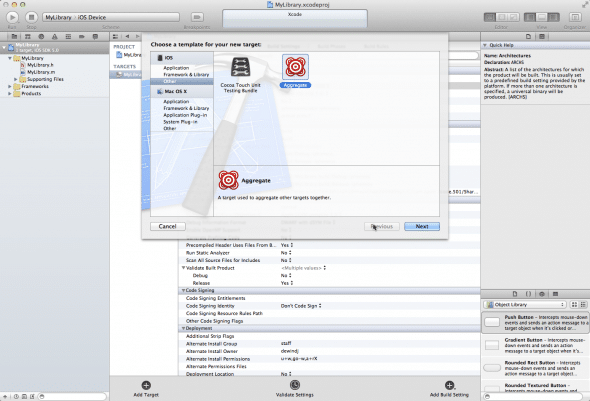
Create aggregate target

An aggregate target aggregates other targets together. In effect, it wraps a number of script executables and copy file tasks in a specified order.

  1. File -> New Target
  2. Select “Other” under iOS
  3. Select “Aggregate”
  4. Give it a name (MyLibrary-iOS for example)


Build static libraries

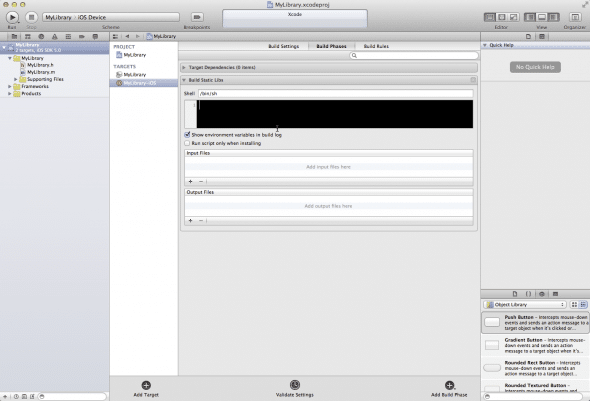
Under the “Build Phases” section of the aggregate target we are going to add a build phase that compiles a static library for i386 and ARM. In the next step we’ll merge the binaries into a fat binary.

  1. Select MyLibrary-iOS target
  2. Select “Build Phases”
  3. Click “Add Build Phase”
  4. Select “Add Run Script”
  5. Name it “Build Static Libs”


xcodebuild -project ${PROJECT_NAME}.xcodeproj -sdk iphonesimulator -target ${PROJECT_NAME} -configuration ${CONFIGURATION} clean build
xcodebuild -project ${PROJECT_NAME}.xcodeproj -sdk iphoneos -target ${PROJECT_NAME} -configuration ${CONFIGURATION} clean build


Build universal binary

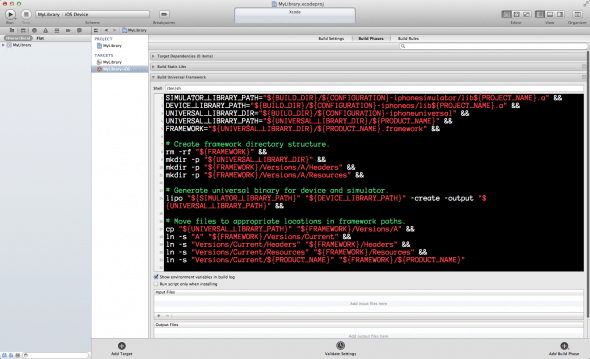
We are going to add another “Run Script” phase that builds the framework itself. The script is going to:

Create a directory structure that mimics the same directory structure seen in Apple’s dynamic frameworks:


SIMULATOR_LIBRARY_PATH="${BUILD_DIR}/${CONFIGURATION}-iphonesimulator/lib${PROJECT_NAME}.a" &&
DEVICE_LIBRARY_PATH="${BUILD_DIR}/${CONFIGURATION}-iphoneos/lib${PROJECT_NAME}.a" &&
UNIVERSAL_LIBRARY_DIR="${BUILD_DIR}/${CONFIGURATION}-iphoneuniversal" &&
UNIVERSAL_LIBRARY_PATH="${UNIVERSAL_LIBRARY_DIR}/${PRODUCT_NAME}" &&
FRAMEWORK="${UNIVERSAL_LIBRARY_DIR}/${PRODUCT_NAME}.framework" &&
# Create framework directory structure.
rm -rf "${FRAMEWORK}" &&
mkdir -p "${UNIVERSAL_LIBRARY_DIR}" &&
mkdir -p "${FRAMEWORK}/Versions/A/Headers" &&
mkdir -p "${FRAMEWORK}/Versions/A/Resources" &&


Merge the static libraries built for the various architectures into a fat binary using a tool called lipo:


# Generate universal binary for the device and simulator.
lipo "${SIMULATOR_LIBRARY_PATH}" "${DEVICE_LIBRARY_PATH}" -create -output "${UNIVERSAL_LIBRARY_PATH}" &&


Move the appropriate files into place:


# Move files to appropriate locations in framework paths.
cp "${UNIVERSAL_LIBRARY_PATH}" "${FRAMEWORK}/Versions/A" &&
ln -s "A" "${FRAMEWORK}/Versions/Current" &&
ln -s "Versions/Current/Headers" "${FRAMEWORK}/Headers" &&
ln -s "Versions/Current/Resources" "${FRAMEWORK}/Resources" &&
ln -s "Versions/Current/${PRODUCT_NAME}" "${FRAMEWORK}/${PRODUCT_NAME}"


The full script can be found here.

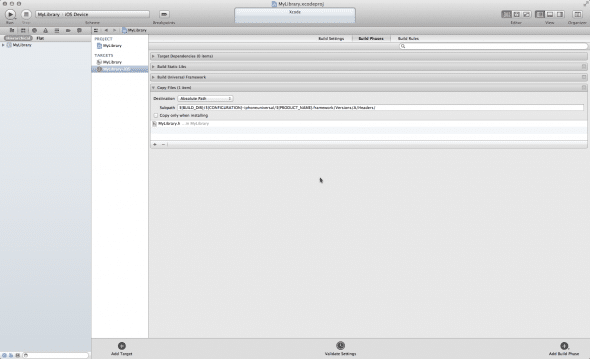
Copy header files into place

  1. Select “Add Build Phase”
  2. Click “Add Copy Files”
  3. Set “Destination” to “Absolute Path”
  4. Set subpath to ${BUILD_DIR}/${CONFIGURATION}-iphoneuniversal/${PRODUCT_NAME}.framework/Versions/A/Headers/
  5. Add header files that should be public to the list


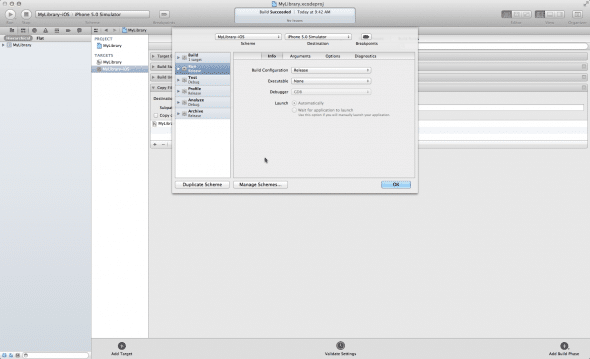
Configure aggregate target build against the ‘Release’ configuration

  1. Product -> Edit Scheme
  2. Choose aggregate target (MyLibrary-iOS)
  3. Select “Run”
  4. Choose “Release” under Build Configuration


Build and verify framework

  1. Select aggregate target
  2. Build it (Command-B)

Verify that the binary was built for the correct architectures using lipo:


lipo -info build/Release-iphoneuniversal/MyLibrary-iOS.framework/MyLibrary-iOS
Architectures in the fat file: build/Release-iphoneuniversal/MyLibrary-iOS.framework/MyLibrary-iOS are: i386 armv6 armv7


Ensure that the header files are copied into place (XCode is known to mess this up on occasion):


tree build/Release-iphoneuniversal/MyLibrary-iOS.framework/
build/Release-iphoneuniversal/MyLibrary-iOS.framework/
├── Headers -> Versions/Current/Headers
├── MyLibrary-iOS -> Versions/Current/MyLibrary-iOS
├── Resources -> Versions/Current/Resources
└── Versions
├── A
│ ├── Headers
│ │ └── MyLibrary.h
│ ├── MyLibrary-iOS
│ └── Resources
└── Current -> A
7 directories, 3 files

Conclusion


Creating a universal framework certainly requires a fair amount of upfront work. However, it is a great mechanism to distribute your library to the masses without making them work to use it. There is not any configuration (header paths) or tweaking (warnings, ARC vs non-ARC files) required on the part of the user. Which means less work for you having to respond to issues and complaints.