This tutorial will teach you how to develop a simple app for the iPad using Flash CS 5.5. In this two-part series, we’ll be building a simple hangman game. After completing this series, you should feel comfortable enough to start developing your own iOS applications with Flash.
Step 1: Generating A CSR
Before we get started actually building our application, let’s take a step back and get the development environment setup. If you’re Flash developer new to iOS development, then you probably have no idea how to test Flash applications on an iOS device. Unfortunately, it isn’t as simple as just clicking “Run”. You’ll first need to create what’s called a CSR, or Certificate Signing Request. You’ll need to upload this CSR to the Apple Provisioning Portal, which means you’ll also need to create an iOS developer account at the official iOS development site. We won’t cover all the steps of setting up an account with the iOS developer program here, but the instructions on Apple’s site are easy to follow. If you aren’t already an iOS development program member, sign up now.
After you’ve registered with Apple as an iOS developer, you’re ready to continue setting up a CSR. Inside your applications folder on a Mac, you’ll find a folder called utilities, and within this folder, there is an application called “Keychain Access”. Open Keychain Access to get started with the certificate generation process.
NOTE: Unfortunately, you will need to be running the latest version of OS X in order to successfully, build, test, and deploy iOS applications, even though you are building them with Flash!
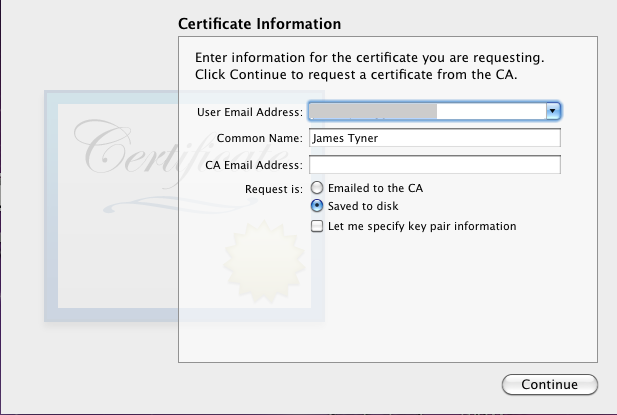
With the Keychain Access program open, choose the following menu options: KeyChain Access > Certificate Assistant > Request A Certificate From A Certificate Authority.

You will need to enter the e-mail address you used to register with apple, and then enter the same name as well. After you’ve filled these in, make sure “Saved To Disk” is selected and press continue. You will need to choose where to save the request. I chose to save it to the desktop.
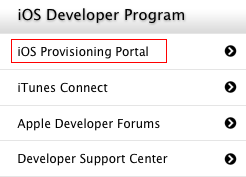
Now we can upload it to the provisioning portal. Log into the developer center at developer.apple.com and on the left of the page you should see a link to the Provisioning Portal, go ahead and click that link.
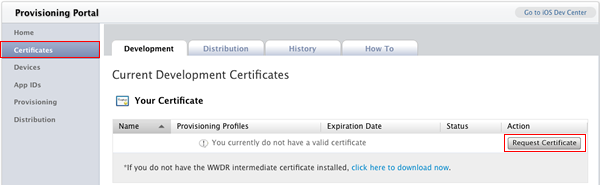
Within the Provisioning Portal click on “Certificates” and then on the “Request Certificate” button.
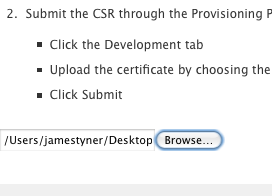
At the bottom of the this page, browse to where you saved the CSR from the previous step, then click on “Submit”.
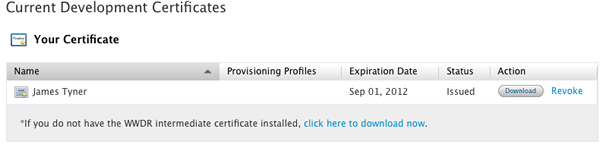
You will be returned to the previous page. It will say “Pending Issuance” under “Status”. Wait a few seconds, and refresh the page and your certificate should be available for download. Don’t download it just yet, we still have a few steps to go.
Step 2: Registering a Device
Plug in your device and open iTunes. Make sure your device is selected, and you will see some information about it. Click on the Serial Number and it will change to your device ID.

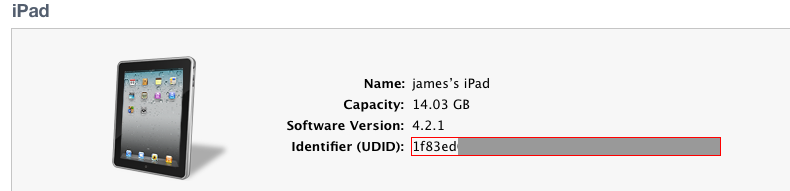
Go to Edit > Copy. This will copy the device UDID to your clipboard.
Back in the Provisioning Portal, click on the menu item “Devices” and then choose “Add Devices”

Enter a name for your device and the “Device ID” you copied in the step above and then click on submit. Your device is now ready.
Step 3: Generating an App ID
Still within the Provision Portal, click on the menu item “App IDs”, then choose “New App ID”.

Enter a name that you want to reference this app by. I chose “MobileTuts Hangman”. Next choose a Bundle Seed ID, choosing “Use Team Id” is most common.
Finally, choose your Bundle Identifier, I chose “com.mobiletuts.hangman”.
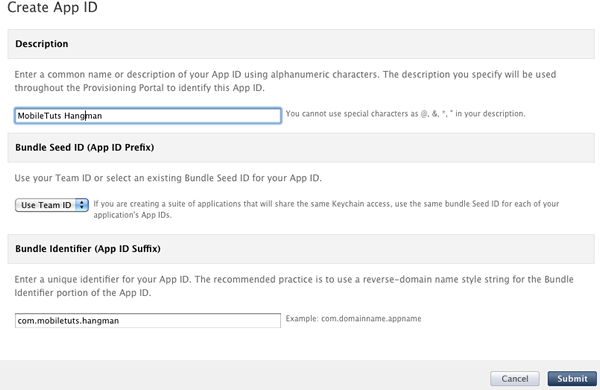
When you are finished entering the information click “Submit”.
If all goes well you should see your app enabled.

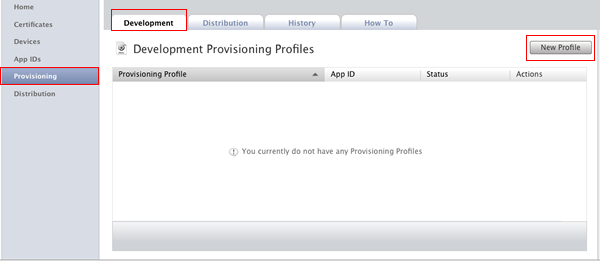
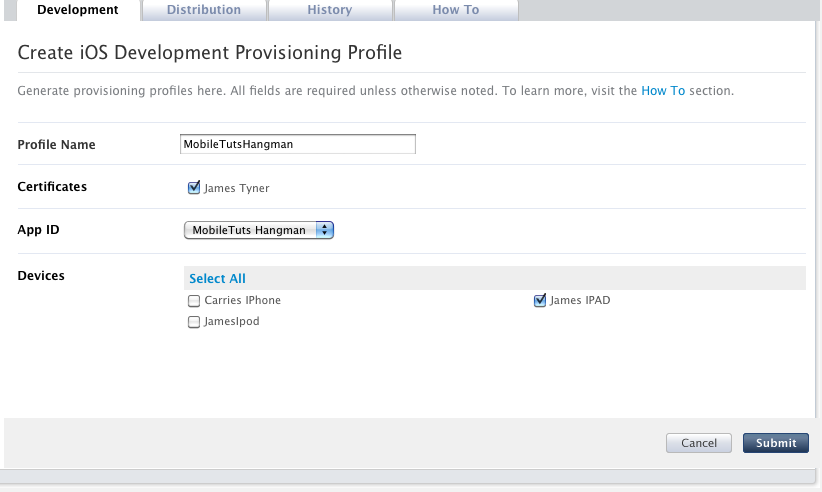
Step 4: Obtaining a Development Provisioning Profile
Choose the menu item “Provisioning”, then making sure you are under “Development”, choose “New Profile”.
On the next screen, making sure you are under “Development”, enter a “Profile Name” (I chose “MobileTutsHangman”), tick your certificate, choose the App ID you created in the step above, choose the device you are going to test on, and then click submit.
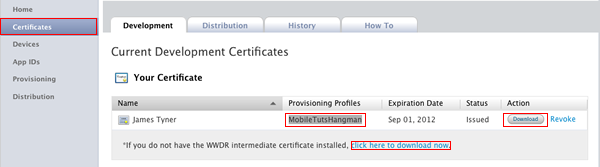
You will be returned to the previous page. The status will say pending, wait a few seconds and refresh the page, and your profile should be ready for downloading. Go ahead and download it now.
Next, go back to the “Certificates” link and you should see “MobileTutsHangman” listed under the “Provisioning Profiles” of your certificate.
Go ahead and download your certificate now, and, while still there, download the “WWDR intermediate certificate” as well.
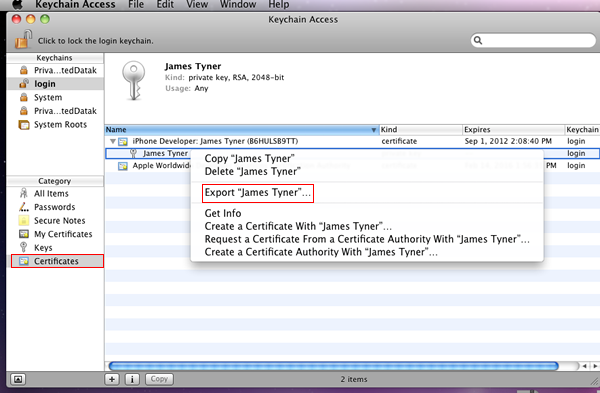
Step 5: Adding the certificate to KeyChain Access and Creating a .P12
If you don’t have keychain access open, do so now. Then double click on the certificate you downloaded above, add it to keychain access, and double click on the “WWDR intermediate certificate as well”.
Within keychain access, choose certificates and then “twirl down” the certificate you just added, right click on your private key and choose “Export”.
I saved mine to a folder named “MOBILETUTS HANGMAN”. Make sure the type is set to “Personal Information Exhange (.p12)” and click “Save”.
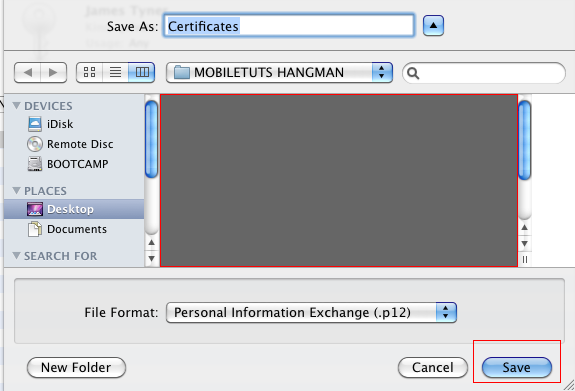
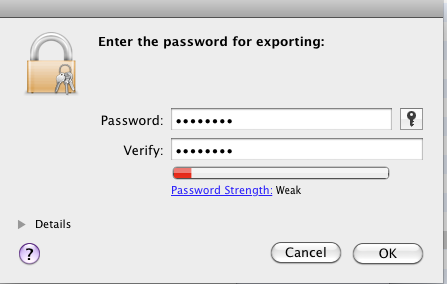
You will be prompted for a password for your .P12, make sure you remember this password, we will need it when we import the .P12 to flash. You will also need to enter the password for your machine after entering this password.
Step 6: Create a New Flash Project
Now that we have set everything up, we are ready to begin our Flash Project.
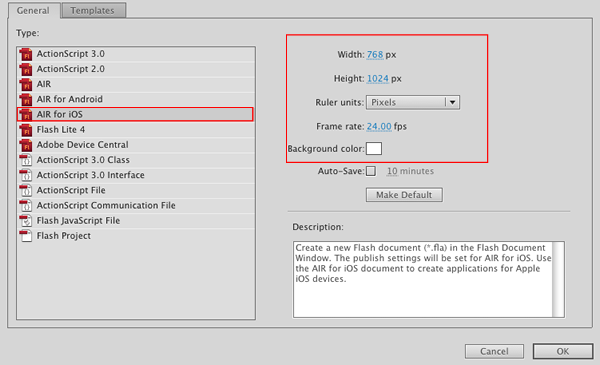
Go to File > New and Choose “Air For iOS”.
Make sure the following properties are set, then press “OK”.
- Width: 768
- Height: 1024
- Frame Rate: 24
- Background Color: White
Save this document as Hangman.fla.
Step 7: Creating Main.as
Go to file > new and choose “Actionscript File”.
Save this as “Main.as”, and then enter the following code:
package{

import flash.display.MovieClip;
public class Main extends MovieClip{
public function Main() {
trace("Working");
}

}
}
Set your Document Class to “Main” and test the movie. You should see your Movie open up in the ADL, and see “Working” traced to the output window.
Step 8: Adding A TextField To the Project
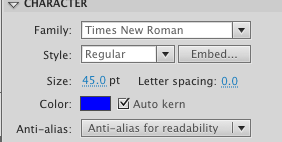
Choose the “Text Tool” and make sure the following properties are set under the “CHARACTER” panel.
- Size: 45pt
- Color: #0000ff”
Now drag a textfield out onto the stage and enter the following text into it: “MOBILETUTS+ HANGMAN”.
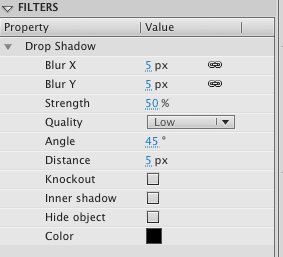
Next, choose the “FILTERS” panel and click on the new filter button and choose “DROP SHADOW”.
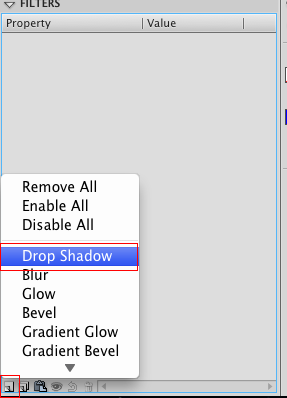
Set the following properties on the Drop Shadow.
- Blur X: 5px
- Blur Y: 5px
- Strength: 50%
- Quality: Low
- Angle: 45
- Distance: 5px
Finally, set the following properties on the TextField:
- X: 76.00
- Y: 26.00
- W: 561.00
- H: 56.00
Lastly, make sure the textfield is set to “Classic Text” and “Static Text”.
Step 9: Setting the iOS Preferences and Building the App
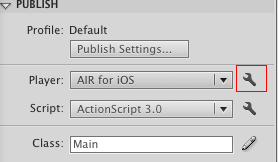
Click on the Main Stage. Under “PUBLISH”, select the Air For iOS option.
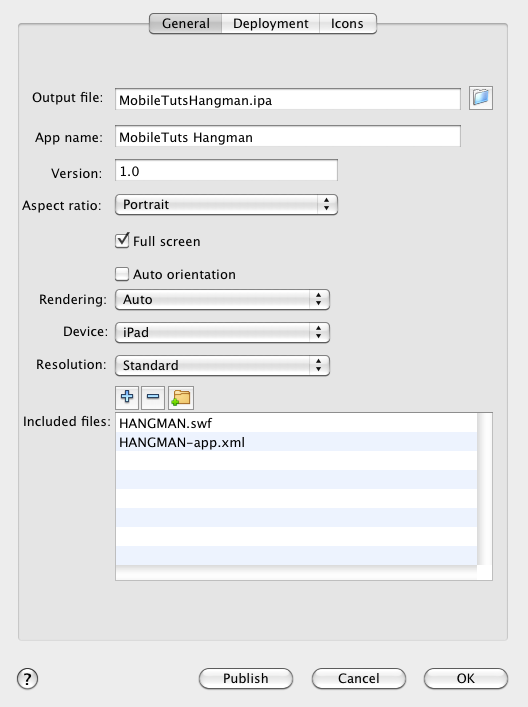
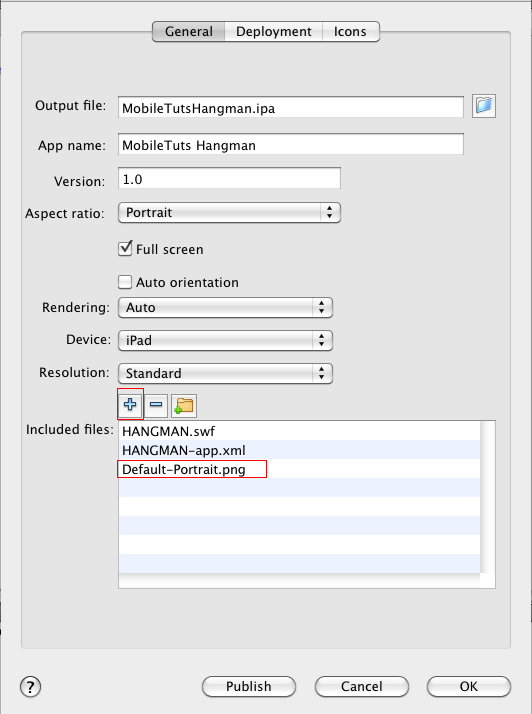
Under the “General Tab”, Fill in the “Output File”,”App name”, and “Version”. I chose “MobileTutsHangman.ipa”, “MobileTuts Hangman”, and “1.0″ for the version. Next, select “Portrait” for the Aspect Ratio, tick off the Full screen, choose “Auto” for rendering, “iPad” for the Device, and “Standard” for the Resolution.
Switch over to the “Deployment” tab. Browse for the .P12 file you created in the steps above, enter the password you made for it, and tick off “Remember password for this session”. Next, browse for the provisioning profile you downloaded and add it.
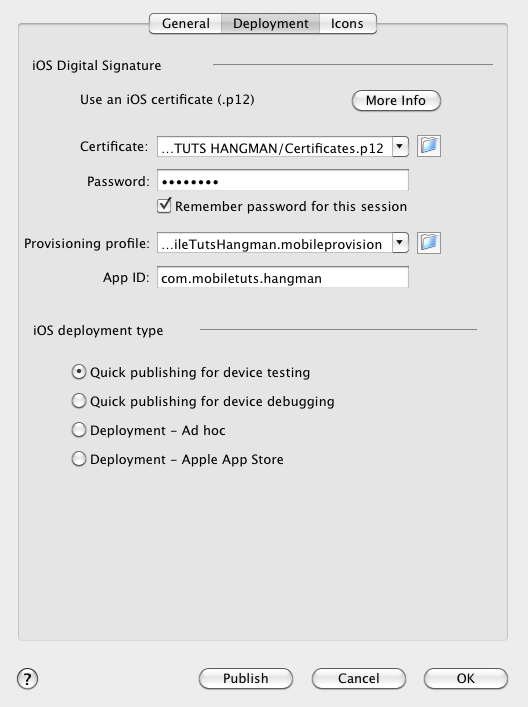
Tick off “Quick publishing for device testing” and finally click “Publish”. It can take a few minutes to build your app.
Step 10: Uploading the “Provisioning Profile to iTunes”
To be able to test on the device, you must first put the Provisioning Profile onto it.
Go to the folder where you saved the Provisioning Profile and drag it into the iTunes “Library”. Next select your device under “Devices” and click on sync.
If you go to “Settings” on your IPad and select “General”, You should see a “Profiles” Menu. Click it and you should see that your profile has been installed.
Step 11: Installing the App onto the iPad
Now that we have compiled the app and installed the Provisioning Profile, we can upload it to the iPad and test it to make sure everything has gone as planned so far.
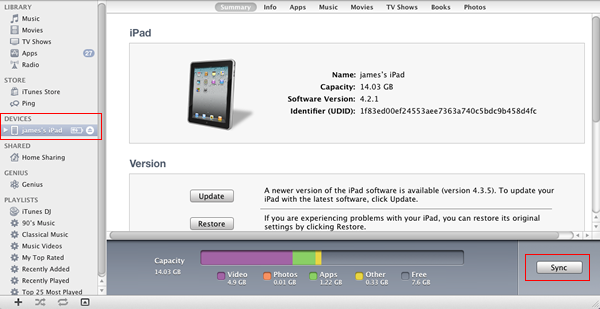
Drag the .ipa file that was created when you published the application into the “LIBRARY” section for your iPad in iTunes, and then choose “Sync”.
If all goes well you should be able to start the app and see the the text we added to the App.
Step 12: Creating the Default Image
We now have the app on our iPad, but it is blank when it starts up. In this step we will make the default graphic that will show while the app is loading.
I have included a file called Default-Portrait.png in the exercise files. You will need to make sure this is in the same folder as your .fla, and not in any subdirectories or it will not work. This image needs to be 768*1004 as per the instructions on the adobe site.
Back in Flash, go to the “Air For iOS” setting as you did in the steps above.
On the “General” tab, make sure all the settings are the same and click on the “Add” (+) button, browse to “Default-Portrait.png”, and then add it to the “Included Files”.
Step 13: Adding the Icons
The icons are used for the iPad itself as well as for the App Store. Go to the “Air For iOS” settings and click on the “Icons” tab. You must supply the icons in the sizes stated in this panel. I have included the icons in the “icon” folder of the download files. They are named icon(size).png, where size is the graphic size. Go through the icon sizes and browse to the respective icons.
Step 14: Republish the App
Make sure all the settings are the same on the “General” and “Deployment” tabs and click “Publish”. Then add the .ipa file to iTunes, make sure you
delete the previous version off your iPad first, and then finally resync the ipa file with the iPad.
You should now see the app has a picture associated with it and the “Splash Screen” shows when you first start up the app.
Conclusion
With all of the “hard” stuff out of the way, we can begin programming our hangman game. Be looking for the next part of this tutorial to do just that. And thanks for reading!
没有评论:
发表评论