This entry is part 17 of 16 in the series Android User Interface Design
There’s nothing more annoying than trying to navigate a poorly designed user interface on a mobile application. How your application behaves in terms of screen navigation can mean the difference between a happy user and one who flames you on the Android Market. Today, we focus on focus—that is: control focus, and how to customize it within your user interfaces. Android device input methods are becoming quite diverse: directional pads, trackballs, touch screens, keyboards, and more. Some devices, like tablets, are primarily navigated by touch. Others, like the Google TV, have no touch screen whatsoever and rely upon input devices such as those with a directional pad (d-pad).
Android developers need to understand how users navigate the controls on a screen, how and in what order these screen controls gain and lose focus, and how to customize control focus order to their applications to provide users with a frustration-free experience.
Understanding Control Focus Order
The Android platform does its best to determine an appropriate control order for a given layout type. In many cases, the default focus order makes sense. However, this is not always the case. Which control should gain focus next is determined by finding the current focused control’s nearest neighbor in a given direction (up/down/left/right). When there are multiple controls that fit that description, the platform scans from left to right, top to bottom, much like one might read a book in English.
This has some ramifications. By default, the top-most control in a screen would have nothing to focus on if the user navigated “Up”, nor would anything happen if the user navigated “Down” from the bottom control on the screen. Similarly, nothing would occur if the user tried to navigate “Left” from the left-most control, or “Right” from the right-most control. There is no “wrapping” of focus, by default.
Now let’s look at an example of how you might want to modify the default focus behavior on a screen and make it work for you and your users. For example, let’s say you want to force your focus order to wrap circularly around a set of controls that make up a clock face.
Step 0: Getting Started
We provide the full source code for the sample application discussed in this tutorial. You can download the sample source code we provide for review here.
Step 1: Define a Layout with Controls
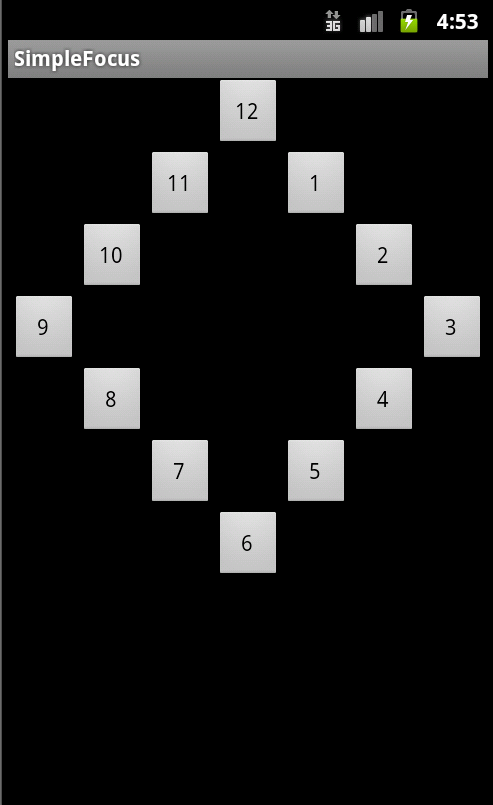
First, create or edit the layout resource file used by your Activity class, such as /res/layout/main.xml. For example, the following layout defines a sort of “clock face” of Button controls using a RelativeLayout.
<?xml version="1.0" encoding="utf-8"?>
<RelativeLayout
xmlns:android="http://schemas.android.com/apk/res/android"
android:layout_width="fill_parent"
android:layout_height="fill_parent">
<Button
style="@style/clockFaceNum"
android:text="12"
android:id="@+id/button12"
android:layout_alignParentTop="true"
android:layout_centerHorizontal="true">
</Button>
<Button
style="@style/clockFaceNum"
android:text="11"
android:id="@+id/button11"
android:layout_below="@+id/button12"
android:layout_toLeftOf="@+id/button12">
</Button>
<Button
style="@style/clockFaceNum"
android:text="1"
android:id="@+id/button1"
android:layout_below="@+id/button12"
android:layout_toRightOf="@+id/button12">
</Button>
<Button
style="@style/clockFaceNum"
android:text="10"
android:id="@+id/button10"
android:layout_below="@+id/button11"
android:layout_toLeftOf="@+id/button11">
</Button>
<Button
style="@style/clockFaceNum"
android:text="2"
android:id="@+id/button2"
android:layout_below="@+id/button1"
android:layout_toRightOf="@+id/button1">
</Button>
<Button
style="@style/clockFaceNum"
android:text="9"
android:id="@+id/button9"
android:layout_below="@+id/button10"
android:layout_toLeftOf="@+id/button10">
</Button>

<Button
style="@style/clockFaceNum"
android:text="3"
android:id="@+id/button3"
android:layout_below="@+id/button2"
android:layout_toRightOf="@+id/button2">
</Button>
<Button
style="@style/clockFaceNum"
android:text="8"
android:id="@+id/button8"
android:layout_below="@+id/button9"
android:layout_toRightOf="@+id/button9">
</Button>
<Button
style="@style/clockFaceNum"
android:text="4"
android:id="@+id/button4"
android:layout_below="@+id/button3"
android:layout_toLeftOf="@+id/button3">
</Button>
<Button
style="@style/clockFaceNum"
android:text="7"
android:id="@+id/button7"
android:layout_below="@+id/button8"
android:layout_toRightOf="@+id/button8">
</Button>
<Button
style="@style/clockFaceNum"
android:text="5"
android:id="@+id/button5"
android:layout_below="@+id/button4"
android:layout_toLeftOf="@+id/button4">
</Button>
<Button
style="@style/clockFaceNum"
android:text="6"
android:id="@+id/button6"
android:layout_below="@+id/button5"
android:layout_centerHorizontal="true">
</Button>
</RelativeLayout>
The style called clockFaceNum is defined in the /res/values/styles.xml file as follows:
<?xml version="1.0" encoding="utf-8"?>
<resources>
<style
name="clockFaceNum">
<item
name="android:layout_width">38dp</item>
<item
name="android:layout_height">38dp</item>
<item
name="android:onClick">numClicked</item>
<item
name="android:textSize">9sp</item>
</style>
</resources>
The resulting screen looks like this:
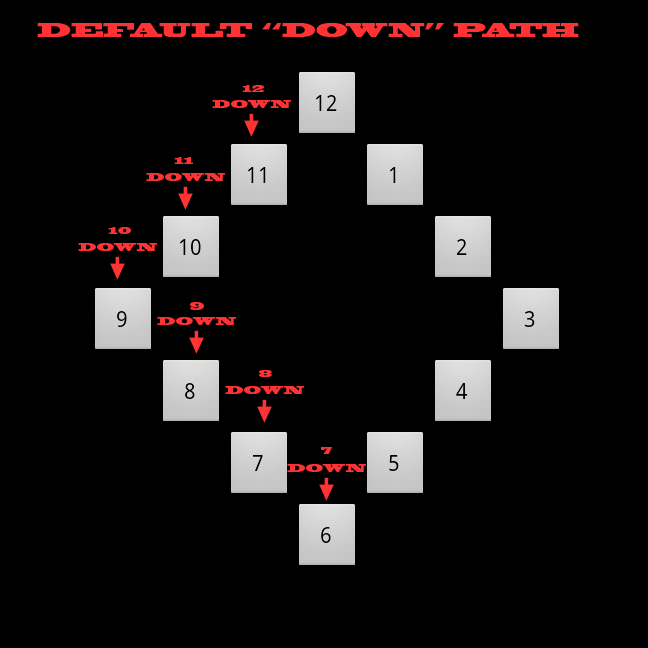
Step 2: Review the Default Focus Order
Let’s review the default focus order for the clock face Button controls in this RelativeLayout. If the user is focused on the 12 button and presses “down” on a directional pad, the next control to take focus will be the 11 Button, followed by the 10 Button, etc.
The default “Down” path is shown here:
Step 3: Provide a Custom Control Focus Order
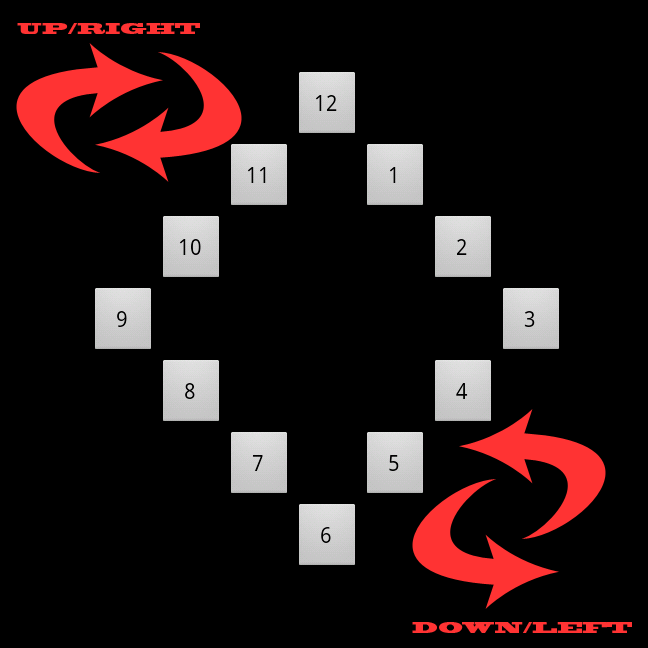
Let’s say we want to force the user to only be able to traverse the clock face controls in clockwise or counterclockwise order as opposed to the default focus order, as shown:
We can define this behavior by specifying, for each Button, which control should gain focus next. There are four XML attributes you can set on any View control to define the focus order. These attributes are:
- android:nextFocusUp-This attribute defines the control that should gain focus if the user navigates up
- android:nextFocusDown-This attribute defines the control that should gain focus if the user navigates down
- android:nextFocusLeft-This attribute defines the control that should gain focus if the user navigates left
- android:nextFocusRight-This attribute defines the control that should gain focus if the user navigates right
So let’s say we want all “Down” and “Right” navigation to allow the user in traverse the clock face Button controls in clockwise order, and all “Up” and “Left” navigation to allow the user to traverse the controls in counter-clockwise order. We would then have to define these four attributes for each control. For example, if you moved “Down” or “Right” from the 12 Button, you would reach the 1 Button. Similarly, if you moved “Up” or “Left” from the 12 Button, you would reach the 11 Button.
A complete definition of this new clock face layout looks like this:
<?xml version="1.0" encoding="utf-8"?>
<RelativeLayout
xmlns:android="http://schemas.android.com/apk/res/android"
android:layout_width="fill_parent"
android:layout_height="fill_parent">
<Button
style="@style/clockFaceNum"
android:text="12"
android:id="@+id/button12"
android:layout_alignParentTop="true"
android:layout_centerHorizontal="true"
android:nextFocusUp="@+id/button11"
android:nextFocusLeft="@+id/button11"
android:nextFocusRight="@+id/button1"
android:nextFocusDown="@+id/button1">
</Button>
<Button
style="@style/clockFaceNum"
android:text="11"
android:id="@+id/button11"
android:layout_below="@+id/button12"
android:layout_toLeftOf="@+id/button12"
android:nextFocusUp="@+id/button10"
android:nextFocusLeft="@+id/button10"
android:nextFocusRight="@+id/button12"
android:nextFocusDown="@+id/button12">
</Button>
<Button
style="@style/clockFaceNum"
android:text="1"
android:id="@+id/button1"
android:layout_below="@+id/button12"
android:layout_toRightOf="@+id/button12"
android:nextFocusUp="@+id/button12"
android:nextFocusLeft="@+id/button12"
android:nextFocusRight="@+id/button2"
android:nextFocusDown="@+id/button2">
</Button>
<Button
style="@style/clockFaceNum"
android:text="10"
android:id="@+id/button10"
android:layout_below="@+id/button11"
android:layout_toLeftOf="@+id/button11"
android:nextFocusUp="@+id/button9"
android:nextFocusLeft="@+id/button9"
android:nextFocusRight="@+id/button11"
android:nextFocusDown="@+id/button11">
</Button>
<Button
style="@style/clockFaceNum"
android:text="2"
android:id="@+id/button2"
android:layout_below="@+id/button1"
android:layout_toRightOf="@+id/button1"
android:nextFocusUp="@+id/button1"
android:nextFocusLeft="@+id/button1"
android:nextFocusRight="@+id/button3"
android:nextFocusDown="@+id/button3">
</Button>
<Button
style="@style/clockFaceNum"
android:text="9"
android:id="@+id/button9"
android:layout_below="@+id/button10"
android:layout_toLeftOf="@+id/button10"
android:nextFocusUp="@+id/button8"
android:nextFocusLeft="@+id/button8"
android:nextFocusRight="@+id/button10"
android:nextFocusDown="@+id/button10">
</Button>

<Button
style="@style/clockFaceNum"
android:text="3"
android:id="@+id/button3"
android:layout_below="@+id/button2"
android:layout_toRightOf="@+id/button2"
android:nextFocusUp="@+id/button2"
android:nextFocusLeft="@+id/button2"
android:nextFocusRight="@+id/button4"
android:nextFocusDown="@+id/button4">
</Button>
<Button
style="@style/clockFaceNum"
android:text="8"
android:id="@+id/button8"
android:layout_below="@+id/button9"
android:layout_toRightOf="@+id/button9"
android:nextFocusUp="@+id/button7"
android:nextFocusLeft="@+id/button7"
android:nextFocusRight="@+id/button9"
android:nextFocusDown="@+id/button9">
</Button>
<Button
style="@style/clockFaceNum"
android:text="4"
android:id="@+id/button4"
android:layout_below="@+id/button3"
android:layout_toLeftOf="@+id/button3"
android:nextFocusUp="@+id/button3"
android:nextFocusLeft="@+id/button3"
android:nextFocusRight="@+id/button5"
android:nextFocusDown="@+id/button5">
</Button>
<Button
style="@style/clockFaceNum"
android:text="7"
android:id="@+id/button7"
android:layout_below="@+id/button8"
android:layout_toRightOf="@+id/button8"
android:nextFocusUp="@+id/button6"
android:nextFocusLeft="@+id/button6"
android:nextFocusRight="@+id/button8"
android:nextFocusDown="@+id/button8">
</Button>
<Button
style="@style/clockFaceNum"
android:text="5"
android:id="@+id/button5"
android:layout_below="@+id/button4"
android:layout_toLeftOf="@+id/button4"
android:nextFocusUp="@+id/button4"
android:nextFocusLeft="@+id/button4"
android:nextFocusRight="@+id/button6"
android:nextFocusDown="@+id/button6">
</Button>
<Button
style="@style/clockFaceNum"
android:text="6"
android:id="@+id/button6"
android:layout_below="@+id/button5"
android:layout_centerHorizontal="true"
android:nextFocusUp="@+id/button5"
android:nextFocusLeft="@+id/button5"
android:nextFocusRight="@+id/button7"
android:nextFocusDown="@+id/button7">
</Button>
</RelativeLayout>
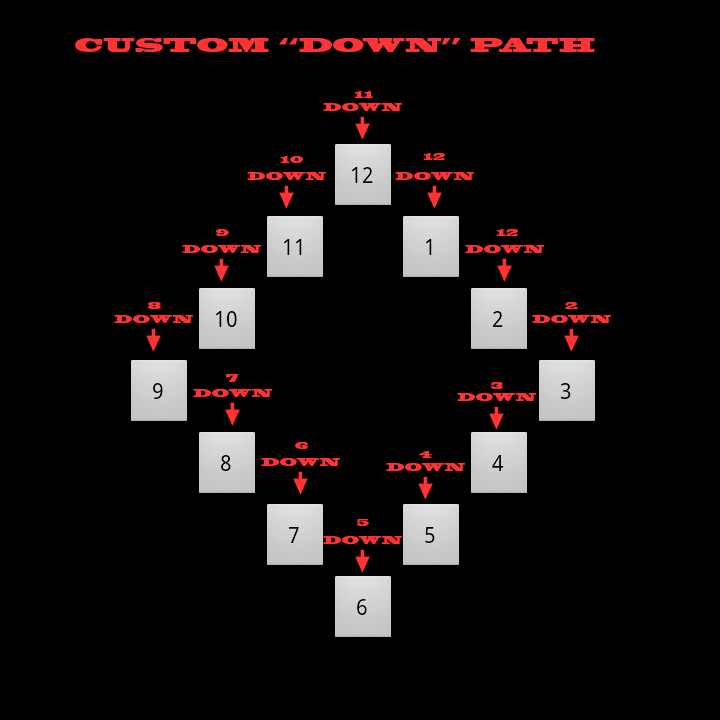
Therefore, our new “Down” path, starting at the 12 Button, looks like this now:
Step 4: Setting Initial Control Focus
Finally, here’s a trick for setting the default control to gain focus on a given screen from within your layout file. You can only do this for one View control in each file.
Use the tag within the View control to set the initial focus on the screen. For example, we might want to update the 12 Button to gain initial focus, like this:
<Button
style="@style/clockFaceNum"
android:text="12"
android:id="@+id/button12"
android:layout_alignParentTop="true"
android:layout_centerHorizontal="true"
android:nextFocusUp="@+id/button11"
android:nextFocusLeft="@+id/button11"
android:nextFocusRight="@+id/button1"
android:nextFocusDown="@+id/button1">
<requestFocus />
</Button>
You can, of course, also use the programmatic method to set the control focus as well, using the View class method called requestFocus().
Conclusion
Android developers need to remember that different users will navigate an application’s user interface using different input methods. Some methods make it easy to jump between screen controls, while others can make navigation onerous. Developers can provide custom focus orders which can greatly improve the user’s experience with the application. Please don’t forget about the keyboard users. ☺
About the Authors
Mobile developers Lauren Darcey and Shane Conder have coauthored several books on Android development: an in-depth programming book entitled Android Wireless Application Development, Second Edition and Sams Teach Yourself Android Application Development in 24 Hours, Second Edition. When not writing, they spend their time developing mobile software at their company and providing consulting services. They can be reached at via email to androidwirelessdev+mt@gmail.com, via their blog at androidbook.blogspot.com, and on Twitter @androidwireless.
Need More Help Writing Android Apps? Check out our Latest Books and Resources!


没有评论:
发表评论