In this part of the series, we will build a custom view to make chat messages look more professional. Moreover, we will also add real emoticons to display in place of their textual counterparts.
Small Bug Fix
Before going on we have noticed a small bug introduced in part 3 of the series. When we receive a notification that a new buddy is online, we add it to the array of online people and refresh the view.
- (void)newBuddyOnline:(NSString *)buddyName
{
   [onlineBuddies addObject:buddyName];
   [self.tView reloadData];

}
This could work if we received an online notification just once. In reality, such a notification is sent out periodically. This might be due to the nature of the XMPP protocol or the ejabbered implementation that we are using. In any case, to avoid duplicates, we should check whether we have already added to the array the buddy carried in the notification. So, we refactor like this:
- (void)newBuddyOnline:(NSString *)buddyName {
   if (![onlineBuddies containsObject:buddyName]) {
       [onlineBuddies addObject:buddyName];
       [self.tView reloadData];
   }
}
And the bug is fixed.
Building Custom Chat Messages
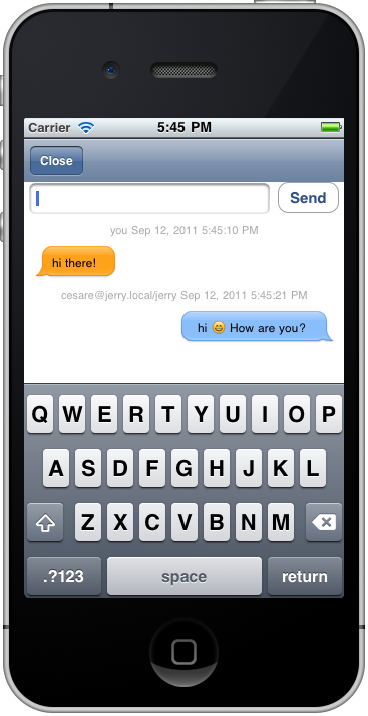
During the series we have built a chat view controller which displays messages using standard visual components included in the iOS SDK. Our goal is to build something prettier, which displays the sender and the time of a message. We take inspiration from the SMS application bundled in iOS, which displays the content of the message wrapped by a balloon like bubble. The result that we want to achieve is shown in the following figure:
The components for the input are on the top, as in the current implementation. We need to create a custom view for the cells of the table. This is the list of requirements:
- Each cell shows the sender and the time of the message by means of a label at the top
- Each message is wrapped by a balloon image with some padding
- Background images for the message are different according to the sender
- The height of the message (and its background image) may vary according to the length of the text
Saving the Timestamp of a Message
The current implementation does not save the time at which a message as been sent/received. Since we have to perform this operation in more than one place, we create a utility method which returns the current date and time in the form of a string. We do it by means of a category, extending the NSString class.
Following the convention suggested by Apple we create two source files named NSString+Utils.h and NSString+Utils.m. The header file contains the following code:
@interface NSString (Utils)

+ (NSString *) getCurrentTime;

@end
In the implementation, we define the static method getCurrentTime as follows
@implementation NSString (Utils)

+ (NSString *) getCurrentTime {
 NSDate *nowUTC = [NSDate date];
 NSDateFormatter *dateFormatter = [[NSDateFormatter alloc] init];
 [dateFormatter setTimeZone:[NSTimeZone localTimeZone]];
 [dateFormatter setDateStyle:NSDateFormatterMediumStyle];
 [dateFormatter setTimeStyle:NSDateFormatterMediumStyle];
 return [dateFormatter stringFromDate:nowUTC];
}

@end
Such a method will return strings like the following: Sep 12, 2011 7:34:21 PM
If you want to customize the format of the date you can consult the documentation of NSFormatter.
Now that we have the utility method ready we need to save the date and time of sent and received messages. Both modifications pertain to the SMChatViewController when we send a message:
- (IBAction)sendMessage {

   NSString *messageStr = self.messageField.text;

   if([messageStr length] > 0) {

  ...

  NSMutableDictionary *m = [[NSMutableDictionary alloc] init];
  [m setObject:@"you" forKey:@"sender"];
  [m setObject:[NSString getCurrentTime] forKey:@"time"];

        ...

   }

   ...
}
And when we receive it:
- (void)newMessageReceived:(NSDictionary *)messageContent {

 NSString *m = [messageContent objectForKey:@"msg"];
 ...
 [messageContent setObject:[NSString getCurrentTime] forKey:@"time"];

 ...

}
Now we have all the data structures we need to build our custom interface, so let’s start by customizing our cell view.
The Balloon View
Most of the modifications we are going to introduce are related to the SMChatViewController, and particularly to the method -(UITableViewCell *)tableView:(UITableView *)tableView cellForRowAtIndexPath:(NSIndexPath *)indexPath, which is where the content of each cell is drawn.
The current implementation uses a generic UITableViewCell, but that is not enough for our requirements, so we need to subclass it. We call our new class SMMessageViewTableCell.
The class needs three visual elements:
- A label to show date and time
- A textual view to show the message
- An image view to display a balloon shaped custom view
Here is the corresponding interface file:
@interface SMMessageViewTableCell : UITableViewCell {
 UILabel *senderAndTimeLabel;
 UITextView *messageContentView;
 UIImageView *bgImageView;
}

@property (nonatomic,assign) UILabel *senderAndTimeLabel;
@property (nonatomic,assign) UITextView *messageContentView;
@property (nonatomic,assign) UIImageView *bgImageView;

@end
The first step of the implementation is to synthesize properties and set up the deallocation of instances.
@implementation SMMessageViewTableCell

@synthesize senderAndTimeLabel, messageContentView, bgImageView;

- (void)dealloc {
   [senderAndTimeLabel release];
   [messageContentView release];
   [bgImageView release];
   [super dealloc];
}

@end
Then we can override the constructor to add the visual elements to the contentView of the cell. The senderAndTimeLabel is the only element with a fixed position so we can set its frame and appearance right in the constructor.
- (id)initWithStyle:(UITableViewCellStyle)style reuseIdentifier:(NSString *)reuseIdentifier {

   if (self = [super initWithStyle:style reuseIdentifier:reuseIdentifier]) {

  senderAndTimeLabel = [[UILabel alloc] initWithFrame:CGRectMake(10, 5, 300, 20)];
  senderAndTimeLabel.textAlignment = UITextAlignmentCenter;
  senderAndTimeLabel.font = [UIFont systemFontOfSize:11.0];
  senderAndTimeLabel.textColor = [UIColor lightGrayColor];
  [self.contentView addSubview:senderAndTimeLabel];

   }

   return self;

}
The image view and the message field do not need any positioning. That will be managed in the table view method, for we need to know the length of the message to calculate its frame. So the final implementation of the constructor is the following.
- (id)initWithStyle:(UITableViewCellStyle)style reuseIdentifier:(NSString *)reuseIdentifier {

 if (self = [super initWithStyle:style reuseIdentifier:reuseIdentifier]) {

  senderAndTimeLabel = [[UILabel alloc] initWithFrame:CGRectMake(10, 5, 300, 20)];
  senderAndTimeLabel.textAlignment = UITextAlignmentCenter;
  senderAndTimeLabel.font = [UIFont systemFontOfSize:11.0];
  senderAndTimeLabel.textColor = [UIColor lightGrayColor];
  [self.contentView addSubview:senderAndTimeLabel];

  bgImageView = [[UIImageView alloc] initWithFrame:CGRectZero];
  [self.contentView addSubview:bgImageView];

  messageContentView = [[UITextView alloc] init];
  messageContentView.backgroundColor = [UIColor clearColor];
  messageContentView.editable = NO;
  messageContentView.scrollEnabled = NO;
  [messageContentView sizeToFit];
  [self.contentView addSubview:messageContentView];

   }

   return self;

}
Now let’s rewrite the -(UITableViewCell *)tableView:(UITableView *)tableView cellForRowAtIndexPath:(NSIndexPath *)indexPath method using the new custom cell we have built. First, we need to substitute the old cell class with the new one.
- (UITableViewCell *)tableView:(UITableView *)tableView cellForRowAtIndexPath:(NSIndexPath *)indexPath {

 NSDictionary *s = (NSDictionary *) [messages objectAtIndex:indexPath.row];
 static NSString *CellIdentifier = @"MessageCellIdentifier";

 SMMessageViewTableCell *cell = (SMMessageViewTableCell *)[tableView dequeueReusableCellWithIdentifier:CellIdentifier];

 if (cell == nil) {
  cell = [[[SMMessageViewTableCell alloc] initWithFrame:CGRectZero reuseIdentifier:CellIdentifier] autorelease];
 }

}
Since it makes no sense to assign geometrical dimensions in the constructor we start with zero. Here is a crucial step. We need to calculate the size of the text according to the length of the string sent or received. Fortunately the SDK provides a handy method called sizeWithFont:constrainedToSize:lineBreakMode: which calculates the height and width of a string as rendered according to the constraints we pass as parameter. Our only constraint is the width of the device which is 320 logical pixels in width. Since we want some padding we set the constraint to 260, whereas the height is not a problem, so we can set a much higher number.
 CGSize  textSize = { 260.0, 10000.0 };
 CGSize size = [message sizeWithFont:[UIFont boldSystemFontOfSize:13]
       constrainedToSize:textSize
        lineBreakMode:UILineBreakModeWordWrap];
Now, size is a parameter that we will use to draw both the messageContentView and the balloon view. We want messages sent to appear left-aligned, and messages received to appear right-aligned. So the position of messageContentView changes according to the sender of the message, as follows:
 NSString *sender = [s objectForKey:@"sender"];
 NSString *message = [s objectForKey:@"msg"];
 NSString *time = [s objectForKey:@"time"];

 CGSize  textSize = { 260.0, 10000.0 };
 CGSize size = [message sizeWithFont:[UIFont boldSystemFontOfSize:13]
       constrainedToSize:textSize
        lineBreakMode:UILineBreakModeWordWrap];

 cell.messageContentView.text = message;
 cell.accessoryType = UITableViewCellAccessoryNone;
 cell.userInteractionEnabled = NO;

 if ([sender isEqualToString:@"you"]) { // sent messages

  [cell.messageContentView setFrame:CGRectMake(padding, padding*2, size.width, size.height)];

 } else {

        [cell.messageContentView setFrame:CGRectMake(320 - size.width - padding,
                    padding*2,
              size.width,
              size.height)];

 }

 ...
Now we have to display the balloon image as a wrapper for the message view. First, we need to get graphical assets. You can build your own or use the following ones.


The first, with the “arrow” on the left will be used for sent messages, and the other for received ones. You might wonder why the assets are so small. We won’t need big images to be adapted in size, but we will stretch those assets to adapt to the frame of the message view. The stretching will spread only the central part of the assets, which is made of a solid color, so there won’t be any unwanted deformation effect. To achieve that we use a handy method [[UIImage imageNamed:@"orange.png"] stretchableImageWithLeftCapWidth:24 topCapHeight:15];. The parameters represent the limit (from borders) where the stretching can start. Now our image is ready to be positioned.
The final implementation is the following:
- (UITableViewCell *)tableView:(UITableView *)tableView cellForRowAtIndexPath:(NSIndexPath *)indexPath {

 NSDictionary *s = (NSDictionary *) [messages objectAtIndex:indexPath.row];

 static NSString *CellIdentifier = @"MessageCellIdentifier";

 SMMessageViewTableCell *cell = (SMMessageViewTableCell *)[tableView dequeueReusableCellWithIdentifier:CellIdentifier];

 if (cell == nil) {
  cell = [[[SMMessageViewTableCell alloc] initWithFrame:CGRectZero reuseIdentifier:CellIdentifier] autorelease];
 }

 NSString *sender = [s objectForKey:@"sender"];
 NSString *message = [s objectForKey:@"msg"];
 NSString *time = [s objectForKey:@"time"];

 CGSize  textSize = { 260.0, 10000.0 };
 CGSize size = [message sizeWithFont:[UIFont boldSystemFontOfSize:13]
       constrainedToSize:textSize
        lineBreakMode:UILineBreakModeWordWrap];

 size.width += (padding/2);

 cell.messageContentView.text = message;
 cell.accessoryType = UITableViewCellAccessoryNone;
 cell.userInteractionEnabled = NO;

 UIImage *bgImage = nil;

 if ([sender isEqualToString:@"you"]) { // left aligned

  bgImage = [[UIImage imageNamed:@"orange.png"] stretchableImageWithLeftCapWidth:24  topCapHeight:15];

  [cell.messageContentView setFrame:CGRectMake(padding, padding*2, size.width, size.height)];

  [cell.bgImageView setFrame:CGRectMake( cell.messageContentView.frame.origin.x - padding/2,
             cell.messageContentView.frame.origin.y - padding/2,
             size.width+padding,
             size.height+padding)];

 } else {

  bgImage = [[UIImage imageNamed:@"aqua.png"] stretchableImageWithLeftCapWidth:24  topCapHeight:15];

  [cell.messageContentView setFrame:CGRectMake(320 - size.width - padding,
              padding*2,
              size.width,
              size.height)];

  [cell.bgImageView setFrame:CGRectMake(cell.messageContentView.frame.origin.x - padding/2,
             cell.messageContentView.frame.origin.y - padding/2,
             size.width+padding,
             size.height+padding)];

 }

 cell.bgImageView.image = bgImage;
 cell.senderAndTimeLabel.text = [NSString stringWithFormat:@"%@ %@", sender, time];

 return cell;

}
We should not forget that the height of the whole cell is dynamic, so we should also update the following method:
- (CGFloat)tableView:(UITableView *)tableView heightForRowAtIndexPath:(NSIndexPath *)indexPath {

 NSDictionary *dict = (NSDictionary *)[messages objectAtIndex:indexPath.row];
 NSString *msg = [dict objectForKey:@"msg"];

 CGSize  textSize = { 260.0, 10000.0 };
 CGSize size = [msg sizeWithFont:[UIFont boldSystemFontOfSize:13]
      constrainedToSize:textSize
       lineBreakMode:UILineBreakModeWordWrap];

 size.height += padding*2;

 CGFloat height = size.height < 65 ? 65 : size.height;
 return height;

}
Now we are ready to run our new implementation of custom view cells. Here is the result:
Emoticons
Many chat programs like iChat, Adium, or even web-based chats like Facebook Chat, support emoticons, that is expressions made of letters and punctuation that represent an emotion like :) for happyness, :( for sadness, and so on. Our goal is to customize the the message view so that images are displayed instead of letters and punctuation. To enable this behavior we need to parse each message and substitute occurrences of emoticons with the corresponding Unicode characters. For a list of emoticons available on the iPhone you can check out this table. We can add the substitution method in the Utils category we have already used to calculate the current date. This is the implementation:
- (NSString *) substituteEmoticons {

 //See http://www.easyapns.com/iphone-emoji-alerts for a list of emoticons available

 NSString *res = [self stringByReplacingOccurrencesOfString:@":)" withString:@"\ue415"];
 res = [res stringByReplacingOccurrencesOfString:@":(" withString:@"\ue403"];
 res = [res stringByReplacingOccurrencesOfString:@";-)" withString:@"\ue405"];
 res = [res stringByReplacingOccurrencesOfString:@":-x" withString:@"\ue418"];

 return res;

}
Here we replace only three emoticons just to give you an idea of how the method works. Such a method needs to be called before storing messages in the array which populates the SMChatViewController. When we send a message:
- (IBAction)sendMessage {

   NSString *messageStr = self.messageField.text;

   if([messageStr length] > 0) {

        ...

  NSMutableDictionary *m = [[NSMutableDictionary alloc] init];
  [m setObject:[messageStr substituteEmoticons] forKey:@"msg"];

        ...

  [messages addObject:m];]

   }
    ...
}
When we receive it:
- (void)newMessageReceived:(NSDictionary *)messageContent {

 NSString *m = [messageContent objectForKey:@"msg"];

 [messageContent setObject:[m substituteEmoticons] forKey:@"msg"];

 [messages addObject:messageContent];

 ...
}
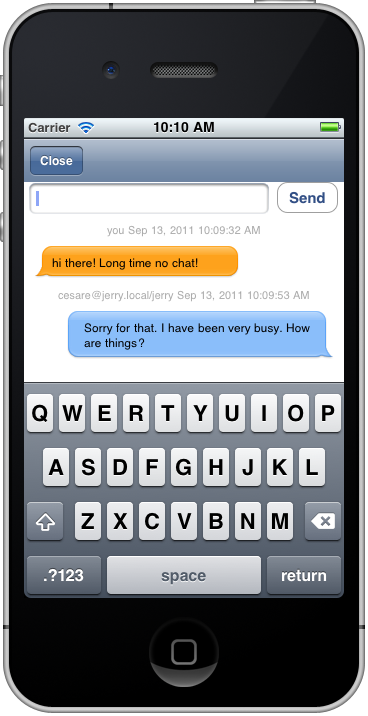
Our Jabber Client is now complete. Here is a screenshot of the final implementation:

Ready to chat?
Source Code
The complete source code for this project can be found on GitHub here.
没有评论:
发表评论