Introduction
In the age where Core Data is king, the database that started it all is often overlooked. I’m talking of course about sqlite. As you may or may not know, prior to core data, sqlite was the preferred method of storing relational data on iOS devices.
Although, most developers don’t interact with sqlite directly, they still use it under the hood as the primary data store for core data. This is great and all, but there are often times when raw sqlite is still the preferred storage method.
A few of these might include:
- Caching
- Preferences
- Simple objects
- Portability
- Cross platform applications
Recently, I have had to make heave use of raw sqlite as a caching strategy in a new project that I’m working on. Being that we are developing a framework for other developers to include in their projects, we can’t always assume that they have their environment set up to use core data. When I was but a n00b iOS developer I did all of the crazy sqlite management by hand. See This post series, but don’t spend too much time there because it’s embarrassing.
Gross right? Now, there is a much easier way to manage and interact with your sqlite databases. This library has been around for quite some time and I wish I had known about it earyly on.
FMDB
FMDB stands for Flying Meat Database. What a great name… This project aims to be a fully featured wrapper for sqlite.
You can clone their repository on their github.
This tutorial will give you a brief introduction to using FMDB to create a database, create a table, insert, fetch, and delete data.
Project Set Up
The first step is to download/clone fmdb from the url above. Once downloaded drag everything inside of the src folder into your project except fmdb.m. That file contains unit tests and a main, which will cause some conflicts in your project.
The next step is to link in the sqlite library. To do this:
- Click your project in the left column of XCode
- Click the main target in the middle column. In our case it’s “FMDBTest”
- Click the “Build Phases” tab in the third column
- Expand the arrow next to “Link Binary With Libraries”
- Click the “+” button
- Search for libsqlite3.0.dylib and double click it
When you are all done, it should look like this:

Now, that we have the library in place, let’s write some code.
Creating A Database
Obviously where you create your database is up to you, but we are going to do it in the appDelegate.
In addition to working with existing databases, fmdb can easily create any number of databases for you on the fly. After importing FMDatabase.h in our AppDelegate.m file, we can add the following code to the
application:didFinishLaunching method.NSArray *paths = NSSearchPathForDirectoriesInDomains(NSDocumentDirectory, NSUserDomainMask, YES); NSString *docsPath = [paths objectAtIndex:0]; NSString *path = [docsPath stringByAppendingPathComponent:@"database.sqlite"]; FMDatabase *database = [FMDatabase databaseWithPath:path];
First, we resolve the path to the documents directory. Be careful, if you don’t need your database to be backed up, use the cache directory instead. When you send a path to the databaseWithPath method of fmdb, it first checks if the database exists, and if not, it creates it. Similarly, we could copy an existing database to the documents directory and source it the exact same way.
Opening The Database And Creating Tables
In order to perform any action on the database, it must first be opened. Here is the code to open the database and create a users table. Don’t worry about closing it right now, we will do that when we are all done.
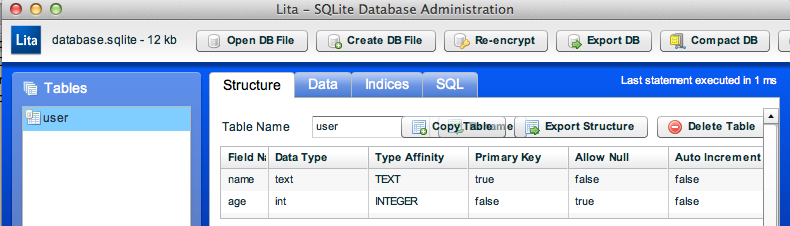
[database open];
[database executeUpdate:@"create table user(name text primary key, age int)"];
Here we first call the open method of the database to open it. Next, we use the executeUpdate method to create the table. Make sure you use this method and not executeQuery when creating a table. This is a common error. The database should look like this after our update:
After we are all done here we close the database.
Inserting And Deleting Data
Inserting data using sqlite is very straight forward. You can either build your strings and pass them in directly OR use the sqlite format using “?’s” and letting fmdb do the work. Below is an example of each:
// Building the string ourself
NSString *query = [NSString stringWithFormat:@"insert into user values ('%@', %d)",
@"brandontreb", 25];
[database executeUpdate:query];

// Let fmdb do the work
[database executeUpdate:@"insert into user(name, age) values(?,?)",
@"cruffenach",[NSNumber numberWithInt:25],nil];
Generally, the second route is preferred as fmdb will do some of the sanitizing for your (such as add slashes to single quotes).
Now that we have some data in our database, let’s delete it. The following code will delete all users with an age of 25:
[database executeUpdate:@"delete from user where age = 25"];
And that should remove both of the records that we inserted.
Querying The Database
Querying the database is a bit more tricky than inserting and deleting. FMDB has some great utility methods for helping us out in certain circumstances, but for this tutorial, we will assume the don’t exist and show you how to fetch data out. If you are following along in a sample application, put this code before your delete code (so that we actually have some data to work with).
Below is an example of fetching all users from the database:
FMResultSet *results = [database executeQuery:@"select * from user"];
while([results next]) {
NSString *name = [results stringForColumn:@"name"];
NSInteger age  = [results intForColumn:@"age"];
NSLog(@"User: %@ - %d",name, age);
}
[database close];
We first query the database using the
executeQuery method. This returns to us an FMResultsSet. Next we start a while loop that continues while there are results to be retrieved and fetch out each of our data points. Finally, we just print out each user. And finally, our database gets close…
Conclusion
This concludes our sqlite using fmdb tutorial. As always, if you have any questions, please leave them here or write me on twitter.
You can download the source for this tutorial here
Happy iCoding!
没有评论:
发表评论