I know I know, Documentation is a bad bad word, especially for us creative people. The true creativity is in writing code, not in writing comments, isn’t it?
Well, regardless, you might find yourself in the situation that you want other people to reuse your code. Or better yet, a different self of you in a year should be able to understand your line of reasoning of today. If you do programming for a longer time you will pass the phase of being shocked at how bad your code was and then get into the phase of having no idea what you where thinking. So a liberal sprinkling of comments can help you get up to speed on your old code.
I invented a technique of chewing on a portion of a programming puzzle where you comment almost every line of code as if you were to explain to somebody the steps in your ingenious approach. Maybe somebody else coined a term for this, for me it helps me sort my thoughts. And probably will do the same a year or ten from now. So commenting comes naturally to me, Documentation by Comment-ation is a logical extension to the concept.
Readability
Apple has nicely written documentation for their APIs though their process of creating it is hard to duplicate for us solo or small team developers. Apple has an entire department that writes the documentation the “Apple Developer Publications Department”, googling for them you can even find a two-year-old style guide for writers. Just consider this quote from it on page 6 just to see how much over our heads this “proper documenting” is:
“In general, follow the style and usage rules in:
- The American Heritage Dictionary
- The Chicago Manual of Style
- Words into Type
Exceptions to certain guidelines in these resources are noted in this guide.
In cases where reference sources conflict with each other, follow:
- The Chicago Manual of Style for questions of style and usage
- The American Heritage Dictionary for questions of spelling
Also refer to any department-specific materials provided by your editor.”
No way I’m going to start perusing a dictionary for my comments! And I guess neither will you…
Apple apparently is using the RenderX XEP engine to convert their own XML documentation to the nice PDF and HTML output you see online today. That’s the second reason why their process is out of reach for us.
Enter AppleDoc
One-person company Gentle Bytes saw our need for a simple and usable way to generate nice-to-look-at documentation from source code comments. So he started the AppleDoc open-source project in or around April 2009. It’s grown over 2 years and in January 2011 the version got bumped to 2.0. This is finally a full rewrite that no longer depends on Doxygen to parse the source code.
AppleDoc works such that it parses your source code and assembles the source comments in a structure strikingly similar to what we are used to from Apple. There is documentation as to how to construct your comments but I found it not very intuitive. So let me give you an overview and tutorial here as to what I learned to help you get up to speed as quickly as possible on using AppleDoc yourself.
Setup
You need to clone the AppleDoc Xcode project from github and build the command line tool. I assume that you have previously set up github on your development machine.
git clone git://github.com/tomaz/appledoc.git cd appledoc open appledoc.xcodeproj |
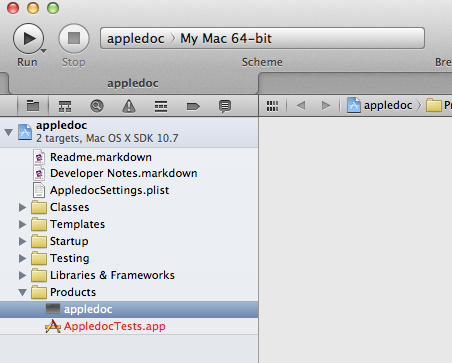
In Xcode switch to the appledoc target and build it. You will see the appledoc entry in the Products group turn black.
Copy the appledoc command line utility to any folder in your path, I put it in /usr/local/bin. This way it is available regardless of what your current working directory is. To see that this is working and to see the appledoc help you can do “appledoc –help”.
Commenting Correctly
AppleDoc requires that you adhere to a certain style of commenting that is slightly different from the standard C comments you are used to, namely /* comment */ and // single line.
Classes and Categories
For every class or category that you are documenting, add one or more paragraphs of comments describing what the class is used for. This goes between the imports and the interface in the header file.
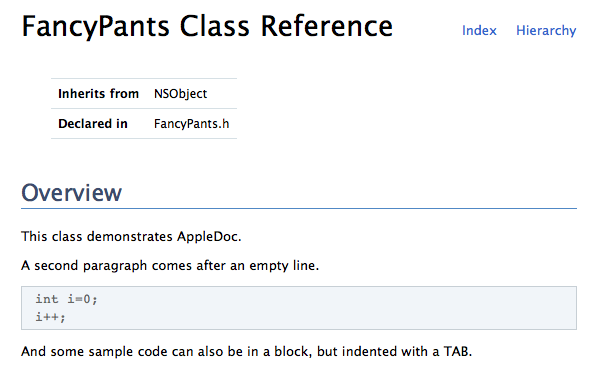
/** This class demonstrates AppleDoc.

A second paragraph comes after an empty line.

int i=0;
i++;

And some sample code can also be in a block, but indented with a TAB.
*/ |
Note the second asterisk on the opening of the comment. Paragraphs are separated by an empty line. All this text is parsed as markdown syntax, the inventor Gruber has an introduction. You can have sample code in the text as well, in it’s own block and indented with a tabulator. The above turns into a nicely formatted Overview section.
AppleDoc automatically turns anything looking like an Objective-C method into a cross-reference. That’s usually what we want, but will get you some warnings if you reference external classes in a sample block. See below how you can solve that.
Methods
The comment block before a method (again in header) will be turned into the description 0f the method. The default behavior is to use the first paragraph for the short description and all paragraphs for the “Discussion”. I disabled this repeating of the first paragraph because I find that it looks weird to have the same text twice, not like Apple.
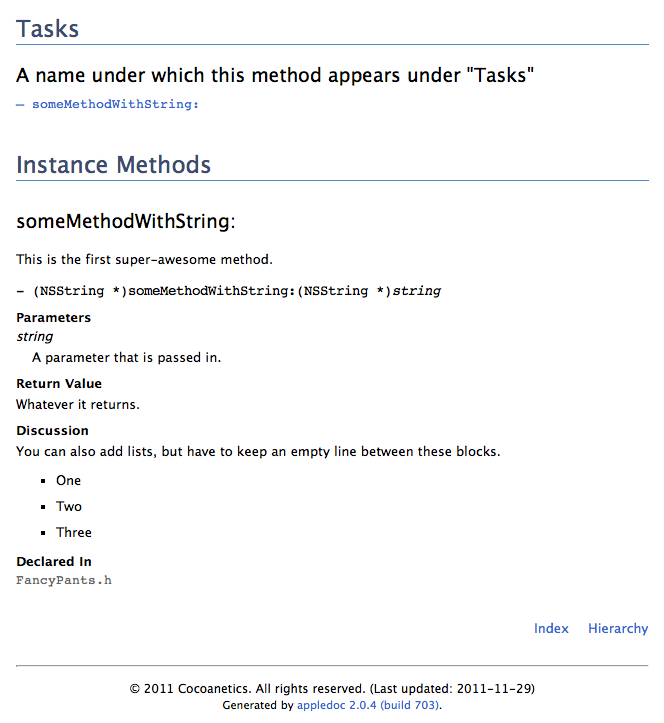
/**--------------------------------------------------------------------------------------- * @name A name under which this method appears under "Tasks" * --------------------------------------------------------------------------------------- */ /** This is the first super-awesome method. You can also add lists, but have to keep an empty line between these blocks. - One - Two - Three @param string A parameter that is passed in. @return Whatever it returns. */ - (NSString *)someMethodWithString:(NSString *)string; |
The comment block with the @name serves for the grouping of methods in the “Tasks” section at the beginning of the page for the class/category. You should group similar methods under one such section, you don’t have to repeat it because the @name is good until the next one. You see that you can also have lists (numbered or not). You need an @param for each parameter of the method. If it has a non-void return value then you also need an @return to describe that. Omitting any of these will get you a warning.
You see that the first paragraph of the description ended up at the top, the rest of it including the list went to the Discussion part.
Some more bells and whistles are possible, shown here:
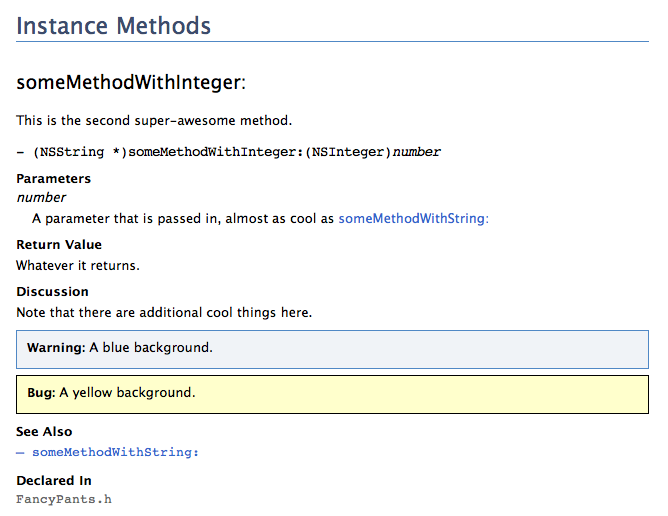
/** This is the second super-awesome method. Note that there are additional cool things here, like [direct hyperlinks](http://www.cocoanetics.com) @param number A parameter that is passed in, almost as cool as someMethodWithString: @return Whatever it returns. @see someMethodWithString: @warning *Warning:* A blue background. @bug *Bug:* A yellow background. */ - (NSString *)someMethodWithInteger:(NSInteger)number; |
This shows cross references inline and via the @see tag. For external hyperlinks you put the link words in square brackets, the link itself in round ones. Finally you have a choice of blue or yellow box for warnings/notices.
Unfortunately there is no support for constants, enums and other things you might want to put in your headers, but it’s being worked on as we speak. For now you should probably put the possible values for an typedef’d enum in a simple list.
Building the Docset and HTML
Once you have added sufficient commentary as outline above you will want to build the documentation. AppleDoc primarily builds docsets which are essentially bundles with a bunch of HTML and xml index files. These docsets integrate with your Xcode for easy browsing and searching.
It took me quite a bit of tweaking until I got the parameters right to get the output I wanted. Also there are apparently some bugs that manifest themselves if you have some switches in the wrong oder. For quick building I set up a Documentation target where I added a “Run Script” build phase to execute this script. This would just as well work in a separate shell script, though you’d have to substitute the actual path for the PROJECT_DIR.
/usr/local/bin/appledoc \
--project-name "DTFoundation" \
--project-company "Cocoanetics" \
--company-id "com.cocoanetics" \
--docset-atom-filename "DTFoundation.atom" \
--docset-feed-url "http://cocoanetics.github.com/DTFoundation/%DOCSETATOMFILENAME" \
--docset-package-url "http://cocoanetics.github.com/DTFoundation/%DOCSETPACKAGEFILENAME" \
--docset-fallback-url "http://cocoanetics.github.com/DTFoundation/" \
--output "~/help" \
--publish-docset \
--logformat xcode \
--keep-undocumented-objects \
--keep-undocumented-members \
--keep-intermediate-files \
--no-repeat-first-par \
--no-warn-invalid-crossref \
--ignore "*.m" \
--ignore "LoadableCategory.h" \
--index-desc "${PROJECT_DIR}/readme.markdown" \
"${PROJECT_DIR}" |
Here are my reasons for the various switches:
- project-name, project-company and company_id are standard
- the atom filename and the urls are necessary to let the docset know where it can get an update
- the output directory should be a place outside of your Xcode project. I found that having the generated documentation inside a github project does not make sense.
- publish-docset causes AppleDoc to generate the Atom feed and xar archive file
- logformat-xcode makes the output compatible with Xcode so that you get inline warnings
- keep-intermediate-files is necessary to preserve the original HTML output which you can put on your server for online reading
- no-repeate-first-par is the setting that does not duplicate the first paragraph into the discussion section
- no-warn-invalid-crossref omits the annoying warnings that you get when AppleDoc cannot find a reference to class or method
- we’re ignoring the .m files because otherwise AppleDoc would also try to get comments from these. We only want the comments from headers used also we don’t want the documentation say that a method was defined in the .h and the .m files which is unlike Apple.
- the LoadableCategory.h is another file we explicitly need to ignore, it is a dummy class that forces the linker to also load certain tagged categories. No use having that in the documentation.
- the index-desc is the path to a markdown file which additionally gets injected into the index page
The last switch is of special interest. Without it the index page of the docset is relatively barren. But since all of AppleDoc is based on markdown you can also re-purpose the readme file you usually have in the project root of your project as an introduction to the project. Write once, reuse: I’m loving it!
Publishing
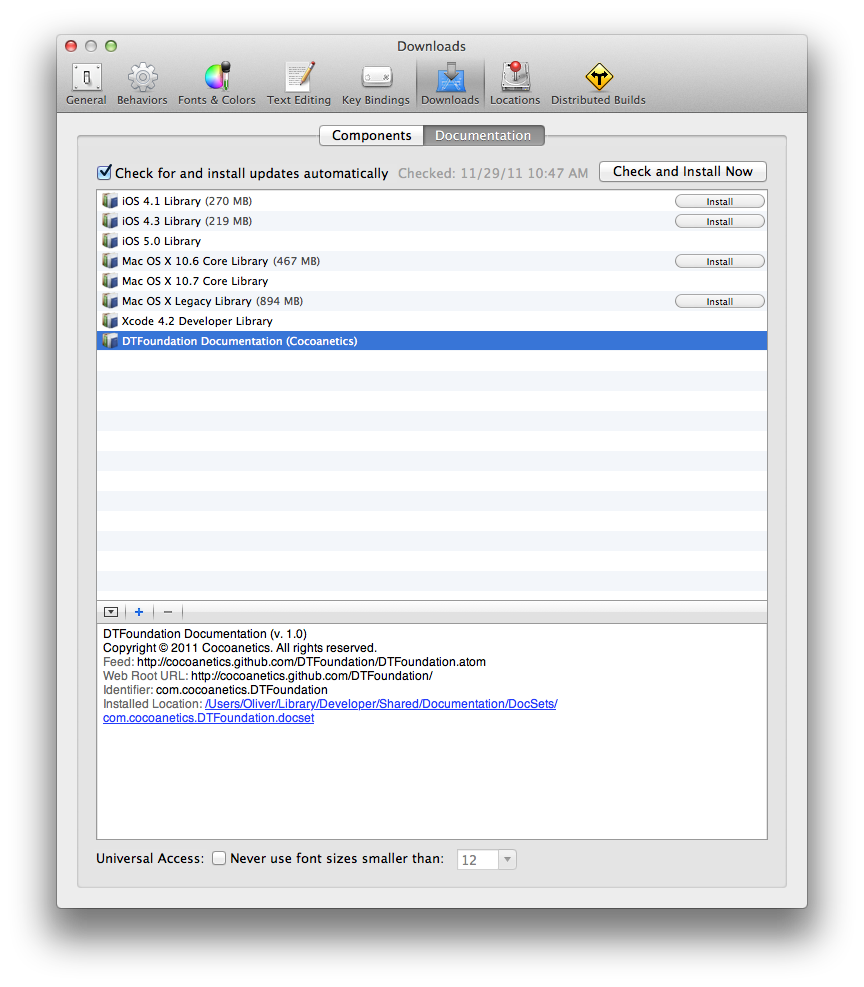
AppleDoc will also install a generated docset into the same location where Apple’s docsets are residing. You can see these and install new ones via Xcode preferences, Downloads, Documentation tab.
You can add docsets on this screen via the plus button and by specifying the URL of the Atom feed. Remember, AppleDoc can generate this feed for you. If you leave the generated output in the publish folder around and update the project version then AppleDoc will add the new version to the feed file. So all you need is to copy the xar and the atom files to your web server after making sure that you specified the URLs correctly. This way somebody only needs to have the URL of the atom feed to install the docset.
The contents of the html folder in your output directory contain a full HTML site for the entire documentation. You can upload that to your web site as well, it is essentially the same content as in the docset. If you do, then people can browse the documentation outside of Xcode and you can also specify the URL there as fallback URL in your docset.
GitHub has a mechanism called GitHub Pages which you can enable via the admin area of every project. Once enabled you can put the web server files into a gh-pages branch of your open-source project. I finally got it working as well, but it is a bit weird having to constantly move around between the master and the gh-pages branch.
Conclusion
By adopting the described style of commenting methods and classes/categories you immediately reap the benefit of being able to generate beautiful docsets and HTML documentation. You can also inject your additional markdown files to enhance the index or even going as far as adding custom images and full HTML files. Development on AppleDoc continues – although slowly – and we’re looking forward to getting support for other things we’d like to document: notifications, protocols, enums and constants.
The main advantage of AppleDoc is that the comments also enhance your source code, so that even people without Xcode can read what you wrote. This way other developers benefit because they can look up your methods and see what your thoughts where. Often the availability of documentation is what many people use to decide whether or not they should add a dependency on your library or framework.
Finally it is yourself who will benefit in the long run because your commentary will allow you to understand what you where thinking many years ago. Don’t discount this possibility, we all get older all the time.
没有评论:
发表评论