显示标签为“DevBrief”的博文。显示所有博文

2011年12月8日星期四

How To Make A Multi-Directional Scrolling Shooter Part 1

How To Make A Multi-Directional Scrolling Shooter Part 1:

A while back in the weekly tutorial vote, you guys said you wanted a tutorial on how to make a multi-directional scrolling shooter. Your wish is my command! :]


In this tutorial series, we’ll make a tile-based game where you drive a tank around using the accelerometer. Your goal is to get to the exit, without being blasted by enemy tanks!


To see what we’ll make, check out this video:


In this first part of the series, you’ll get some hands on experience with Cocos2D 2.X, porting it to use ARC, using Cocos2D vector math functions, working with tile maps, and much more!


This tutorial assumes you have some basic knowledge of Cocos2D. If you are new to Cocos2D, you may wish to check out some of the other Cocos2D tutorials on this site first. In particular, you should review the tile-based game tutorial before this tutorial.


Rev up your coding engines, and let’s begin!


Getting Started


We’re going to use Cocos2D 2.X in this project, so go ahead and download it if you don’t have it already.


Double click the tar to unarchive it, then install the templates with the following commands:


cd ~/Downloads/cocos2d-iphone-2.0-beta
./install-templates.sh -f -u

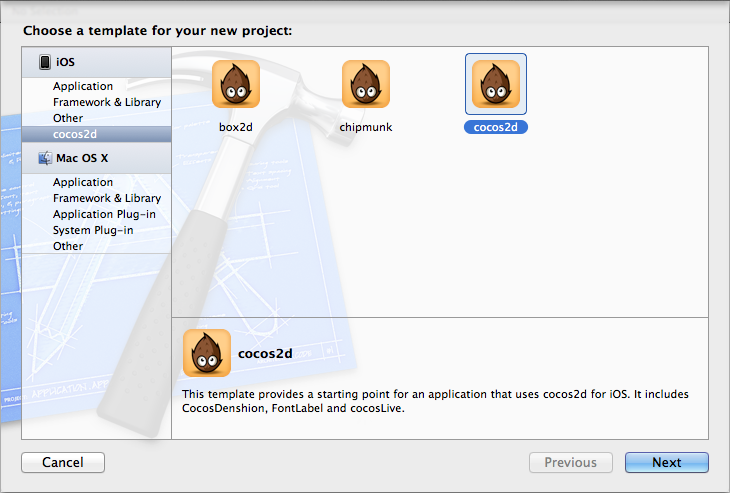
Next create a new project in Xcode with the iOS/cocos2d/cocos2d template, and name it Tanks.


We want to use ARC in this project to make memory management simpler, but by default the template isn’t set up to use ARC. So let’s fix that by performing the following 5 steps:


  1. Control-click the libs folder in your Xcode project and click Delete. Then click Delete again to delete the files permanently. This removes the Cocos2D files from our project – but that’s OK, because we will link in the project separately in a minute. We are doing this so we can set up our project to use ARC (but allow the Cocos2D code to be non-ARC).
  2. Find where you downloaded Cocos2D 2.0 to, and find the cocos2d-ios.xcodeproj inside. Drag that into your project.
  3. Click on your project, select the Tanks target, and go to the Build Phases tab. Expand hte Link Binary With Libraries section, click the + button, select libcocos2d.a and libCocosDenhion.a from the list, and click add.

Linking Cocos2D libs


  1. Click the Build Settings tab and scroll down to the Search Paths section. Set Always Search User Paths to YES, double click User Header Search Paths, and enter in the path to the directory where you’re storing Cocos2D 2.0. Make sure Recursive is checked.

Adding Cocos2D User Header Paths


  1. From the main menu go to Edit\Refactor\Convert to Objective-C ARC. Select all of the files from the dropdown and go through the wizard. It should find no problems, so just finish up the conversion.

And that’s it! Build and run and make sure everything still works OK – you should see the normal Hello World screen.


But you might notice that it’s in portrait mode. We want landscape mode for our game, so open RootViewController.m and make sure shouldAutorotateToInterfaceOrientation looks like the following:


- (BOOL)shouldAutorotateToInterfaceOrientation:(UIInterfaceOrientation)interfaceOrientation {
return ( UIInterfaceOrientationIsLandscape( interfaceOrientation ) );
}


Build and run and now we have a landscape game with the latest and greatest version of Cocos2D 2.0, ARC compatibile. w00t!


Adding the Resources


First things first – download the resources for this project and drag the two folders inside (Art and Sounds) into your project. Make sure “Copy items into destination group’s folder” is checked, and “Create groups for any added folders” is selected, and click Finish.


Here’s what’s inside:


  • Two particle effects I made with Particle Designer – two different types of explosions.
  • Two sprite sheets I made with Texture Packer. One contains the background tiles, and one contains the foreground sprites.
  • A font I made with Glyph Designer that we’ll use in the HUD and game over menu.
  • Some background music I made with Garage Band.
  • Some sound effects I made with cxfr.
  • The tile map itself, which I made with Tiled.

The most important thing here is obviously the tile map. I recommend you download Tiled if you don’t have it already, and use it to open up tanks.tmx to take a look.


A tile map made with Tiled


As you can see, it’s a pretty simple map with just three types of tiles – water, grass, and wood (for bridges). If you right click on the water tile and click Properties, you’ll see that it has a property for “Wall” defined, which we’ll be referring to in code later:


A tile map property defined with Tiled


There’s just one layer (named “Background”), and we don’t add anything onto the map for the sprites like the tanks or the exit – we’ll add those in code.


Feel free to modify this map to your desire! For more info on using Tiled, see our earlier tile-based game tutorial.

Adding the Tile Map and Helpers


Next let’s add the tile map to our scene. As you know, this is ridiculously easy in Cocos2D.


Open HelloWorldLayer.h and add two instance variables into HelloWorldLayer:


CCTMXTiledMap * _tileMap;
CCTMXLayer * _bgLayer;


We’re keeping track of the tile map and the one and only layer inside (the background layer) in these variables, because we’ll need to refer to them often.


Then open HelloWorldLayer.m and replace the init method with the following:


-(id) init
{
if( (self=[super init])) {

_tileMap = [CCTMXTiledMap tiledMapWithTMXFile:@"tanks.tmx"];
[self addChild:_tileMap];

_bgLayer = [_tileMap layerNamed:@"Background"];

}
return self;
}


Here we just create the tile map, add it to the layer, and get a reference to the background layer in the tile map.


Build and run, and you’ll see the bottom left corner of the map:


Bottom left corner of the map


In this game we want to start our tank in the upper left corner. To make this easy, let’s build up a series of helper methods. I use these helper methods in almost any tile-based game app I work on, so you might find these handy to use in your own projects as well.


First, we need some methods to get the height and width of the tile map in points. Add these in HelloWorldLayer.m, above init:


- (float)tileMapHeight {
return _tileMap.mapSize.height * _tileMap.tileSize.height;
}

- (float)tileMapWidth {
return _tileMap.mapSize.width * _tileMap.tileSize.width;
}


The mapSize property on a tile map returns the size in number of tiles (not points) so we have to multiply the result by the tileSize to get the size in points.


Next, we need some methods to check if a given position is within the tile map – and likewise for tile coordinate.


In case you forgot what a tile coordinate is, each tile in the map has a coordinate, starting with (0,0) for the upper left and (99,99) for the bottom right (in our case). Here’s a screenshot from the earlier tile-based game tutorial:

Tile Coordinates in Tiled


So add these methods that will verify positions/tile coordinates right after the tileMapWidth method:


- (BOOL)isValidPosition:(CGPoint)position {
if (position.x < 0 ||
position.y < 0 ||
position.x > [self tileMapWidth] ||
position.y > [self tileMapHeight]) {
return FALSE;
} else {
return TRUE;
}
}

- (BOOL)isValidTileCoord:(CGPoint)tileCoord {
if (tileCoord.x < 0 ||
tileCoord.y < 0 ||
tileCoord.x >= _tileMap.mapSize.width ||
tileCoord.y >= _tileMap.mapSize.height) {
return FALSE;
} else {
return TRUE;
}
}


These should be pretty self-explanitory. Obviously negative positions/coordinates would be outside of the map, and the upper bound is the width/height of the map, in points or tiles respectively.


Next, add methods to convert between positions and tile coordinates:


- (CGPoint)tileCoordForPosition:(CGPoint)position {   

if (![self isValidPosition:position]) return ccp(-1,-1);

int x = position.x / _tileMap.tileSize.width;
int y = ([self tileMapHeight] - position.y) / _tileMap.tileSize.height;

return ccp(x, y);
}

- (CGPoint)positionForTileCoord:(CGPoint)tileCoord {

int x = (tileCoord.x * _tileMap.tileSize.width) + _tileMap.tileSize.width/2;
int y = [self tileMapHeight] - (tileCoord.y * _tileMap.tileSize.height) - _tileMap.tileSize.height/2;
return ccp(x, y);

}


The first method converts from a position to a tile coordinate. Converting the x coordinate is easy – it just divides the number of points by the points per tile (discarding the fraction) to get the tile number it’s inside. The y coordinate is similar, except it first has to subtract the y value from the tile map height to “flip” the y value, because positions have 0 at the bottom, but tile coordinates have 0 at the top.


The second method does the oppostie – tile coordinate to position. This is pretty much the same idea, but notice that there are a lot of potential points inside a tile that this method could return. We choose to return the center of the tile here, because that works nicely with Cocos2D since you often want to place a sprite at the center of a tile.


Now that we have this handy library built up, we can now build a routine to allow scrolling the map to center something (namely our tank) within the view. Add this next:


-(void)setViewpointCenter:(CGPoint) position {

CGSize winSize = [[CCDirector sharedDirector] winSize];

int x = MAX(position.x, winSize.width / 2 / self.scale);
int y = MAX(position.y, winSize.height / 2 / self.scale);
x = MIN(x, [self tileMapWidth] - winSize.width / 2 / self.scale);
y = MIN(y, [self tileMapHeight] - winSize.height/ 2 / self.scale);
CGPoint actualPosition = ccp(x, y);

CGPoint centerOfView = ccp(winSize.width/2, winSize.height/2);
CGPoint viewPoint = ccpSub(centerOfView, actualPosition);

_tileMap.position = viewPoint;

}


The easiest way to explain this is through a picture:


Tile Map Scrolling


To make a given point centered, we move the tile map itself. If we subtract our “goal” position from the center of the view, we’ll get the “error” and we can move the map that amount.


The only tricky part is there are certain points we shouldn’t be able to set in the center. If we try to center the map on a position less than half the window size, then empty “black” space would be visible to the user, which isn’t very nice. Same thing for if we try to center a position on the very top of the map. So these checks take care of that.


Now that we have the helper methods in place, let’s try it out! Add the following inside the init method:


CGPoint spawnTileCoord = ccp(4,4);
CGPoint spawnPos = [self positionForTileCoord:spawnTileCoord];
[self setViewpointCenter:spawnPos];


Build and run, and now you’ll see the upper left of the map – where we’re about to spawn our tank!


Upper left of the map


Adding the Tank


Time to add our hero into the mix!


Create a new file with the iOS\Cocoa Touch\Objective-C class template, enter Tank for the class, and make it a subclass of CCSprite. Then open Tank.h and replace it with the following:


#import "cocos2d.h"
@class HelloWorldLayer;

@interface Tank : CCSprite {
int _type;
HelloWorldLayer * _layer;
CGPoint _targetPosition;
}

@property (assign) BOOL moving;
@property (assign) int hp;

- (id)initWithLayer:(HelloWorldLayer *)layer type:(int)type hp:(int)hp;
- (void)moveToward:(CGPoint)targetPosition;

@end


Let’s cover the instance variablers/properties inside this class:


  • type: We have two types of tanks, so this is either 1 or 2. Based on this we can select the proper sprites.
  • layer: We’ll need to call some methods in the layer later on from within the tank class, so we store a reference here.
  • targetPosition: The tank always has a position it’s trying to move toward. We store that here.
  • moving: Keeps track of whether the tank is currently trying to move or not.
  • hp: Keeps track of the tank’s HP, which we’ll be using later.

Next open Tank.m and replace it with the following:


#import "Tank.h"
#import "HelloWorldLayer.h"

@implementation Tank
@synthesize moving = _moving;
@synthesize hp = _hp;

- (id)initWithLayer:(HelloWorldLayer *)layer type:(int)type hp:(int)hp {

NSString *spriteFrameName = [NSString stringWithFormat:@"tank%d_base.png", type];   
if ((self = [super initWithSpriteFrameName:spriteFrameName])) {
_layer = layer;
_type = type;
self.hp = hp;    
[self scheduleUpdateWithPriority:-1];
}
return self;
}

- (void)moveToward:(CGPoint)targetPosition {   
_targetPosition = targetPosition;                   
}

- (void)updateMove:(ccTime)dt {

// 1
if (!self.moving) return;

// 2
CGPoint offset = ccpSub(_targetPosition, self.position);
// 3
float MIN_OFFSET = 10;
if (ccpLength(offset) < MIN_OFFSET) return;

// 4
CGPoint targetVector = ccpNormalize(offset);   
// 5
float POINTS_PER_SECOND = 150;
CGPoint targetPerSecond = ccpMult(targetVector, POINTS_PER_SECOND);
// 6
CGPoint actualTarget = ccpAdd(self.position, ccpMult(targetPerSecond, dt));

// 7
CGPoint oldPosition = self.position;
self.position = actualTarget; 

}

- (void)update:(ccTime)dt {   
[self updateMove:dt];       
}

@end


The initializer is pretty straightforward – it just squirrels away the variables passed in, and schedules an update method to be called. You might not have known that you can schedule an update method on any CCNode – but now you do! :] And note the priority is set to -1, because we want this update to run BEFORE the layer’s update (which is run at the default priority of 0).


moveToward just updates the target position – updateMove is where all the action is, and this is called once per frame. Let’s go over what this method does bit by bit:


  1. If moving is false, just bail. Moving will be false when the app first begins.
  2. Subtract the current position from the target position, to get a vector that points in the direction of where we’re going.
  3. Check the length of that line, and see if it’s less than 10 points. If it is, we’re “close enough” and we just return.
  4. Make the directional vector a unit vector (length of 1) by calling ccpNormalize. This makes it easy to make the line any length we want next.
  5. Multiply the vector by however fast we want the tank to travel in a second (150 here). The result is a vector in points/1 second the tank should travel.
  6. This method is being called several times a second, so we multiply this vector by the delta time (around 1/60 of a second) to figure out how much we should actually travel.
  7. Set the position of the tank to what we figured out. We also keep track of the old position in a local variable, which we’ll use soon.

Now let’s put our new tank class to use! Make the following changes to HelloWorldLayer.h:


// Before the @interface
@class Tank;

// After the @interface
@property (strong) Tank * tank;
@property (strong) CCSpriteBatchNode * batchNode;


And the following changes to HelloWorldLayer.m:


// At the top of the file
#import "Tank.h"

// Right after the @implementation
@synthesize batchNode = _batchNode;
@synthesize tank = _tank;

// Inside init
_batchNode = [CCSpriteBatchNode batchNodeWithFile:@"sprites.png"];
[_tileMap addChild:_batchNode];
[[CCSpriteFrameCache sharedSpriteFrameCache] addSpriteFramesWithFile:@"sprites.plist"];

self.tank = [[Tank alloc] initWithLayer:self type:1 hp:5];
self.tank.position = spawnPos;
[_batchNode addChild:self.tank];

self.isTouchEnabled = YES;
[self scheduleUpdate];

// After init
- (void)ccTouchesBegan:(NSSet *)touches withEvent:(UIEvent *)event {

UITouch * touch = [touches anyObject];
CGPoint mapLocation = [_tileMap convertTouchToNodeSpace:touch];

self.tank.moving = YES;
[self.tank moveToward:mapLocation];

}

- (void)ccTouchesMoved:(NSSet *)touches withEvent:(UIEvent *)event {

UITouch * touch = [touches anyObject];
CGPoint mapLocation = [_tileMap convertTouchToNodeSpace:touch];

self.tank.moving = YES;
[self.tank moveToward:mapLocation];

}

- (void)update:(ccTime)dt {

[self setViewpointCenter:self.tank.position];

}


Nothing too fancy here – we create a batch node for the sprites and add it as a child of the tile map (so that we can scroll the tile map and have the sprites in the batch node scroll along with it).


We then create a tank and add it to the batch node. We set up touch routines to call the moveToward method we wrote earlier, and on each update keep the view centered on the tank.


Build and run, and now you can tap the screen to scroll your tank all around the map, in any direction!


Checking for Walls


So far so good, except there’s one major problem – our tank can roll right across the water! This tank does not have the submersive upgrade yet, so we have to nerf him a bit :]


To do this we need to add a couple more helper methods to HelloWorldLayer.h. Add these methods right above init:


-(BOOL)isProp:(NSString*)prop atTileCoord:(CGPoint)tileCoord forLayer:(CCTMXLayer *)layer {
if (![self isValidTileCoord:tileCoord]) return NO;
int gid = [layer tileGIDAt:tileCoord];
NSDictionary * properties = [_tileMap propertiesForGID:gid];
if (properties == nil) return NO;  
return [properties objectForKey:prop] != nil;
}

-(BOOL)isProp:(NSString*)prop atPosition:(CGPoint)position forLayer:(CCTMXLayer *)layer {
CGPoint tileCoord = [self tileCoordForPosition:position];
return [self isProp:prop atTileCoord:tileCoord forLayer:layer];
}

- (BOOL)isWallAtTileCoord:(CGPoint)tileCoord {
return [self isProp:@"Wall" atTileCoord:tileCoord forLayer:_bgLayer];
}

- (BOOL)isWallAtPosition:(CGPoint)position {
CGPoint tileCoord = [self tileCoordForPosition:position];
if (![self isValidPosition:tileCoord]) return TRUE;
return [self isWallAtTileCoord:tileCoord];
}

- (BOOL)isWallAtRect:(CGRect)rect {
CGPoint lowerLeft = ccp(rect.origin.x, rect.origin.y);
CGPoint upperLeft = ccp(rect.origin.x, rect.origin.y+rect.size.height);
CGPoint lowerRight = ccp(rect.origin.x+rect.size.width, rect.origin.y);
CGPoint upperRight = ccp(rect.origin.x+rect.size.width, rect.origin.y+rect.size.height);

return ([self isWallAtPosition:lowerLeft] || [self isWallAtPosition:upperLeft] ||
[self isWallAtPosition:lowerRight] || [self isWallAtPosition:upperRight]);
}


These are just helper methods we’ll use to check if a given tile coordinate/position/rectangle has the “Wall” property. I’m not going to go over these because they are just review from our earlier tile-based game tutorial.

Open up HelloWorldLayer.h and predeclare all of these methods so we can access them from outside the class if we want:


- (float)tileMapHeight;
- (float)tileMapWidth;
- (BOOL)isValidPosition:(CGPoint)position;
- (BOOL)isValidTileCoord:(CGPoint)tileCoord;
- (CGPoint)tileCoordForPosition:(CGPoint)position;
- (CGPoint)positionForTileCoord:(CGPoint)tileCoord;
- (void)setViewpointCenter:(CGPoint) position;
- (BOOL)isProp:(NSString*)prop atTileCoord:(CGPoint)tileCoord forLayer:(CCTMXLayer *)layer;
- (BOOL)isProp:(NSString*)prop atPosition:(CGPoint)position forLayer:(CCTMXLayer *)layer;
- (BOOL)isWallAtTileCoord:(CGPoint)tileCoord;
- (BOOL)isWallAtPosition:(CGPoint)position;
- (BOOL)isWallAtRect:(CGRect)rect;


Then make the following changes to Tank.m:


// Add right before updateMove
- (void)calcNextMove {

}

// Add at bottom of updateMove
if ([_layer isWallAtRect:[self boundingBox]]) {
self.position = oldPosition;
[self calcNextMove];
}


The new code in updateMove checks to see if we’ve moved into a position that is colliding with a wall. If it does, it moves back to the old position and calls calcNextMove. Right now this method does absolutely nothing, but later on we’ll override this in a subclass.


Build and run, and now you should no longer be able to sail across the sea!


Adding Accelerometer Support


For this game, we don’t actually want to move the tank by tapping, because we want to be able to shoot wherever the user taps.


So to move the tank, we’ll use the accelerometer for input. Add these new methods to HelloWorldLayer.m:


- (void)onEnterTransitionDidFinish {

self.isAccelerometerEnabled = YES;

}

- (void)accelerometer:(UIAccelerometer *)accelerometer
didAccelerate:(UIAcceleration *)acceleration {

#define kFilteringFactor 0.75
static UIAccelerationValue rollingX = 0, rollingY = 0, rollingZ = 0;

rollingX = (acceleration.x * kFilteringFactor) +
(rollingX * (1.0 - kFilteringFactor));   
rollingY = (acceleration.y * kFilteringFactor) +
(rollingY * (1.0 - kFilteringFactor));   
rollingZ = (acceleration.z * kFilteringFactor) +
(rollingZ * (1.0 - kFilteringFactor));

float accelX = rollingX;
float accelY = rollingY;
float accelZ = rollingZ;

CGPoint moveTo = _tank.position;
if (accelX > 0.5) {
moveTo.y -= 300;
} else if (accelX < 0.4) {
moveTo.y += 300;
}
if (accelY < -0.1) {
moveTo.x -= 300;
} else if (accelY > 0.1) {
moveTo.x += 300;
}
_tank.moving = YES;
[_tank moveToward:moveTo];

//NSLog(@"accelX: %f, accelY: %f", accelX, accelY);

}


We set isAccelerometerEnabled in onEnterTransitionDidFinish (I had trouble getting it to work if I put it in init because the scene wasn’t “running” at that point).


The first part of this method comes directly from Apple sample code, to filter the accelerometer values so it’s not so “jiggly”. Don’t worry if you don’t understand this, all you really need to know is that it makes things more smooth. If you’re insatiably curious, this is called a high-pass filter, and you can read about it on Wikipedia’s high pass filter entry.


We check the acceleration in the x and y axis, and set the move target for the tank based on that.


That’s it – build and run (make sure your home button is to your left), and now you should be able to move your tank around the map with the accelerometer!


Gratuituous Music


I can’t leave ya guys hanging without some gratuituous music! :] Just make the following mods to HelloWorldLayer.m:


// Add to top of file
#import "SimpleAudioEngine.h"

// Add to end of init
[[SimpleAudioEngine sharedEngine] playBackgroundMusic:@"bgMusic.caf"];
[[SimpleAudioEngine sharedEngine] preloadEffect:@"explode.wav"];
[[SimpleAudioEngine sharedEngine] preloadEffect:@"tank1Shoot.wav"];
[[SimpleAudioEngine sharedEngine] preloadEffect:@"tank2Shoot.wav"];


Build and run, and enjoy some groovy tunes as you explore! :]


Where To Go From Here?


Here is an example project with all of the code form the tutorial series so far.


Stay tuned for the rest of the series, where we’ll start adding shooting, enemies, and action!


In the meantime, if you have any questions or comments on the tutorial so far, please join the forum discussion below!


How To Make A Multi-Directional Scrolling Shooter Part 1 is a post from: Ray Wenderlich

2011年11月29日星期二

Building a Caterpillar Game with Cocos2D

Building a Caterpillar Game with Cocos2D:
This entry is part 1 of 2 in the series Build a Caterpillar Game with Cocos2D

In this series, we will be recreating the popular Atari game Centipede using the Cocos2D game engine for iOS. Centipede was originally developed for Atari and released on the Arcade in 1980. Since then, it has been ported to just about every platform imaginable. For our purposes, we will be calling the game Caterpillar.


Series Overview


This series will focus heavily on utilizing all that Cocos2D has to offer to create a complete game from start to finish. We will also be using some other tools such as Texture Packer to help us along the way. By the end of this series, you will have a fully functional Centipede clone containing graphics, simple animations, user interaction, artificial intelligence, game logic, and audio.


Caterpillar HD, the project this series teaches you to build, is a real game available on the iTunes App Store for free. So, the best way to see what this series is all about is to download the game and try it out for yourself!


Organization of the Series


This series is organized into 6 separate parts that will be released over the coming month or so.


  • Part 1 – We will be focused on getting your assets and Cocos2D project set up. I will show you how to use Texture Packer to prepare your assets as well as how to start a new Cocos2D project, load the assets, and start the title screen.
  • Part 2 – In this section, we will be setting up the game area. This will include getting all of the sprites into place and learning how to draw the game board.
  • Part 3 – We will be building our basic caterpillar and getting it to move across the screen.
  • Part 4 – This will be the most in-depth section. It will be all about the Caterpillar’s artificial intelligence and how it interacts with the world. Bring your thinking caps to this one.
  • Part 5 – At some point, we need to make the game playable by someone. This section focuses on player interaction and the missile object used to kill the caterpillar. After this section, it will really start feeling like a game.
  • Part 6 – In this wrap up of the series, we put on the polish with game audio, scoring, and restart conditions.


Step 1: Getting Cocos2D


Before you begin, you need to download and install a couple tools. The first is the Cocos2D game engine. You can obtain it from their website at http://cocos2d-iphone.org/download.


Once downloaded, you need to install their Xcode templates. This will make your life much easier in the future when you want to set up a project using Cocos2D. Here is their tutorial on how to do that. Don’t worry, this is really simple: just download the template tarball and then untar it in ~/Library/Developer/Xcode/Templates on your machine. The next time you open Xcode and create a new project, you should see a Templates category with several Cocos2D options.


Step 2: Texture Packer


Texture Packer is a fantastic tool that will take a set of textures, turn them into a single texture, and output a plist that tells Cocos2D how to use them. Having a single texture can save you quite a bit of disk space, load time, and complexity.


To get started, download Texture Packer from http://texturepacker.com. You can use the demo version for this tutorial but I strongly recommend purchasing this tool. It is well worth the money!


Importing Assets Into Texture Packer


Start by downloading the attachment for this tutorial. It contains both the standard and high definition versions of our images. Remember, the iPhone 3GS is free now, so there are still plenty of users not using retina display devices. Let’s not leave them out. ;)


Being that we have 2 separate versions of our images, you will need to perform this process twice. Simply drag all of the images in the HD folder except title-hd.png and game-over-hd.png into Texture Packer. It will be clear later why we are not including these two images.


Exporting Assets Out Of Texture Packer


Texture Packer will automatically lay out the images for you and create a single image that is as small as it can possibly be. Note that Cocos2D requires all image dimensions to be supplied in powers of 2.


Now that the images have been laid out, click the Publish button at the top. Name the output caterpillar-hd. Make sure to clear the images from Texture Packer and repeat this process for all of the standard definition images in the sd folder and name their output caterpillar.


You should now see a total of 4 files: caterpillar-hd.png, caterpillar-hd.plist, caterpillar.png, and caterpillar.plist.


Step 3: Creating A New Cocos2D Project


Open Xcode and create a new Cocos2D application. This should appear in your new project menu after installing the templates mentioned above.


New Cocos2D Project

Name this project Caterpillar and Xcode will set up everything needed to start a basic project.


Step 4: The Game Scene


Cocos2D uses movie terminology to organize their objects (Director, Scene, etc…). The director is responsible for running and maintaining all of the scenes within the application.


Before we go any further, drag all of the caterpillar files that you created in the previous section into your project, as well as the few stragglers (title.png, title-hd.png, game-over.png, game-over-hd.png). Make sure to check the box to copy the files into your project directory.


By default, you are provided with a new scene and layer called HelloWorldLayer. Since we will be creating our own scene, we don’t need this in our project. Simply delete both the .h and .m files.


Create a new file that is a subclass of CCLayer called GameLayer. Paste in the following code for GameLayer.h.


#import &amp;quot;cocos2d.h&amp;quot;

@interface GameLayer : CCLayer {

}

@property(nonatomic, retain) CCSpriteBatchNode *spritesBatchNode;

+ (CCScene *) scene;

@end

This is basically the same content that was in the HelloWorldLayer with names changed to GameLayer and the additon of the spriteBatchNode property.


In Cocos2D, a CCSpriteBatchNode allows us to group all of our sprites up so that OpenGL ES displays them in a single call. OpenGL ES is essentially a state machine, and switching between states is often very costly, so you will want to do it as infrequently as possibly. You can have Cocos2D draw all of your sprites without a CCSpriteBatchNode, however you are not guaranteed when they will be drawn, therefore affecting performance.


The scene method is simply a class level method that will return a singleton instance of our GameScene. This will only be called when telling the director to start our game. We will see the implementation of that in a later section.


Open up GameLayer.m and add the following code:


#import &amp;quot;GameLayer.h&amp;quot;

@implementation GameLayer

@synthesize spritesBatchNode = _spritesBatchNode;

+(CCScene *) scene {
CCScene *scene = [CCScene node];

GameLayer *layer = [GameLayer node];

[scene addChild: layer];

return scene;
}

- (void) dealloc {
[_spritesBatchNode release];
[super dealloc];
}

-(id) init {
if( (self=[super init])) {

[CCTexture2D setDefaultAlphaPixelFormat:kCCTexture2DPixelFormat_RGBA4444];

// 1.
self.spritesBatchNode = [CCSpriteBatchNode batchNodeWithFile:@&amp;quot;caterpillar.png&amp;quot;];
[self addChild:self.spritesBatchNode];
// 2.
[[CCSpriteFrameCache sharedSpriteFrameCache] addSpriteFramesWithFile:@&amp;quot;caterpillar.plist&amp;quot;];

[CCTexture2D setDefaultAlphaPixelFormat:kCCTexture2DPixelFormat_RGB565];
// 3.
CCSprite * background = [CCSprite spriteWithSpriteFrameName:@&amp;quot;background.png&amp;quot;];
background.anchorPoint = ccp(0,0);
[self.spritesBatchNode addChild:background];

[CCTexture2D setDefaultAlphaPixelFormat:kCCTexture2DPixelFormat_Default];

}
return self;
}
@end

Starting with the scene method, we see all of the boilerplate code to initialize the main layer for this scene. We call the node method of our layer which initializes and returns it back to the caller. Finally the instantiated scene is returned. You will see code exactly like this in every scene that you create.


The init method is where we are going to be doing all of our setup for our game and loading the main spritesheet into memory.


  1. Is where we initialize our CCSpriteBatchNode object with our caterpillar.png sprite sheet file. It will also look for a file of the same name with a .plist extention in order to determine how to use the file.
  2. After the sprite sheet is loaded, we add all of the sprites to Cocos2D’s CCSpriteFrameCache. This caches the sprites so that when we want to use them over and over again, we don’t have to re-source them from disk. I strongly encourage using the cache here as it will drastically improve performance.
  3. Now we are able to fetch sprites out of the cache based on their original file names. This is thanks to the caterpillar.plist file informing Cocos2D of the mappings (I told you Texutre Packer was handy). In this case, we fetch the background out of the cache and add it as a child to our layer at position 0,0 (starting from the top left corner). This will display our game background.


Step 5: The Title Scene


Before we can begin playing our game, we need to present our title screen to the player. To do this, you must create another new file that is a subclass of CCLayer called TitleLayer.


The file TitleLayer.h is very straight forward. Add the following code:


#import &amp;quot;cocos2d.h&amp;quot;

@interface TitleLayer : CCLayer
+(CCScene *) scene;
@end

The only thing we added was the declaration for the scene method. Now, open up TitleLayer.m and add the following code:


#import &amp;quot;TitleLayer.h&amp;quot;
#import &amp;quot;GameLayer.h&amp;quot;
#import &amp;quot;CCTransition.h&amp;quot;

@implementation TitleLayer

+(CCScene *) scene {
CCScene *scene = [CCScene node];

TitleLayer *layer = [TitleLayer node];

[scene addChild: layer];

return scene;
}

-(id) init {
if( (self=[super init])) {
[CCTexture2D setDefaultAlphaPixelFormat:kCCTexture2DPixelFormat_RGB565];
// 1
CCSprite * background = [CCSprite spriteWithFile:@&amp;quot;title.png&amp;quot;];
background.anchorPoint = ccp(0,0);
[self addChild:background];

// 2
[[CCTouchDispatcher sharedDispatcher] addTargetedDelegate:self priority:0 swallowsTouches:YES];
}
return self;
}

- (BOOL)ccTouchBegan:(UITouch *)touch withEvent:(UIEvent *)event {
// 3
[[CCDirector sharedDirector] replaceScene:[CCTransitionFade transitionWithDuration:.5 scene:[GameLayer scene] withColor:ccWHITE]];
return YES;
}

@end

The code for this should look very similar to the GameLayer code that we discussed above. Here are the few key differences.


  1. This loads the background image for the title screen and displays it in our TitleScene’s main layer.
  2. In order for any layer in Cocos2D to accept touches, you must enable it using the swallowsTouches method. This will invoke some of the touch callback methods of the receiving delegate class. In our case, we only care about the ccTouchesBegan method.
  3. When the user taps the screen, this method will fire. Inside, we use the director to transition the scene from the TitleScene to the GameScene using a fade transition. You can see all of the different transition types inside of the CCTransition.h file.


Step 6: Running The Project


If you try to build and run the application at this point, you will get an error. That’s because the AppDelegate is still trying to load the HelloWorldLayer that you deleted before. We need to modify the code and tell it to start with our TitleLayer upon application startup.


Open up AppDelegate.m and import the TitleLayer:


#import &amp;quot;TitleLayer.h&amp;quot;

Also, be sure to delete the import for the HelloWorldLayer. Next, navigate to around line 113 and change [HelloWorldLayer scene] to [TitleLayer scene].


[[CCDirector sharedDirector] runWithScene: [TitleLayer scene]];

Now, hit the Run button…If you pasted the code correctly, you should see something like this:


Landscape Screenshot

It appears that our game has been improperly oriented. This is an easy fix. By default, Cocos2D relies on the view controller that is displaying in it to determine the proper orientation. It’s currently set to landscape mode. Open up RootViewController.m and look in the “shouldAutorotateToInterfaceOrientation” method. Change the return statement of that method to be this:


return ( UIInterfaceOrientationIsPortrait( interfaceOrientation ) );

This will simply tell the view controller and Cocos2D to only support portrait mode. Now, when you hit Run, the game will be properly oriented and will function as you might expect.


Title


Game


Conclusion


What we have now is the ground work for our Cocos2D implementation of Centipede. It’s not much to look at right now, but know that this foundation is very important for our development going forward.


Next Time


In the next tutorial in this series, we will be setting up the interface elements including score, lives, and the sprout field.


Happy Coding!

iOS Framework: Introducing MKNetworkKit

iOS Framework: Introducing MKNetworkKit:

How awesome would it be if a networking framework automatically takes care of caching responses for you?

How awesome would it be if a networking framework automatically remembers your operations when your client is offline?

You favorite a tweet or mark a feed as read when you are offline and the Networking Framework performs all these operations when the device comes back online, all with no extra coding effort from you. Introducing MKNetworkKit.

What is MKNetworkKit?

MKNetworkKit is a networking framework written in Objective-C that is seamless, block based, ARC ready and easy to use.

MKNetworkKit is inspired by the other two popular networking frameworks, ASIHTTPRequest and AFNetworking. Marrying the feature set from both, MKNetworkKit throws in a bunch of new features. In addition to this, MKNetworkKit mandates you to write slightly more code than the other frameworks at the expense of code clarity. With MKNetworkKit, it’s hard to write ugly networking code.

Features

Super light-weight

The complete kit is just 2 major classes and some category methods. This means, adopting MKNetworkKit should be super easy.

Single Shared Queue for your entire application.

Apps that depend heavily on Internet connectivity should optimize the number of concurrent network operations. Unfortunately, there is no networking framework that does this correctly. Let me give you an example of what can go wrong if you don’t optimize/control the number of concurrent network operations in your app.

Let’s assume that you are uploading a bunch of photos (think Color or Batch) to your server. Most mobile networks (3G) don’t allow more than two concurrent HTTP connections from a given IP address. That is, from your device, you cannot open more than two concurrent HTTP connections on a 3G network. Edge is even worse. You can’t, in most cases, open more than one connection. This limit is considerably high (six) on a traditional home broadband (Wifi). However, since your iDevice is not always connected to Wifi, you should be prepared for throttled/restricted network connectivity. On any normal case, the iDevice is mostly connected to a 3G network, which means, you are restricted to upload only two photos in parallel. Now, it is not the slow upload speed that hurts. The real problem arises when you open a view that loads thumbnails of photos (say on a different view) while this uploading operations are running in the background. When you don’t properly control the queue size across the app, your thumbnail loading operations will just timeout which is not really the right way to do it. The right way to do this is to prioritize your thumbnail loading operation or wait till the upload is complete and the load thumbnails. This requires you to have a single queue across the entire app. MKNetworkKit ensures this automatically by using a single shared queue for every instance of it. While MKNetworkKit is not a singleton by itself, the shared queue is.

Showing the Network Activity Indicator correctly

While there are many third party classes that uses “incrementing” and “decrementing” the number of network calls and using that to show the network activity indicator, MKNetworkKit backs on the single shared queue principle and shows the activity indicator automatically when there is an operation running in the shared queue by observing (KVO) the operationCount property. As a developer, you normally don’t have to worry about setting the network activity indicator manually, ever again.

if (object == _sharedNetworkQueue && [keyPath isEqualToString:@"operationCount"]) {

[UIApplication sharedApplication].networkActivityIndicatorVisible =
([_sharedNetworkQueue.operations count] > 0);       
}

Auto queue sizing

Continuing the previous discussion, I told that most mobile networks don’t allow more than two concurrent connections. So your queue size should be set to two, when the current network connectivity is 3G. MKNetworkKit automatically handles this for you. When the network drops to 3G/EDGE/GPRS, it changes the number of concurrent operations that can be performed to 2. This is automatically changed back to 6 when the device connects back to a Wifi network. With this technique in place, you will see a huge performance benefit when you are loading thumbnails (or multiple similar small requests) for a photo library from a remote server over 3G.

Auto caching

MKNetworkKit can automatically cache all your “GET” requests. When you make the same request again, MKNetworkKit calls your completion handler with the cached version of the response (if it’s available) almost immediately. It also makes a call to the remote server again. After the server data is fetched, your completion handler is called again with the new response data. This means, you don’t have to handle caching manually on your side. All you need to do is call one method,

[[MKNetworkEngine sharedEngine] useCache];

Optionally, you can override methods in your MKNetworkEngine subclass to customize your cache directory and in-memory cache cost.

Operation freezing

With MKNetworkKit, you have the ability to freeze your network operations. When you freeze an operation, in case of network connectivity losses, they will be serialized automatically and performed once the device comes back online. Think of “drafts” in your twitter client.

When you post a tweet, mark that network call as freezable and MKNetworkKit automatically takes care of freezing and restoring these requests for you! So the tweets get sent later without you writing a single line of additional code. You can use this for other operations like favoring a tweet or sharing a post from your Google reader client, adding a link to Instapaper and similar operations.

Performs exactly one operation for similar requests

When you load thumbnails (for a twitter stream), you might end up creating a new request for every avatar image. But in reality, you only need as many requests as there are unique URLs. With MKNetworkKit, every GET request you queue gets executed exactly once. MKNetworkKit is intelligent enough not to cache “POST” http requests.

Image Caching

MKNetworkKit can be seamlessly used for caching thumbnail images. By overriding a few methods, you can set how many images should be held in the in-memory cache and where in the Caches directory it should be saved. Overriding these methods are completely optional.

Performance

One word. SPEED. MKNetworkKit caching is seamless. It works like NSCache, except that, when there is a memory warning, the in-memory cache is written to the Caches directory.

Full support for Objective-C ARC

You normally choose a new networking framework for new projects. MKNetworkKit is not meant for replacing your existing framework (though you can, it’s quite a tedious job). On new projects, you will almost and always want to enable ARC and as on date of writing this, MKNetworkKit is probably the only networking framework that is fully ARC ready. ARC based memory management is usually an order of magnitude faster than non-ARC based memory management code.

How to use

Ok, Enough self-praises. Let us now see how to use the framework.

Adding the MKNetworkKit

  1. Drag the MKNetworkKit directory to your project.
  2. Add the CFNetwork.Framework and SystemConfiguration.framework.
  3. Include MKNetworkKit.h to your PCH file
  4. Under your “Compile Sources” section, add -fno-objc-arc to the Reachability.m file.

You are done. Just 5 core files and there you go. A powerful networking kit.

Classes in MKNetworkKit

  1. MKNetworkOperation
  2. MKNetworkEngine
  3. Miscellaneous helper classes (Apple’s Reachability) and categories

I believe in simplicity. Apple has done the heavy lifting of writing the actual networking code. What a third-party networking framework should provide is an elegant queue based networking with optional caching. I believe that, any third party framework should have under 10 classes (whether it’s networking or UIKit replacement or whatever). More than that is a bloat. Three 20 library is an example of bloat and so is ShareKit. May be it’s good. But it still huge and bloated. ASIHttpRequest or AFNetworking are lean and lightweight, unlike RESTKit. JSONKit is lightweight unlike TouchJSON (or any of the TouchCode libraries). May be it’s just me, but I just can’t take it when more than a third of source code lines in my app comes from a third party library.

The problem with a huge framework is the difficulty in understanding the internal working and the ability to customize it to suit your needs (in case you need to). My frameworks (MKStoreKit for adding In App Purchases to your app) have always been super easy to use and I believe MKNetworkKit would also be the same. For using MKNetworkKit, all you need to know are the methods exposed by the two classes MKNetworkOperation and MKNetworkEngine. MKNetworkOperation is similar to the ASIHttpRequest class. It is a subclass of NSOperation and it wraps your request and response classes. You create a MKNetworkOperation for every network operation you need in your application.

MKNetworkEngine is a pseudo-singleton class that manages the network queue in your application. It’s a pseudo-singleton, in the sense, for simple requests, you should use MKNetworkEngine methods directly. For more powerful customization, you should subclass it. Every MKNetworkEngine subclass has its own Reachability object that notifies it of server reachability notifications. You should consider creating a subclass of MKNetworkEngine for every unique REST server you use. It’s pseudo-singleton in the sense, every single request in any of it’s subclass goes through one and only one single queue.

You can retain instances of your MKNetworkEngine in your application delegate just like CoreData managedObjectContext class. When you use MKNetworkKit, you create an MKNetworkEngine sub class to logically group your network calls. That is, all Yahoo related methods go under one single class and all Facebook related methods into another class. We will now look at three different examples of using this framework.

Example 1:

Let’s now create a “YahooEngine” that pulls currency exchange rates from Yahoo finance.

Step 1: Create a YahooEngine class as a subclass of MKNetworkEngine. MKNetworkEngine init method takes hostname and custom headers (if any). The custom headers is optional and can be nil. If you are writing your own REST server (unlike this case), you might consider adding client app version and other misc data like client identifier.

NSMutableDictionary *headerFields = [NSMutableDictionary dictionary];
[headerFields setValue:@"iOS" forKey:@"x-client-identifier"];

self.engine = [[YahooEngine alloc] initWithHostName:@"download.finance.yahoo.com"
customHeaderFields:headerFields];

Note that, while yahoo doesn’t mandate you to send x-client-identifier in the header, the sample code shown above sends this just to illustrate this feature.

Since the complete code is ARC, it’s up to you as a developer to own (strong reference) the Engine instance.

When you create a MKNetworkEngine subclass, Reachability implementation is done automatically for you. That’s when your server goes down or due to some unforeseen circumstances, the hostname is not reachable, your requests will automatically be queued/frozen. For more information about freezing your operations, read the section Freezing Operations later in the page.

Step 2: Designing the Engine class (Separation of concerns)

Let’s now start write the methods in Yahoo Engine to fetch exchange rates. The engine methods will be called from your view controller. A good design practice is to ensure that your engine class doesn’t expose URL/HTTPHeaders to the calling class. Your view should not “know” about URL endpoints or the parameters needed. This means, parameters to methods in your Yahoo Engine should be the currencies and the number of currency units. The return value of this method could be a double value that is the exchange rate factor and may be the timestamp of the time it was fetched. Since operations are not performed synchronously, you should return these values on blocks. An example of this would be,

-(MKNetworkOperation*) currencyRateFor:(NSString*) sourceCurrency
inCurrency:(NSString*) targetCurrency
onCompletion:(CurrencyResponseBlock) completion
onError:(ErrorBlock) error;

MKNetworkEngine, the parent class defines three types of block methods as below.

typedef void (^ProgressBlock)(double progress);
typedef void (^ResponseBlock)(MKNetworkOperation* operation);
typedef void (^ErrorBlock)(NSError* error);

In our YahooEngine, we are using a new kind of block, CurrencyResponseBlock that returns the exchange rate. The definition looks like this.

typedef void (^CurrencyResponseBlock)(double rate);

In any normal application, you should be defining your own block methods similar to this CurrencyResponseBlock for sending data back to the view controllers.

Step 3: Processing the data

Data processing, that is converting the data you fetch from your server, whether it’s JSON or XML or binary plists, should be done in your Engine. Again, relieve your controllers of doing this task. Your engine should send back data only in proper model objects or arrays of model objects (in case of lists). Convert your JSON/XML to models in the engine. Again, to ensure proper separation of concerns, your view controller should not “know” about the “keys” for accessing individual elements in your JSON.


That concludes the design of your Engine. Most networking framework doesn’t force you to follow this separation of concerns. We do, because we care for you :)


Step 4: Method implementation

We will now discuss the implementation details of the method that calculates your currency exchange.


Getting currency information from Yahoo, is as simple as making a GET request.

I wrote a macro to format this URL for a given currency pair.

#define YAHOO_URL(__C1__, __C2__) [NSString stringWithFormat:@"d/quotes.csv?e=.csv&f=sl1d1t1&s=%@%@=X", __C1__, __C2__]

Methods you write in your engine class should do the following in order.

  1. Prepare your URL from the parameters.
  2. Create a MKNetworkOperation object for the request.
  3. Set your method parameters.
  4. Add completion and error handlers to the operation (The completion handler is the place to process your responses and convert them to Models.)
  5. Optionally, add progress handlers to the operation. (Or do this on the view controller)
  6. If your operation is file download, set a download stream (normally a file) to it. This is again optional.
  7. When the operation completes, process the result and invoke the block method to return this data to the calling method.

This is illustrated in the following code

MKNetworkOperation *op = [self operationWithPath:YAHOO_URL(sourceCurrency, targetCurrency)
params:nil
httpMethod:@"GET"];

[op onCompletion:^(MKNetworkOperation *completedOperation)
{
DLog(@"%@", [completedOperation responseString]);

// do your processing here
completionBlock(5.0f);

}onError:^(NSError* error) {

errorBlock(error);
}];

[self enqueueOperation:op];

return op;


The above code formats the URL and creates a MKNetworkOperation. After setting the completion and error handlers it queues the operation by calling the super class’s enqueueOperation method and returns a reference to it. Your view controller should own this operation and cancel it when the view is popped out of the view controller hierarchy. So if you call the engine method in, say viewDidAppear, cancel the operation in viewWillDisappear. Canceling the operation will free up the queue for performing other operations in the subsequent view (Remember, only two operations can be performed in parallel on a mobile network. Canceling your operations when they are no longer needed goes a long way in ensuring performance and speed of your app).


You view controller can also (optionally) add progress handlers and update the user interface. This is illustrated below.


[self.uploadOperation onUploadProgressChanged:^(double progress) {

DLog(@"%.2f", progress*100.0);
self.uploadProgessBar.progress = progress;
}];


MKNetworkEngine also has convenience methods to create a operation with just a URL. So the first line of code can also be written as


MKNetworkOperation *op = [self operationWithPath:YAHOO_URL(sourceCurrency, targetCurrency)];


Do note here that request URLs are automatically prefixed with the hostname you provided while initializing your engine class.


Creating a POST, DELETE or PUT method is as easy as changing the httpMethod parameter. MKNetworkEngine has more convenience methods like this. Read the header file for more.


Example 2:


Uploading an image to a server (TwitPic for instance).

Now let us go through an example of how to upload an image to a server. Uploading an image obviously requires the operation to be encoded as a multi-part form data. MKNetworkKit follows a pattern similar to ASIHttpRequest.

You call a method addFile:forKey: in MKNetworkOperation to “attach” a file as a multi-part form data to your request. It’s that easy.

MKNetworkOperation also has a convenience method to add a image from a NSData pointer. That’s you can call addData:forKey: method to upload a image to your server directly from NSData pointer. (Think of uploading a picture from camera directly).


Example 3:


Downloading files to a local directory (Caching)

Downloading a file from a remote server and saving it to a location on users’ iPhone is super easy with MKNetworkKit.

Just set the outputStream of MKNetworkOperation and you are set.


[operation setDownloadStream:[NSOutputStream
outputStreamToFileAtPath:@"/Users/mugunth/Desktop/DownloadedFile.pdf"
append:YES]];


You can set multiple output streams to a single operation to save the same file to multiple locations (Say one to your cache directory and one to your working directory)


Example 4:


Image Thumbnail caching

For downloading images, you might probably need to provide an absolute URL rather than a path. MKNetworkEngine has a convenience method for this. Just call operationWithURLString:params:httpMethod: to create a network operation with an absolute URL.

MKNetworkEngine is intelligent. It coalesces multiple GET calls to the same URL into one and notifies all the blocks when that one operation completes. This drastically improves the speed of fetching your image URLs for populating thumbnails.


Subclass MKNetworkEngine and override image cache directory and cache cost. If you don’t want to customize these two, you can directly call MKNetworkEngine methods to download images for you. I would actually recommend you to do that.


Caching operations


MKNetworkKit caches all requests by default. All you need to do is to turn on caching for your Engine. When a GET request is performed, if the response was previously cached, your completion handler is called with the cached response almost immediately. To know whether the response is cached, use the isCachedResponse method. This is illustrated below.


[op onCompletion:^(MKNetworkOperation *completedOperation)
{
if([completedOperation isCachedResponse]) {
DLog(@"Data from cache");
}
else {
DLog(@"Data from server");
}

DLog(@"%@", [completedOperation responseString]);
}onError:^(NSError* error) {

errorBlock(error);
}];


Freezing operations


Arguably, the most interesting feature of MKNetworkKit is built in ability to freeze operations. All you need to do is set your operation as freezable. Almost zero effort!


[op setFreezable:YES];


Freezable operations are automatically serialized when the network goes down and executed when connectivity is restored. Think of having the ability to favorite a tweet while you are offline and the operation is performed when you are online later.

Frozen operations are also persisted to disk when the app enters background. They will be automatically performed when the app is resumes later.


Convenience methods in MKNetworkOperation


MKNetworkOperation exposes convenience methods like the following to get the format your response data.


  1. responseData
  2. responseString
  3. responseJSON (Only on iOS 5)
  4. responseImage
  5. responseXML
  6. error

They come handy when accessing the response after your network operation completes. When the format is wrong, these methods return nil. For example, trying to access responseImage when the actual response is a HTML response will return nil. The only method that is guaranteed to return the correct, expected response is responseData. Use the other methods if you are sure of the response type.


Convenience macros


The macros, DLog and ALog were stolen unabashedly from Stackoverflow and I couldn’t again find the source. If you wrote that, let me know.


A note on GCD


I purposefully didn’t use GCD because, network operations need to be stopped and prioritized at will. GCD, while more efficient that NSOperationQueue cannot do this. I would recommend not to use GCD based queues for your network operations.


Documentation


The header files are commented and I’m trying out headerdoc from Apple. Meanwhile, you can use/play around (read: Fork) with the code.


Source Code


The source code for MKNetworkKit along with a demo application is available on Github.

MKNetworkKit on Github


Feature requests


Please don’t email me feature requests. The best way is to create an issue on Github.


Licensing


MKNetworkKit is licensed under MIT License


All of my source code can be used free of charge in your app, provided you add the copyright notices to your app. A little mention on one of your most obscure “about” page will do.


Attribution free licensing available upon request. Contact me at mknetworkkit@mk.sg


Mugunth