显示标签为“Dev Brief”的博文。显示所有博文

2011年12月30日星期五

iPhone Development – core data relationships tutorial part 1

iPhone Development – core data relationships tutorial part 1:
I’m going to start a short series on Core Data relationships and maybe throw in some general Core Data stuff too. Here in part one we’re just going to set our app up with core data and add two entities with a simple one to one relationship between them. A one to one relationship means that for every Fruit there will be one source and in our case here the reverse it true too, for every source there is one fruit.

Core Data Relationships


1.) Create a new Tab Bar Application named CoreDataRelationshipsTutorial.

2.) Change FirstView.xib so it looks similar to this.

FirstView.xib

3.) Add the core data framework to the app.

Add Core Data Framework

4.) Right click on Supporting Files and select New File, then choose Core Data select Data Model and hit Next. I just accepted the default name of Model and clicked save.

Add Data Model

5.) Select Model.xcdatamodeld and the visual editor will open. Click Add Entity and name it Fruit. Add an Attribute named fruitName of type String. Add another Entity named Source with an Attribute sourceName, which will also be of type String.

6.) Select Fruit and then click the plus symbol under Relationships. Name the relationship fruitSource. Set the destination to Source, there will be no inverse yet. In the relationship data model inspector uncheck the Optional checkbox. In the delete rule select Cascade.

Edit Data Model

7.) Now select Source and add a relationship named sourceFruit. Destination should be Fruit and set the inverse to artistCareer. Uncheck the Optional checkbox again.

Set up relationships

8.) Select Fruit under ENTITIES and then go under the file menu up top and select New File. Choose Core Data and NSManagedObject subclass,, click Next. Keep the default location and click Create.

Create Managed Objects

Repeat this same process after selecting Source under ENTITIES.

You should now see your new objects listed under Supporting Files.

xcode view

9.) Open up CoreDataRelationshipsTutorial-Prefix.pch and add an import for CoreDate. This saves us from having to import it into every file that will use it.

#import

#ifndef __IPHONE_3_0
#warning "This project uses features only available in iPhone SDK 3.0 and later."
#endif

#ifdef __OBJC__
#import
#import
#import
#endif

10.) Now let’s add all the necessary Core Data code to the app delegate files.

First the header file. Import our FirstViewController, then declare private instance variables for our NSManagedObjectContext, NSManagedObjectModel and NSPersistentStoreCoordinator. Create an IBOutlet with out FirstViewController, and declare two methods that we’ll implement.

#import
#import "FirstViewController.h"

@interface CoreDataRelationshipsTutorialAppDelegate : NSObject
{

@private
NSManagedObjectContext *managedObjectContext;
NSManagedObjectModel *managedObjectModel;
NSPersistentStoreCoordinator *persistentStoreCoordinator;

}

@property (nonatomic, retain) IBOutlet UIWindow *window;
@property (nonatomic, retain) IBOutlet UITabBarController *tabBarController;

@property (nonatomic, retain) IBOutlet FirstViewController *firstViewController;

@property (nonatomic, retain, readonly) NSManagedObjectContext *managedObjectContext;
@property (nonatomic, retain, readonly) NSManagedObjectModel *managedObjectModel;
@property (nonatomic, retain, readonly) NSPersistentStoreCoordinator *persistentStoreCoordinator;

- (NSURL *)applicationDocumentsDirectory;
- (void)saveContext;

@end

11.) Now open the app delegate implementation file. Synthesize our firstViewController, then set it’s managedObjectContext to the one created in the app delegate. You may see an error on the line that sets the managedObjectContext because we haven’t set that up in FirstViewController yet.

#import "CoreDataRelationshipsTutorialAppDelegate.h"

@implementation CoreDataRelationshipsTutorialAppDelegate

@synthesize window=_window;
@synthesize tabBarController=_tabBarController;
@synthesize firstViewController;

- (BOOL)application:(UIApplication *)application didFinishLaunchingWithOptions:(NSDictionary *)launchOptions
{
firstViewController.managedObjectContext = self.managedObjectContext;

self.window.rootViewController = self.tabBarController;
[self.window makeKeyAndVisible];
return YES;
}

Implement all these methods.

/**
Returns the URL to the application's Documents directory.
*/
- (NSURL *)applicationDocumentsDirectory
{
return [[[NSFileManager defaultManager] URLsForDirectory:NSDocumentDirectory inDomains:NSUserDomainMask] lastObject];
}

- (void)saveContext
{

NSError *error = nil;
NSManagedObjectContext *objectContext = self.managedObjectContext;
if (objectContext != nil)
{
if ([objectContext hasChanges] && ![objectContext save:&error])
{
// add error handling here
NSLog(@"Unresolved error %@, %@", error, [error userInfo]);
abort();
}
}
}

#pragma mark -
#pragma mark Core Data stack

/**
Returns the managed object context for the application.
If the context doesn't already exist, it is created and bound to the persistent store coordinator for the application.
*/
- (NSManagedObjectContext *)managedObjectContext
{

if (managedObjectContext != nil)
{
return managedObjectContext;
}

NSPersistentStoreCoordinator *coordinator = [self persistentStoreCoordinator];
if (coordinator != nil)
{
managedObjectContext = [[NSManagedObjectContext alloc] init];
[managedObjectContext setPersistentStoreCoordinator:coordinator];
}
return managedObjectContext;
}

/**
Returns the managed object model for the application.
If the model doesn't already exist, it is created from the application's model.
*/
- (NSManagedObjectModel *)managedObjectModel
{
if (managedObjectModel != nil)
{
return managedObjectModel;
}
managedObjectModel = [[NSManagedObjectModel mergedModelFromBundles:nil] retain];

return managedObjectModel;
}

/**
Returns the persistent store coordinator for the application.
If the coordinator doesn't already exist, it is created and the application's store added to it.
*/
- (NSPersistentStoreCoordinator *)persistentStoreCoordinator
{

if (persistentStoreCoordinator != nil)
{
return persistentStoreCoordinator;
}

NSURL *storeURL = [[self applicationDocumentsDirectory] URLByAppendingPathComponent:@"CoreDataTabBarTutorial.sqlite"];

NSError *error = nil;
persistentStoreCoordinator = [[NSPersistentStoreCoordinator alloc] initWithManagedObjectModel:[self managedObjectModel]];
if (![persistentStoreCoordinator addPersistentStoreWithType:NSSQLiteStoreType configuration:nil URL:storeURL options:nil error:&error])
{
NSLog(@"Unresolved error %@, %@", error, [error userInfo]);
abort();
}

return persistentStoreCoordinator;
}

12.) Open up FirstViewController.h and let’s set it up with the necessary code and instance variables.

#import

@interface FirstViewController : UIViewController
{

NSFetchedResultsController  *fetchedResultsController;
NSManagedObjectContext      *managedObjectContext;

}

@property (nonatomic, retain) NSString *fruitNameString;
@property (nonatomic, retain) NSString *fruitSourceString;

@property (nonatomic, retain) NSFetchedResultsController    *fetchedResultsController;
@property (nonatomic, retain) NSManagedObjectContext        *managedObjectContext;

- (IBAction) saveData;

@end

13.) Now for the implementation file. Let’s import our managed objects.

#import "FirstViewController.h"
#import "Fruit.h"
#import "Source.h"

Then synthesize the instance variables.

@synthesize fetchedResultsController, managedObjectContext;
@synthesize fruitNameString, fruitSourceString;

Let’s go ahead and set the values of those two strings in ViewDidLoad.

- (void)viewDidLoad
{
[super viewDidLoad];
fruitNameString = [[NSString alloc] initWithString:@"Apple"];
fruitSourceString = [[NSString alloc] initWithString:@"Apple Tree"];
}

14.) Implement the saveData method.

- (IBAction) saveData
{
NSLog(@"saveData");
Fruit *fruit = (Fruit *)[NSEntityDescription insertNewObjectForEntityForName:@"Fruit" inManagedObjectContext:managedObjectContext];
fruit.fruitName = fruitNameString;
Source *source = (Source *)[NSEntityDescription insertNewObjectForEntityForName:@"Source" inManagedObjectContext:managedObjectContext];
source.sourceName = fruitSourceString;

// Because we set the relationship fruitSource as not optional we must set the source here
fruit.fruitSource = source;

NSError *error;

// here's where the actual save happens, and if it doesn't we print something out to the console
if (![managedObjectContext save:&error])
{
NSLog(@"Problem saving: %@", [error localizedDescription]);
}

// **** log objects currently in database ****
// create fetch object, this object fetch's the objects out of the database
NSFetchRequest *fetchRequest = [[NSFetchRequest alloc] init];
NSEntityDescription *entity = [NSEntityDescription entityForName:@"Fruit" inManagedObjectContext:managedObjectContext];
[fetchRequest setEntity:entity];
NSArray *fetchedObjects = [managedObjectContext executeFetchRequest:fetchRequest error:&error];

for (NSManagedObject *info in fetchedObjects)
{
NSLog(@"Fruit name: %@", [info valueForKey:@"fruitName"]);
Source *tempSource = [info valueForKey:@"fruitSource"];
NSLog(@"Source name: %@", tempSource.sourceName);

}
[fetchRequest release];
}

15.) Release our objects in the dealloc method and set them to nil in viewDidUnload.

- (void)viewDidUnload
{
[super viewDidUnload];
fetchedResultsController = nil;
managedObjectContext = nil;
fruitNameString = nil;
fruitSourceString = nil;
}

- (void)dealloc
{
[fetchedResultsController release];
[managedObjectContext release];
[fruitNameString release];
[fruitSourceString release];

[super dealloc];
}

16.) Open up FirstView.xib and connect the UIButton to our saveData IBAction.

17.) Open up MainWindow.xib, select the app delegate and connect firstViewController outlet to FirstViewController under the Tab Bar Controller.

Link view controller

18.) Now you can run the app and hit the Save Data button. Look in the console to see the results of the fetch.

console

The important things to note from this tutorial are these.

When we created the relationship from Fruit to Source we made it so that it was not optional. Therefore during our saveData method we had to set the fruitSource to something.

Fruit *fruit = (Fruit *)[NSEntityDescription insertNewObjectForEntityForName:@"Fruit" inManagedObjectContext:managedObjectContext];
fruit.fruitName = fruitNameString;
Source *source = (Source *)[NSEntityDescription insertNewObjectForEntityForName:@"Source" inManagedObjectContext:managedObjectContext];
source.sourceName = fruitSourceString;

Try commenting out that last line

//    source.sourceName = fruitSourceString;

And then running it again. What happens? Crash and burn. Because the relationship is not optional you must set the sourceName.

You can also see from the block of code above that we use reuse the same managedObjectContext to create both of the managed objects. Then we set the values and just saved the context. Doing this saved both objects (entities in Core Data).

Another thing to take note of happens in the fetch process. You notice that we only fetch the Fruit entity. But because of the relationship between Fruit and Source we can access the Source entity. We don’t need to do a separate fetch on Source.

NSFetchRequest *fetchRequest = [[NSFetchRequest alloc] init];
NSEntityDescription *entity = [NSEntityDescription entityForName:@"Fruit" inManagedObjectContext:managedObjectContext];
[fetchRequest setEntity:entity];
NSArray *fetchedObjects = [managedObjectContext executeFetchRequest:fetchRequest error:&error];

for (NSManagedObject *info in fetchedObjects)
{
NSLog(@"Fruit name: %@", [info valueForKey:@"fruitName"]);
Source *tempSource = [info valueForKey:@"fruitSource"];
NSLog(@"Source name: %@", tempSource.sourceName);
[tempSource release];
}

Okay that does it for this tutorial. Next time we will look at a one to many relationship.

As always here’s the code.

2011年12月28日星期三

Building a Universal Framework for iOS

Building a Universal Framework for iOS:
Apple has invested quite a bit of time into making it easy to compile for a number of different architectures in XCode. For instance, compiling a library into its armv6, armv7, and i386 variants is just a matter of specifying the supported architecture types. However, there isn’t a built-in mechanism to take the binaries built for the various architectures and merge them into a universal iOS framework.

Before we go through the steps of building a universal iOS framework we should first review what a framework is and why they are useful.


What is a ‘framework’ and why are they useful?


Apple defines a framework as:

… a hierarchical directory that encapsulates shared resources, such as a dynamic shared library, nib files, image files, localized strings, header files, and reference documentation in a single package.

So instead of having header files and binaries in disperate locations a framework brings everything together into one package (a directory with a known structure). Packaging a library as a framework simplifies things for developers because it not only provides a binary to link against but it includes all of the necessary header files to reference as well.

What is a ‘universal’ framework?


A universal framework can be defined as a framework that contains a binary which has been built for a number of architectures (armv6, armv7, i386) and can be statically1 linked against. This is particularly useful in iOS development because an application can be built for the simulator (i386) and the device (armv6, armv7).

1 Statically linking a library resolves symbols at compile time and embeds the library into the application. It is not possible, currently, to create a dynamic framework for iOS.

Building a ‘universal’ framework


Firstly, there is a project called iOS Universal Framework that simplifies the process of building a universal framework by providing an XCode template. However, I think it is still a meaningful exercise to understand how a universal framework is built using XCode.

Lets get started:

Create a new project

  1. File -> New -> New Project (Command-Shift-N)
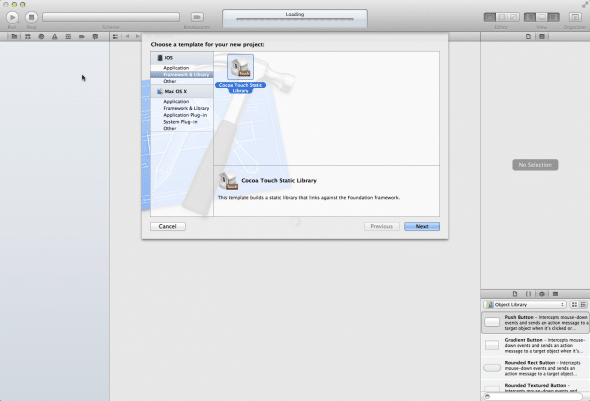
  2. Select Frameworks & Libraries under iOS
  3. Select “Cocoa Touch Static Library” and click “Next”
  4. Provide a name for the library


Configure architectures

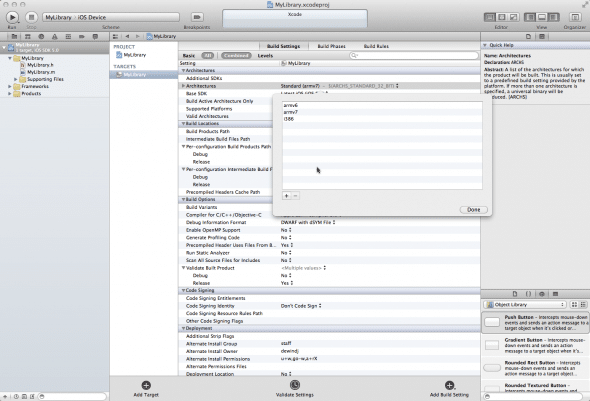
By default the static library is configured to only build for armv7 so we need to add armv6 and i386 to ensure that the static library is built for older devices (iPhone 3G/Original, early generation iPod Touch) and the simulator.


Create aggregate target

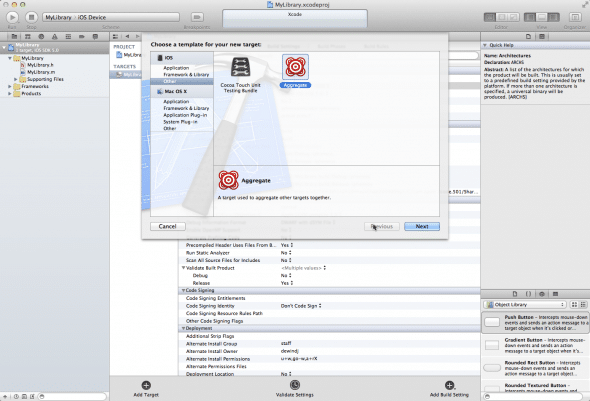
An aggregate target aggregates other targets together. In effect, it wraps a number of script executables and copy file tasks in a specified order.

  1. File -> New Target
  2. Select “Other” under iOS
  3. Select “Aggregate”
  4. Give it a name (MyLibrary-iOS for example)


Build static libraries

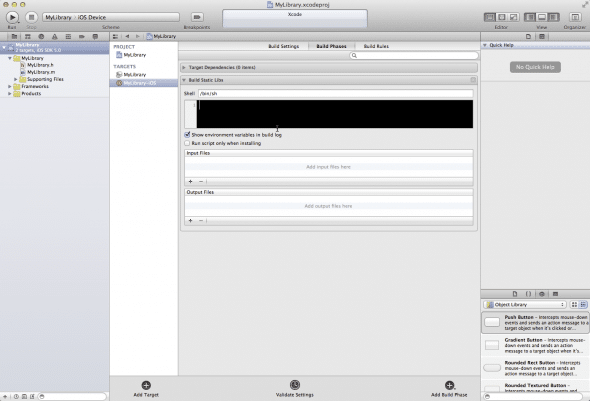
Under the “Build Phases” section of the aggregate target we are going to add a build phase that compiles a static library for i386 and ARM. In the next step we’ll merge the binaries into a fat binary.

  1. Select MyLibrary-iOS target
  2. Select “Build Phases”
  3. Click “Add Build Phase”
  4. Select “Add Run Script”
  5. Name it “Build Static Libs”


xcodebuild -project ${PROJECT_NAME}.xcodeproj -sdk iphonesimulator -target ${PROJECT_NAME} -configuration ${CONFIGURATION} clean build
xcodebuild -project ${PROJECT_NAME}.xcodeproj -sdk iphoneos -target ${PROJECT_NAME} -configuration ${CONFIGURATION} clean build


Build universal binary

We are going to add another “Run Script” phase that builds the framework itself. The script is going to:

Create a directory structure that mimics the same directory structure seen in Apple’s dynamic frameworks:


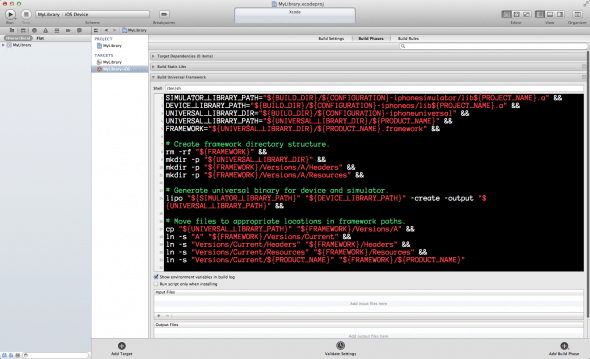
SIMULATOR_LIBRARY_PATH="${BUILD_DIR}/${CONFIGURATION}-iphonesimulator/lib${PROJECT_NAME}.a" &&
DEVICE_LIBRARY_PATH="${BUILD_DIR}/${CONFIGURATION}-iphoneos/lib${PROJECT_NAME}.a" &&
UNIVERSAL_LIBRARY_DIR="${BUILD_DIR}/${CONFIGURATION}-iphoneuniversal" &&
UNIVERSAL_LIBRARY_PATH="${UNIVERSAL_LIBRARY_DIR}/${PRODUCT_NAME}" &&
FRAMEWORK="${UNIVERSAL_LIBRARY_DIR}/${PRODUCT_NAME}.framework" &&
# Create framework directory structure.
rm -rf "${FRAMEWORK}" &&
mkdir -p "${UNIVERSAL_LIBRARY_DIR}" &&
mkdir -p "${FRAMEWORK}/Versions/A/Headers" &&
mkdir -p "${FRAMEWORK}/Versions/A/Resources" &&


Merge the static libraries built for the various architectures into a fat binary using a tool called lipo:


# Generate universal binary for the device and simulator.
lipo "${SIMULATOR_LIBRARY_PATH}" "${DEVICE_LIBRARY_PATH}" -create -output "${UNIVERSAL_LIBRARY_PATH}" &&


Move the appropriate files into place:


# Move files to appropriate locations in framework paths.
cp "${UNIVERSAL_LIBRARY_PATH}" "${FRAMEWORK}/Versions/A" &&
ln -s "A" "${FRAMEWORK}/Versions/Current" &&
ln -s "Versions/Current/Headers" "${FRAMEWORK}/Headers" &&
ln -s "Versions/Current/Resources" "${FRAMEWORK}/Resources" &&
ln -s "Versions/Current/${PRODUCT_NAME}" "${FRAMEWORK}/${PRODUCT_NAME}"


The full script can be found here.

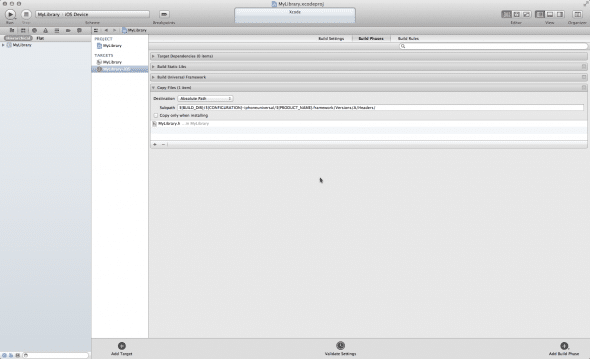
Copy header files into place

  1. Select “Add Build Phase”
  2. Click “Add Copy Files”
  3. Set “Destination” to “Absolute Path”
  4. Set subpath to ${BUILD_DIR}/${CONFIGURATION}-iphoneuniversal/${PRODUCT_NAME}.framework/Versions/A/Headers/
  5. Add header files that should be public to the list


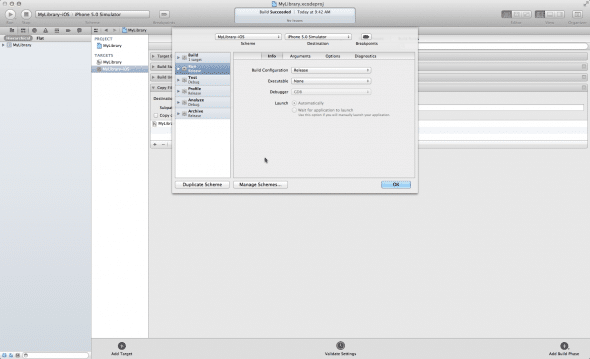
Configure aggregate target build against the ‘Release’ configuration

  1. Product -> Edit Scheme
  2. Choose aggregate target (MyLibrary-iOS)
  3. Select “Run”
  4. Choose “Release” under Build Configuration


Build and verify framework

  1. Select aggregate target
  2. Build it (Command-B)

Verify that the binary was built for the correct architectures using lipo:


lipo -info build/Release-iphoneuniversal/MyLibrary-iOS.framework/MyLibrary-iOS
Architectures in the fat file: build/Release-iphoneuniversal/MyLibrary-iOS.framework/MyLibrary-iOS are: i386 armv6 armv7


Ensure that the header files are copied into place (XCode is known to mess this up on occasion):


tree build/Release-iphoneuniversal/MyLibrary-iOS.framework/
build/Release-iphoneuniversal/MyLibrary-iOS.framework/
├── Headers -> Versions/Current/Headers
├── MyLibrary-iOS -> Versions/Current/MyLibrary-iOS
├── Resources -> Versions/Current/Resources
└── Versions
├── A
│ ├── Headers
│ │ └── MyLibrary.h
│ ├── MyLibrary-iOS
│ └── Resources
└── Current -> A
7 directories, 3 files

Conclusion


Creating a universal framework certainly requires a fair amount of upfront work. However, it is a great mechanism to distribute your library to the masses without making them work to use it. There is not any configuration (header paths) or tweaking (warnings, ARC vs non-ARC files) required on the part of the user. Which means less work for you having to respond to issues and complaints.

2011年12月26日星期一

Migrating your code to Objective-C ARC

Migrating your code to Objective-C ARC:
Recently, Apple introduced several new developer stuff including Xcode 4, ARC, LLVM Compiler 3.0 and iOS 5. From some of the questions on Stack overflow, I could understand that, most of the ARC related confusions arise due to the fact that, developers don’t know if “ABC” is a feature/restriction of LLVM 3.0 or iOS 5 or ARC.

Retain cycles, auto-release pools, @autorelease blocks, oh man! So many new things? What am I going to do? You are right. ARC, or Objective-C Automatic Reference Counting is almost as magical as the iPad. No really!

In this post, I’ve made an attempt to demystify the air around this. Before starting, I’ll have to warn you that, this is a fairly long post. If you are too bored, Instapaper this article and read it later. But, hopefully, at the end of this, I believe, you will have a better understanding on how ARC works and be able to work around the innumerable errors it spits out when you convert your project.

Having said that, let’s get started.

What is ARC


ARC is a feature of the new LLVM 3.0 compiler that helps you to write code without worrying much about memory management. Memory management can be broadly classified into two, garbage collected and reference counted models. Before going to the details, let’s briefly discuss these two models and understand why ARC is even needed.

Problems with the current model.


The current memory model we use in Objective-C is manual reference counting on iOS and Garbage collection on Mac.

There are certain problems with both these memory models which probably was the reason why ARC was developed.

Garbage collection

Garbage collection is a higher level language feature probably introduced in Java (or technically, Java Virtual Machine) and implemented in a variety of other programming platforms including Microsoft’s Common Language Runtime. While Garbage collection worked well for higher level languages, Objective-C, which is still C under the hood, didn’t really fly high. Pointers (or rather references) in other languages like Java were actually objects that managed retain count and automatically releases itself when the count reaches zero. One of the design goals of C was to be optimized for performance and not “easy of use”. While pointer objects (read smart pointers) are great object oriented abstractions, they have an adverse effect on the performance of the code and since Objective-C was intended primarily for native programming where developers are used to use pointers, pointers within a structure, pointer to a pointer (for dereferencing a out parameter), it was just too difficult to introduce something like a smart pointer that would require a lot of mindset change from the developers who prefer a deterministic memory management model (Reference counting) over a non-deterministic memory management model (Garbage collection). Nevertheless, GC (Generational GC) was introduced in Objective-C 2.0 for Mac. While Generational GC doesn’t suffer from “Stop the world” issues like the mark and sweep alogrithm, they don’t collect every released variable and an occasional mark and sweep collection is still needed.

Reference Counting

The memory management model used in iOS is called as reference counting model, or more precisely, manual reference counting.

In manual reference counting model, you as a developer, have to deallocate every object you allocated. When you don’t do this, you either leak memory or over release it, causing a crash. While that counting sounds easy, Most of the memory leaks happen when you transfer ownership of objects across scope boundaries. That’s a creator method that allocates an object for you and expects the caller to deallocate it. To circumvent this problem, Objective-C introduced a concept called autorelease. auto-released variables are added to the auto-release pool and are released at the end of the runloop. While this sounds too good, auto-release pools do incur an additional overhead.

For example, comparing the two code blocks,


{
NSDictionary *dict = [[NSDictionary alloc] init];
// do something with the dictionary here
// I'm done with the dictionary, I don't need it anymore
[dict release];
// more code
}


and


{
NSDictionary *dict = [NSDictionary dictionary]; // auto-released object
// do something with the dictionary here
// I'm done with the dictionary, I don't need it anymore

// more code
}


the first block is an example of optimized use of memory where as the second depends on auto-release pools. While this block of code doesn’t really incur significant memory overhead, code like these slowly adds together and makes your reference counted model heavily dependent on auto-release pools. That is, objects that you know could be deallocated, will still linger around in the auto-release pool for a little longer.

Automatic Reference Counting

Say hello to ARC. ARC is a compiler feature that auto inserts retain and release for you. So in the first code block of the above example, you no longer have to write the release method and ARC auto-inserts for you before compilation.


{
NSDictionary *dict = [[NSDictionary alloc] init];
// do something with the dictionary here
// I'm done with the dictionary, I don't need it anymore
[dict release]; // ARC inserted
// more code
}


When you create an autoreleased object, like in the second block of code, ARC compiler is clever enough not to add a release call. Sound great, so how should I go about doing this ARC thing? Just delete all release/retain codes and pray? Unfortunately, it isn’t that easy. ARC is not just some auto insert or macro expander kind of tool. It forces you to think in terms of object graphs instead of memory allocation, retain or release. Let’s delve a little deeper into ARC.

Compiler level feature


ARC is a compiler level feature. I repeat. ARC IS A COMPILER LEVEL FEATURE. This means, when you use ARC, you don’t have to worry about upgrading your deployment target and so on. However, only the latest LLVM 3.0 compiler supports ARC. If you are still stuck with GCC, you are out of luck. (Meh!) Some more points that you should know about ARC are,

  • ARC is backward compatible with libraries and framework compiled with under non-ARC.
  • ARC can be used within your project on a file-by-file basis. So you can mix and match ARC code with non-ARC code.
  • You can also integrate ARC compiled libraries into your project that doesn’t use ARC and vice-versa.
  • You use a compiler switch to turn ARC on and off.
  • (The keyword here is compiler switch)
  • You can also set the complete target to build with ARC by default (and use non-ARC compiler only when instructed so.) This is shown in the illustration below.
  • ARC  Xcode

The two main compiler switches that you would often use are when you build your application with a third party library that is not ARC compliant and vice versa, are

  • -fno-objc-arc
  • -fobjc-arc

-f is the switch and no-objc-arc and objc-arc are the options that you are turning on. As evident from the names, the first one turns off ARC and the second turns on.

For example, if your application is ARC enabled but a third party library is not, you use the first switch -fno-objc-arc to exclude the third party library. Conversely, if your application is not yet ARC enabled (gasp!) but the third party library you are integrating is, you use the second switch -fobjc-arc You add these flags to the project from the Build phases tab as shown below.Xcode 2 1

Also a run time feature


Wait! You just told me (and repeated) that ARC is a compiler level feature? Now what? Sorry, I hear you, but, unfortunately, things aren’t that easy and it doesn’t just stop here. ARC also backs up on a runtime feature called zero-ing weak references. Oh, damn, another keyword! I should have introduced this before. But that’s ok. We will revisit about the run-time dependency of ARC, a little later in this post.

ARC Ownership qualifiers


As I showed you earlier, ARC automatically inserts releases and retains in your code in a pre-compilation step. But for ARC to know when to release your objects and when to retain them, you need to somehow tell the life of your variables. You use ownership qualifiers for that. A strong understanding of ownerships is vital to understand and use ARC properly. Once you understand this concept, you will be thinking in terms of object graphs instead of retain/release. Secondly, when you use ARC, all variables local or ivars are initialized to nil automatically for you. This means, there is little chance of having a dangling reference in your application.

  • __strong
  • __weak
  • __unsafe_unretained
  • __autoreleasing

The first qualifier, __strong, is the default and you might not even be using this explicitly. It is use to tell the ARC compiler that, the declared variable “owns” the reference. The opposite of this is __weak, which tells the ARC compiler that the declared variable doesn’t own the reference.

The __weak is synonymous to the “assign” modifier. You normally use assign modifier for IBOutlets and delegates. Under ARC, this is replaced with __weak. However, there is a caveat. __weak requires you to deploy the app on a runtime that supports zero-ing weak references. This includes, iOS 5 and Lion. Snow Leopard and older operating systems or iOS 4 and older operating systems don’t support zero-ing weak references. This obviously means you cannot use __weak ownership modifiers if you plan to deploy to older operating systems. Fret not. ARC includes another ownership qualifier, __unsafe_unretained that is synonymous to __weak, except that when the pointer is de-referenced, it is not set to nil, but remains dangling. A while ago, I told something about zero-ing weak references? When the runtime supports zero-ing weak references, your __weak variables are automatically set to nil when they are released. This is the only feature that requires a higher deployment target (iOS 5/Lion). Otherwise, you are good to deploy on iOS 4/Snow Leopard.

A couple other important things to know about __weak vs __unsafe_unretained is that, the compiler doesn’t allow you to use __weak when your deployment target is set to a operating system that doesn’t support zero-ing weak references. The Convert to Objective-C ARC wizard uses __weak only when your deployment target supports zero-ing weak references. So if your deployment target is iOS 4, the Objective-C convert ion wizard will replace assign modifiers with __unsafe_unretained instead of __weak.

The last ownership qualifier, __auto_releasing is used mostly when passing a reference to a function for writing out. You would use this in places where you normally use pointer indirection like returning a NSError object via an out parameter.

Properties in your header file can also have the above ownership qualifiers except the __auto_releasing. When applied to properties, ARC automatically generates the correct code in dealloc to release them when the object dies.

Lastly, and more importantly, all of ARC managed objects are initialized to nil when they are created. So, again, no more dangling pointers because you forgot a initialize statement. However, do note that this initialization doesn’t initialize primitive data types. So a declaration like,


int a;


might contain a garbage value for a.

Whew! That’s pretty taxing. Take a break. We just started.

ARC knows more Objective-C than you


ARC also taps into a the Objective-C language naming conventions and infers the ownership of the returned object.

In Objective-C, a method that stats with any one of the following prefix,

  • init,
  • alloc,
  • copy,
  • mutableCopy and
  • new

are considered to be transferring ownership of the returned object to the caller.

This means, in your application, when you create a method, ARC automatically infers whether to return a autoreleased object or a +1 retained object from your method name. In fact, in most cases, instead of returning auto-release objects, ARC just inserts a manual release in the calling code, automatically for you. However, there is a small caveat. Let’s assume that you have a method that starts with “copy”, as in


-(NSString*) copyRightString;


ARC assumes that it would transfer the ownership of the returned string to the caller and inserts a release automatically. Everything works well, if both the called method and the calling method are compiled using ARC.

But if your “copyRightString” method is in a third party library that isn’t compiled with ARC, you will over-release the returned string. This is because, on the calling code, ARC compiler inserts a release to balance out the retain count bumped up by the “copy” method. Conversely, if the third party library is compiled with ARC and your method isn’t, you will have a memory leak. You can however override this behavior by adding one of the following attribute to your methods.

  • NS_RETURNS_NON_RETAINED
  • NS_RETURNS_RETAINED

So your method will now look like this.


-(NSString*) copyRightString NS_RETURNS_NON_RETAINED;


You can also rename the method name to copyrightString (note the case) or getCopyRightString instead of adding an attribute. However, I wouldn’t recommend the former method as it breaks the cocoa naming conventions (prefixing a method with “get” or “set” is Java-ish)

You will see methods having the NS_RETURNS_* prefixes throughout the header files in Apple’s own UIKit.framework or the foundation classes. Now that you know what happens behind the scenes and how compiler treats these decorations, you can solve crazy memory issues, like a crash when you call a copyRightString in your method in a third party library.

With that, let’s get ready for climbing the next peak.

Toll-free bridging


ARC doesn’t manage Core Foundation objects. They say, there is no free lunch. ARC, takes it one step further. There is no free-casting between Core Foundation objects and equivalent Objective-C objects (NS* objects). Yes, that’s right. You cannot cast a Core Foundation object to an equivalent Objective-C object (NS* object) without telling ARC how to manage ownerships.

Let’s now see how to specify ownership transfers when you cast a Core Foundation object.

The following ownership transfer modifiers should be provided when you cast a Objective-C object to a Core Foundation object.

  • __bridge
  • __bridge_retained
  • __bridge_transfer

When you migrate a project to ARC, you would have seen error messages like the one below.

Toll free bridging
ARC Error because of a missing bridge attribute in a Toll-free bridging code

You might also have proceeded by accepting the suggestions provided by the LLVM compiler. But now, let’s dig deeper and understand the “why” behind it.

The modifier, __bridge tells the ARC compiler that, it’s a plain simple, bridging cast. That means, you ask the ARC compiler to do nothing extra when the transfer is made. You might think, if that is the case, Apple could have made this the default choice. But it was not made probably because, it’s to preposterous to make such an assumption. Making such a bold assumption means, you would easily leak memory as there isn’t a easier way to tell when you are actually releasing a Core Foundation object unlike a Objective-C object.

The second modifier, __bridge_retained is used to tell the ARC compiler that the Objective-C object should be transferred to Core Foundation by bumping the retain count by 1 and it should be treated as if it is a newly created object (as opposed to a auto-released object). You use this modifier if the method was probably named like a creation method (starting with init, copy, mutableCopy etc.,) or if you are going to release the Objective-C object inside of Core Foundation using methods like CFRelease.

The last modifier, __bridge_transfer is used to tell the ARC compiler that the Core Foundation object is to be transferred to ARC with a retain count of 1. This is used if you created a Core Foundation object using one of the CF***Create methods and want the ARC compiler to handle the memory management for you. That’s you are transferring a Core Foundation object to ARC with a retain count of 1.

As a side note on this, avoid using __bridge_retained and __bridge_transfer to trick the compiler to add retain and releases for you. Use it to improve your code readability and minimizing the number of manual memory management calls. (Move on if you don’t understand this line. You will start understanding this automatically when you start using this in your own code)

How does ARC work internally?


ARC ain’t magic, if you know how it works. But a little knowledge is a dangerous thing. Knowing how the ARC compiler works will help you more in understanding the error messages and compiler warnings spat out by it.

The ARC compiler has two main parts, a front end compiler and an optimizer.

ARC front end


The ARC front end compiler checks for every “owned” Objective-C object and inserts release appropriately. By owned object, I mean, an object whose ownership qualifier has been set. For example, if the “owned” object is a local variable, ARC front end compiler inserts a release at the end of the scope. This is because, by default all local variables are “strong” ly owned. If the object is a instance variable, the ARC front end compiler inserts a release statement in the dealloc method, if the ownership type is strong. For unsafe_unretained or weak ownership ARC doesn’t do anything. It also takes care of calling the [super dealloc] for you and intact ARC compiler doesn’t allow you to explicitly call dealloc.

The ARC front end compiler also takes care of generating errors when it encounters a variable (local or instance) whose ownership qualifier is not set or when you explicitly calling dealloc.

ARC optimizer


The function of the ARC optimizer is to optimize the retain and release statements by removing them if they are inserted multiple times by the ARC front end compiler. It is this optimizer that ensures that performance is not affected by calling retain and release multiple times.

The actual Migration using Xcode 4.2


Xcode 4.2 has a wizard to automatically migrate your code for use with the ARC compiler. This means, the wizard rewrites some of your code, removes calls to retain/release and removes dealloc methods and calls to [super dealloc] for you.

The first step is to open your project, select Edit -> Refactor -> Convert to Objective-C ARC from the menu.

Refactor option
Migrating to Objective-C ARC using Xcode 4.2

When you select this option, you will be asked to select a target. If you have only one target, it’s fine. If you have multiple targets in your application, you have to perform the ARC migration on every target. After you select a target, the wizard by default selects all source code files that belong to that project for ARC migration. If you are using third party libraries that are not yet ARC ready, you can uncheck those files in this step. This is illustrated in the screenshot below.

Cannot convert
Selecting your files for ARC exclusion

In the above project, since I know that ASIHttpRequest is not yet ARC compatible, I’m selecting them and command-clicking them to show the option to uncheck all of them. When you do this, the wizard automatically adds a -fno-objc-arc compiler flag for all these files.

The next step is to start the pre-checking process. The pre-checking process compiles the project and analyzes for potential problems before performing the actual migration. You might almost and always get a error message like this.

Cannot convert
The dreaded error message!

Of course, 58 errors in this screenshot is actually quite low. You should expect anywhere in the range of 300+ for a mid sized project. But fret not, they aren’t complicated at all to fix.

Common ARC migration errors


The number of errors that might prevent you from converting your project to ARC is usually high if your code is “old” or if it doesn’t adhere to Objective-C design patterns. For example, accessing a iVar. While it’s technically ok, you should almost and always use properties to access them outside of init and dealloc methods. If you have been using properties, ARC migration would be painless. If you were old skool, you have to feel the pain now. In this last section, I’ll show you the most commonly occurring errors when you migrate your project.

Cast of Objective-C pointer to C Pointer type


This error is generated because ARC doesn’t do toll-free bridging for you. As I explained before in the section, Toll-free bridging, requires the developer to explicitly specify ownership transfer qualifiers.

Use the various ownership transfer qualifiers I showed you before to fix this problem.

performSelector may cause a leak because its selector is unknown


We now know that Objective-C ARC compiler knows more Objective-C than you. This error message is because of that. The ARC compiler tries to identify the method family and determine whether to add a retain or release to the returned value from the caller code. This means, if your method starts with init, alloc, copy, mutableCopy or new, the ARC compiler will add a release to the calling code after the variable scope ends. Since are using a selector to call a method dynamically at runtime, ARC doesn’t really know if the method called returns a +1 retained object or a auto-released object. As such, ARC cannot reliably insert a retain or release to the returned object after its scope ends. This warning is shown to warn you of potential memory leaks.

If you are sure that your code works fine without memory leaks, you can ignore this warning. To suppress this warning, you can turn off the compiler flag -Warc-performSelector-leaks warning on a line by line basis like this.


#pragma clang diagnostic push
#pragma clang diagnostic ignored "-Warc-performSelector-leaks"
[self performSelector:self.mySel];
#pragma clang diagnostic pop


Unfortunately, you cannot annotate a dynamic selector using __attribute__ ((objc_method_family(*))).

Receiver type “*” doesn’t declare the method with selector “*”


ARC mandates that every method you call should be declared properly. With GCC, this was a warning. But LLVM makes this step mandatory since ARC needs to accurately identify and that is why you see an error like this.

Undeclared Selectors
Error that you see when you don't declare a receiver type

This error is also because of the fact that ARC needs to identify the method family to determine if it has to add a retain or release to the returned object. For example, in the above code, the method, returnMyGreatObject might return a NS_RETURNS_RETAINED. In this case, the ARC compiler has to insert a release after the returned object goes out of scope. The ARC compiler can know this only when you declare it formally. This is why, under ARC method declarations are mandatory. If you have been declaring methods formally under GCC, even when the compiler didn’t enforce (so that the code was aesthetically beautiful) you wouldn’t see this error at all. As I said before, the number of ARC migration errors is directly proportional to the quality of code you write. Fixing this error is fairly simple and all you have to do is to declare every method formally in the header file or on a private category extension.

Common workarounds that you use in ARC on code that otherwise looks normal


In some cases, while using ARC, you might end up writing code that looks as if it’s written to “please” the ARC compiler rather than writing natural code. Unfortunately, nothing can be done to this and we all have to live with this. The next two sections explain when you might need to write unnecessary code like this to please the compiler.

Capturing “*” strongly is likely to lead to a retain cycle


Capture
ARC and retain cycles

The last category of warning message is shown when a retain cycle is detected in your code. An example is shown below.

This code was probably leaking the request object before ARC and increasing your memory footprint. But, thanks to ARC. You now know that code like these cause retain cycles that cannot be released automatically. Circumventing a retain cycle issue almost and always ends up breaking the cycle with a weak reference.

Fixing this error is fairly simple and in this case, you can get a weak reference to the request object and copy it to the block. Within the block, convert it again to a strong reference. This is illustrated below.

Capture fixed
Workaround for ARC and retain cycle issue

In the above code block, you can also replace references to __unsafe_unretained with __weak if you are deploying to a runtime that supports zero-ing weak references.

Avoiding retain cycles using __block


Sometimes, you need an object to live till as long as the completion handler on it can live. For example, a Block based UIAlertView can call a completion handler after the user presses a button on the UIAlertView.

For example,


UIAlertView *alertView = [UIAlertView alertViewWithTitle:@"Test" buttons:[NSArray arrayWithObjects:@"Ok", @"Cancel", nil] completionHandler:^(int tappedButtonIndex)  {

// do something based on the button tapped on alertView
}];
[alertView show];


In the above case, the alertView gets deallocated by ARC as soon as it’s shown and the call to completionHandler never gets executed (or even crashes).

To prevent this, you can use the __block decoration on UIAlertView declaration and copy it inside the block like


__block UIAlertView *alertView = [UIAlertView alertViewWithTitle:@"Test" buttons:[NSArray arrayWithObjects:@"Ok", @"Cancel", nil] completionHandler:^(int tappedButtonIndex)  {

// do something based on the button tapped on alertView
alertView = nil;
}];
[alertView show];


ARC takes care of releasing it when you nil it inside the completionHandler. You will find this pattern used a lot when you work with completionHandlers in TwTweetComposeViewController or even UIViewController presentViewController:animated:completion: methods.

That last question


When should you migrate?


NOW

The performance benefits you get by using ARC is remarkable. Apple claims that the @autoreleasepool is over 6 times faster than NSAutoReleasePool objects used in your non-ARC code. This is because, @autoreleasepools don’t allocate objects and all it does is must bump up the pointer retain counts. Similarly, NSObjects’ retain and release are optimized that you can expect a performance boost of anywhere around 2.5x. The third important performance benefit you will see is in methods that return autoreleased object. Under ARC, this variable is no longer transferred using the auto-release pool and what instead happens is a ownership transfer. Again this is upto 20x faster.

Hence, don’t wait till your dependent third party frameworks are migrated to ARC. You can always exclude them and go ahead and convert your code to ARC now.

Where to go from here?


  • WWDC 2011 – Session 322 Introduction to Automatic Reference Counting
  • WWDC 2011 – Session 322 Objective-C Advancements in depth
  • Stop: You are warned. This link is only for hard code geeks. http://clang.llvm.org/docs/AutomaticReferenceCounting.html
  • WWDC 2011 – Session 308 – Blocks and Grand Central Dispatch in Practice

One last word, treat this post as a living document. I’ll be updating the last few sections on new workarounds as and when I find a fix for them.


Mugunth

2011年12月22日星期四

Build a Caterpillar Game with Cocos2D: Movement and Missiles

Build a Caterpillar Game with Cocos2D: Movement and Missiles:
This entry is part 5 of 5 in the series Build a Caterpillar Game with Cocos2D
This is the fifth installment of our Cocos2D tutorial series on cloning Centipede for iOS. Make sure you have completed the previous parts before beginning.


Last Time…


In the last tutorial, we discussed the AI of the caterpillar. You learned how to move the caterpillar through the sprout field as well as the bounds of the level.

In today’s tutorial, we will be jumping all over the place as we discuss the player movement/interaction and firing missiles.


Step 1: Controlling The Player


Controlling the player is actually quite simple. The first thing we need to do is tell our game layer to swallow touches in order to interact with it. Add the following code to your init method in GameLayer.m:

[[CCTouchDispatcher sharedDispatcher] addTargetedDelegate:self priority:0 swallowsTouches:YES];

As you saw in the first tutorial, this line of code will simply allow GameLayer to be a touch delegate allowing it to receive notifications of touches. Now, there are two methods that we need to implement. Add the following methods to GameLayer.m

// 1
- (BOOL)ccTouchBegan:(UITouch *)touch withEvent:(UIEvent *)event {
return YES;
}

// 2
- (void)ccTouchMoved:(UITouch *)touch withEvent:(UIEvent *)event {
// 3
CGPoint touchLocation = [self convertTouchToNodeSpace:touch];

CGPoint oldTouchLocation = [touch previousLocationInView:touch.view];
oldTouchLocation = [[CCDirector sharedDirector] convertToGL:oldTouchLocation];
oldTouchLocation = [self convertToNodeSpace:oldTouchLocation];

// 4
int xChange = touchLocation.x - oldTouchLocation.x;
int yChange = touchLocation.y - oldTouchLocation.y;

int newX = self.player.position.x + xChange;
int newY = self.player.position.y + yChange;

// 5
if(newX < kGameAreaStartX + kGameAreaWidth - kGridCellSize &&
newX > kGameAreaStartX &&
newY > kGameAreaStartY + kGridCellSize / 2 &&
newY < kGameAreaStartY + (kGridCellSize * 3)) {

__block BOOL collide = NO;
CGPoint oldPosition = self.player.position;
// 6
self.player.position = ccp(newX,newY);

// 7
[self.sprouts enumerateObjectsUsingBlock:^(id obj, NSUInteger idx, BOOL *stop) {
Sprout *sprout = (Sprout *)obj;
CGRect sproutRect = [sprout getBounds];
CGRect playerRect = [self.player getBounds];

if(CGRectIntersectsRect(sproutRect, playerRect)) {
collide = YES;
*stop = YES;
}

}];

// 8
if(collide) {
self.player.position = oldPosition;
}
}
}

  1. We first need to implement the ccTouchesBegan method to let the caller know that we are responding to touches. If you omit this, your game will crash.
  2. Next, is the ccTouchesMoved method which gets called when the player drags their finger on the device.
  3. Get a reference to the coordinates of the current touch location and the coordinates of the previous touch location.
  4. Get the change from the old location to the new one. We will use this change to determine how far the player should move.
  5. Here we have a series of checks to ensure that the player stays within the “player area” or the virtual bounding box that we set up for them. If not, we don’t execute the code in #7 that actually moves the player.
  6. Update the player’s position.
  7. Here we are checking to see if the player collides with any of the sprouts. Sprouts pose as obstacles for the player and we want to restrict the player’s movement if they are in his way.
  8. Finally, if there is a collision, revert the player’s position to their last good position.

Now if you run the game, you should be able to drag anywhere on your game area and move the player within the confined space.


Step 2: The Missile Object


The missile object is what allows the player and the other game objects to interact. The player will fire a constant stream of missiles with the speed and frequency varying on the current level.

Before we begin creating the Missile, we need to establish a few constants that will be used. Open GameConfig.h and add the following lines:

#define kMissileSpeed 1.0
#define kMissileMaxSpeed 10.0
#define kMissilesTotal 20
#define kMissileFrequency .6 //seconds
#define kMinMissileFrequency .2

I will explain each of these as they come up in the code that follows. Now, create a new GameObject subclass called Missile. Add the following code to Missile.h:

#import "cocos2d.h"
#import "GameObject.h"

@interface Missile : GameObject
@property (nonatomic, assign) BOOL dirty;
- (void)update:(ccTime)dt;
@end

The dirty property will be used in the future to denote that this missile is no longer in play. This could be because of it going off screen or colliding with another game object. Since the missiles are constantly moving, they will need an update method to animate them.

Now, open up Missile.m and add the following code:

#import "Missile.h"
#import "GameLayer.h"
#import "GameConfig.h"

@implementation Missile

@synthesize dirty = _dirty;

// 1
- (id)initWithGameLayer:(GameLayer *)layer {

if(self == [super initWithGameLayer:layer]) {
self.sprite = [CCSprite spriteWithSpriteFrameName:@"missile.png"];
}

return self;
}

- (void)update:(ccTime)dt {
// 2
int inc = kMissileSpeed * (self.gameLayer.level + 1.5);

// 3
if(inc > kMissileMaxSpeed) {
inc = kMissileMaxSpeed;
}

// 4
int y = self.position.y + inc;
self.position = ccp(self.position.x,y);

// 5
if(self.position.y > kGameAreaStartY + kGameAreaHeight) {
self.dirty = YES;
}
}

@end

  1. Our init method looks very familiar and is only responsible for creating the Missile’s sprite.
  2. This is how fast the missile will be moving. It starts with a base value and speeds up based on the current level.
  3. At some point, the speed of our missile might get out of control. We prevent this by adding a max speed.
  4. These two lines are what actually move the missile forward. We calculate a new y for the missile and update the position.
  5. Finally, if the missile collides with the top, set it’s _dirty property to true. We will garbage collect the dirty missiles inside of GameLayer.


Step 3: Firing The Missiles


Now that we have some missiles to fire, we need to fire them off from the player. Generally, when you have a large amount of objects such as missiles, you want to reuse as many as possible and not allocate new ones while the main loop is running. To solve this issue, we will create two arrays. One array will hold all of the missiles that are currently in play (ie fired by the player) and the other will hold the pool of missiles that have yet to be fired. At the end of the update method, we will clean up all of the dirty missiles and move them from the “in play” array to the “pool” array.

Add the following properties to your GameLayer.h file:

@property (nonatomic, retain) NSMutableArray *missilesWaiting;
@property (nonatomic, retain) NSMutableArray *missilesFiring;

Now open GameLayer.m, import Missile.h, and add the following lines in to your init method:

// 1
_missilesWaiting = [[NSMutableArray alloc] initWithCapacity:kMissilesTotal];
_missilesFiring = [[NSMutableArray alloc] initWithCapacity:kMissilesTotal];
// 2
for(int x = 0; x < kMissilesTotal; x++) {
Missile *missile = [[Missile alloc] initWithGameLayer:self];
[self.missilesWaiting addObject:missile];
[missile release];
}

  1. Initialize each of the missile arrays
  2. Loop kMissilesTotal times and create that many Missile objects. Once they are created, we add them to the missilesWaiting array.

Next, jump down to the update method and add the following code:

// 1
static float missleFireCount = 0;

- (void)update:(ccTime)dt {

// ...Caterpillar code...

// 2
float frequency = kMinMissileFrequency;
if(kMissileFrequency / (self.level * 1.25) > kMinMissileFrequency) {
frequency = kMissileFrequency / self.level;
}

// 3
if(missleFireCount < frequency) {
missleFireCount += dt;
} else {
missleFireCount = 0;
// 4
if([self.missilesWaiting count] > 0) {
Missile *missile = [self.missilesWaiting objectAtIndex:0];
[self.missilesFiring addObject:missile];
[self.missilesWaiting removeObjectAtIndex:0];
missile.position = self.player.position;
[self.spritesBatchNode addChild:missile.sprite];

}
}

// 5
__block Missile *dirty = nil;
[self.missilesFiring enumerateObjectsUsingBlock:^(id obj, NSUInteger idx, BOOL *stop) {
Missile *missile = (Missile *)obj;
[missile update:dt];
if(missile.dirty) {
dirty = missile;
*stop = YES;
}
}];

// 6
if(dirty) {
dirty.dirty = NO;
[self.missilesWaiting addObject:dirty];
[self.missilesFiring removeObject:dirty];
[self.spritesBatchNode removeChild:dirty.sprite cleanup:NO];
}
}

  1. We need to create a static counter to help facilitate the frequency at which the missiles are fired.
  2. Calculates the missile fire frequency. As the level increases, so does the frequency.
  3. We only want to release a new missile if the current frequency is greater than or equal to the specified frequency for the level
  4. Pulls a missile out of the waiting array (if there are any in there) and adds it to the firing array. It’s also at this stage that we add the missile’s sprite to the batch node to be drawn.
  5. Enumerates all of the missiles checking for dirty one’s. If we find one, remember which one it is so we can move it back to the waiting array.
  6. If there was a dirty missile, move it from the waiting to the firing array and remove it’s sprite from the batch node.

This is all of the code needed to animate the missiles. Go ahead and run the game at this point and watch the missiles fire from the player as you move around.

Missiles


Conclusion


Now that we have enabled some player and missile animations, it’s really starting to feel like a game. We also did some basic collision detection between the player object and the sprout object. In the next tutorial in the series, we will dig deeper into collision detection as we establish collisions between the missiles and the sprouts, missiles and the centipede, and player and the centipede.

Happy coding!

2011年12月20日星期二

Using Storyboards To Make Navigation Based iPhone Apps

Using Storyboards To Make Navigation Based iPhone Apps:


Over the past few weeks I’ve been doing a series on using the new storyboard feature in XCode for iOS apps. The short story here is that we can now compose our iOS apps in a completely new way when we are coding apps in iOS 5. Storyboards are not backward compatible.

Today, I’m going to show you how to using storyboards to create a navigation based app, with and without a table view. If you haven’t already done so, be sure to read my previous two posts on storyboards in iOS:


Step One: Create a New Storyboard Based iOS Application


Make sure to have a storyboard app started out (covered in the last post on storyboards). Your app will look something like this:


Step Two: Delete Default Scene


We need the navigation controller to be the first scene in our storyboard, so we’ll need to remove the scene that XCode place here for us. Select the scene right in Interface Builder and hit the delete button. You will be left with an empty storyboard.

Step Three: Add A Navigation Controller


Use the object library to drag a navigation controller unto the storyboard. XCode will insert the navigation controller and make it the first scene on the storyboard for you automatically. You will also get the root view controller automatically setup and connected with a seque already connected.

Step Four: Add A Button To The First Scene


Select the scene with the title Root View Controller. Use the object library to drag a button onto the root view controller. Set the button title to Red. It should look something like this:

Step Five: Connect A New Scene To The Button


Now we want to move to a new scene when users touch the Red button. Drag a new view controller from the object library into the storyboard and change the view controller’s background color to red.

Then control-click the button and drag the blue line to the view controller. Choose Push for the seque type. Your storyboard will look something like this:


That’s all there is to it when setting up navigation. Now, I’m going to be clever and add more than one scene to my navigation project. Here is what my storyboard looks like:


This app will push new color scenes to the navigation controller based on what button the user presses. All with no coding at all yet.

Step Six: Pushing Model Content Across Scenes


Usually, when you are working with apps that support navigation you are following the Model-View-Controller (MVC) design pattern. This means that one view controller will need to pass a reference to the part of the model that will be presented in the next view controller. So, here our root view controller might need to pass something to the detail view controllers that we have set up here.

Before, this was done as part of the IBAction associated with a user control or in the table view delegate method didSelectRow:atIndexPath: . But, now we don’t have any code associated with these transitions. Luckily, we can get references to the storyboard components from within our view controllers.

So, all we need to do to pass on model references during these storyboard transitions is to override one of these two key UIViewController methods:

- (void)performSegueWithIdentifier:(NSString *)identifier sender:(id)sender;
- (void)prepareForSegue:(UIStoryboardSegue *)segue sender:(id)sender;

To use these method you must make sure that your view controller has a custom code class associated with it. For our example, to set the custom class for our root view controller we can simply use the ViewController that was originally created for us by XCode.

But, we’ll have to set the custom class identity of the view controller on the storyboard to ViewController using Interface Builder.

So, click on the root view controller on the storyboard to select it and then use the Identity Inspector to set the view controller’s custom class to ViewController .


Great, now you can put code into ViewController and it will execute during key events like seque transitions.

In my contrived example, I am going to simply change the view controller’s title property to the text title on the button that the user pressed just to show you how its done:

#import "ViewController.h"

@implementation ViewController

-(void)prepareForSegue:(UIStoryboardSegue *)segue sender:(id)sender{ UIButton *button = (UIButton *)sender; UIViewController *vc = [segue destinationViewController]; vc.title = button.titleLabel.text; }

@end

Now, when you go from the root view controller to a detail view the title property (in the navigation bar) will change as well. Again, this where you would do something meaningful with your model content.

That’s it for now – keep your eye out for some more storyboard related posts coming out in the near future. Let me know what you think about storyboards in the comments below!

iOS 5 : UIImage and resizableImageWithCapInsets

iOS 5 : UIImage and resizableImageWithCapInsets:
I recently began writing a short example to learn more about the iOS 5 Appearance API and customizing UINavigationBar objects. The goal was to add a custom background, title and text to the navbar. Once I had this working, to keep a consist look across my application, I began tweaking the buttons on the navbar using the same Appearance API.

As I got further into the customization of the buttons, I ran into a method within UIImage that was introduced in iOS 5, resizableImageWithCapInsets. I found myself getting side-tracked from the original idea of navbar look and feel, to understanding how cap insets work. This post delves into what I learned.


Cap Insets with UIButton

As the documentation describes, you use resizableImageWithCapInsets to add cap insets to an image, when the image is resized or scaled, cap areas are not affected. The best way to understand this is through an example.

Let’s assume I want all the buttons on my UI to have a similar look, a gradient with a white border. Below is the image used for the examples in this post (the button is shown on a gray backdrop so you can see the white border):


Depending on the context of where the button appears, its size may vary. The code to create a button with the image and the corresponding output follow:


UIButton *button = [[UIButton alloc] initWithFrame:CGRectMake(80, 130, 160, 44)]; 
[button setTitle:@"Test Button" forState:UIControlStateNormal];

// Image with without cap insets
UIImage *buttonImage = [UIImage imageNamed:@"blueButton"];

[button addTarget:self action:@selector(buttonPressed:) forControlEvents: UIControlEventTouchUpInside];       
[button setBackgroundImage:buttonImage forState:UIControlStateNormal];
[[self view] addSubview:button];


As you can see, the button is stretched in all directions. Let’s change the code to include cap insets, however, before we do that, let’s look at the signature of the cap insets method:

- (UIImage *)resizableImageWithCapInsets:(UIEdgeInsets)capInsets

Looking on step further, UIEdgeInserts is defined as:


typedef struct {
CGFloat top, left, bottom, right;
} UIEdgeInsets;


UIEdgeInsets is structure that specifies float values for each cap inset: top, left, bottom and right areas of an image. To apply this to the image for the button, here is all we need to do:


// Image with cap insets
UIImage *buttonImage = [[UIImage imageNamed:@"blueButton"] 
resizableImageWithCapInsets:UIEdgeInsetsMake(0, 16, 0, 16)];


This requests that the left and right 16 pixels of the original image are not scaled or resized when stretching the image to accomodate the button size frame defined above. The end results is as shown below:


Cap Insets with UIBarButtonItem

We can use the same image for a button on a navbar (I’ll show the specifics in the next post on customizing the navbar). Without specifying the cap insets, the button looks as follows:


The code below specifies an image where 12 pixels on the top, left, bottom and right be preserved when stretching/resizing the button:


UIImage *backButton = [[UIImage imageNamed:@"blueButton"] 
resizableImageWithCapInsets:UIEdgeInsetsMake(12, 12, 12, 12)];


The output nows looks as follows:


2011年12月19日星期一

AVPlayer – looping video without “hiccup”/delays

AVPlayer – looping video without “hiccup”/delays:
I tried create loop by AVQueuePlayer, this method has delays between end and start play.

for looping AVQueuePlayer i use this code:

1
2
3
4
5
6
[[NSNotificationCenter defaultCenter] addObserver:self

selector:@selector(playerItemDidReachEnd:)

name:AVPlayerItemDidPlayToEndTimeNotification

object:self.mPlayerItem];


[self player].actionAtItemEnd = AVPlayerActionAtItemEndNone;

and playerItemDidReachEnd

1
2
3
4
5
- (void)playerItemDidReachEnd:(NSNotification *)notification

{

AVPlayerItem *p = [notification object];

[p seekToTime:kCMTimeZero];

}

Another solution without hiccups/delays based on AVMutableComposition!


Easily solution, I use one AVURLAsset for inserting to composition. No memory leaks and warnings, because used just one object.

Solution:

1
2
3
4
5
6
7
8
9
10
11
12
13
14
15
16
17
18
19
20
21
22
23
- (AVAsset*) makeAssetComposition {


int numOfCopies = 25;


AVMutableComposition *composition = [[[AVMutableComposition alloc] init] autorelease];

AVURLAsset* sourceAsset = [AVURLAsset URLAssetWithURL:mURL options:nil];


// calculate time

CMTimeRange editRange = CMTimeRangeMake(CMTimeMake(0, 600), CMTimeMake(sourceAsset.duration.value, sourceAsset.duration.timescale));


NSError *editError;


// and add into your composition

BOOL result = [composition insertTimeRange:editRange ofAsset:sourceAsset atTime:composition.duration error:&editError];


if (result) {

for (int i = 0; i < numOfCopies; i++) {

[composition insertTimeRange:editRange ofAsset:sourceAsset atTime:composition.duration error:&editError];

}

}


return composition;

}

Play composition:

1
2
3
4
5
6
7
8
9
10
11
12
13
14
15
16
AVAsset *composition = [self makeAssetComposition];


// create an AVPlayer with your composition

AVPlayer* mp = [AVPlayer playerWithPlayerItem:[AVPlayerItem playerItemWithAsset:composition]];


// Add the player to your UserInterface

// Create a PlayerLayer:

AVPlayerLayer *playerLayer = [AVPlayerLayer playerLayerWithPlayer:mp];


// integrate it to your view. Here you can customize your player (Fullscreen, or a small preview)

[[self window].layer insertSublayer:playerLayer atIndex:0];

playerLayer.frame = [self window].layer.bounds;

playerLayer.videoGravity = AVLayerVideoGravityResizeAspectFill;

//And finally play your video:


[mp play];

Any questions to comments please.